
It’s Week 2 of the mathgrrl vs atartanian Thingiverse battle and it is already starting to sink in how difficult it is going to be to come up with something new and awesome every week, and to keep up with it on the blog. At least it’s not every day this time!
mathgrrl’s entry:
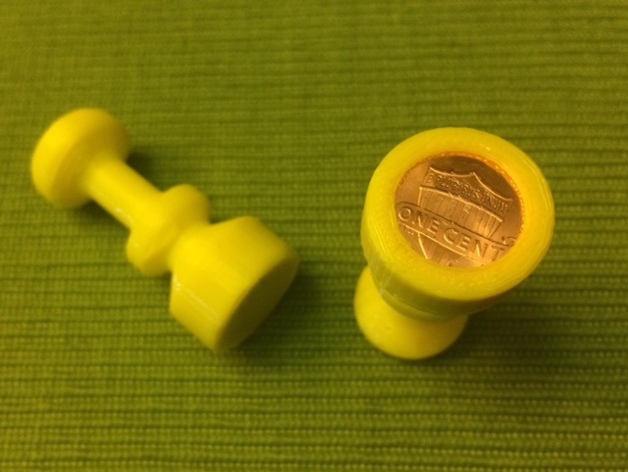
My entry is a Five-Cent Hammer that gets its heft from having five US pennies embedded into the print. It’s small, so you can fit it into your pocket or print it quickly in an emergency.

This model was made in OpenSCAD and is parametrizable, so you can change the code or use the Thingiverse Customizer to adapt the model for any kind of coin, just by entering the correct diameter and height of your coin. You can also decide whether to print the hammer so that the coin becomes the striking surface (it’s sturdier that way) or so that the coins are fully enclosed (better for nailing things flush and so the nail head doesn’t get stuck under the plastic rim). Try it both ways yourself, it will only cost you 10 cents:
Five-Cent Hammer on Thingiverse: http://www.thingiverse.com/thing:939609
I wouldn’t build a bunk bed with the Five-Cent Hammer, but you could easily use it to attach the back panel of an IKEA bookcase or to put in some nails for hanging things on the wall. You might hurt yourself, so be careful; if you miss the nail then your hand could hit it and get cut or bruised. Here is a handy usage guide:

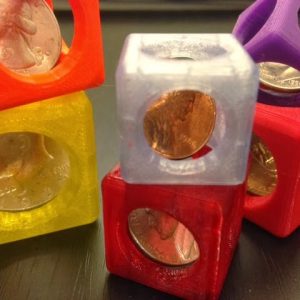
There were three inspirations for this model. First, some time ago I had spent a lot of design time developing a method for embedding coins into 3D prints. I had gone through hours of iteration and many dozens of failed prints trying to get the sizing just right so that the coins would fit exactly inside, and not rattle around after being enclosed. I really wanted to get my coin-encloser out the door somehow, but most people do not want to coins snugly into a 3D print for no reason; so the hammer was an idea for a reason.
Second, I was reminded of my obsession with coins-in-prints last week in the #MakeItFloat Thingiversity STEAM Challenge, the second-place winner Puck3D had made a Customizable MakeItFloat model that used embedded coins. In the Customizer for that model, the user enters their coin diameter, height, and weight, as well as the size of the container that they are willing to print, and then the model uses math and Science! to both compute the maximum number of those coins that could be included in the container while still having everything float, and then automatically construct an enclosure to contain exactly that many coins of the given size. Here’s how Puck3D’s award-winning Customizer looks in action:
 The third reason is that there is a 3D-printed hammer around the MakerBot office that is a promo piece for some new types of composite filament that we’ll have soon. The hammer is printed with an iron composite filament for the head, and a wooden composite filament for the handle. It has some nice heft for something 3D printed, and I am an impatient sort of person that does not like waiting to be able to 3D print hammers, so the Five-Cent Hammer is sort of a poor-man’s early version of having a 3D-printed hammer.

You might be asking yourself why I didn’t call my hammer the “Nickel Hammer” because that would be funnier. That pun was just lying there. Ah, well. You also might be asking yourself why I didn’t even print a handle for my cheap-ass hammer. Shut up. It turns out I couldn’t figure out a good way to design a handle that didn’t look ridiculous, with the necessary constraint that the business part of the hammer needs to be oriented so that the coins are parallel with the build plate. So here’s my first mathgrrl Design Challenge:
mathgrrl Design Challenge #1: Hammer Handle
Remix the Five-Cent Hammer design to include a handle, either by adding a handle that prints with the model (without supports if possible), or by changing the top of the original model so that it connects somehow with a separately-printed handle. Whatever you do, the coin-enclosing part of the model has to remain functional.
Post your design as a remix to the original on Thingiverse, and make a 3D-printed example. Trust me, if you don’t Actually Print it then your model probably is going to have some problems. I’ve never had a model print correctly after just one design interation, and if you can do can somehow do that consistently then please can we collaborate on all projects together forever infinity. Post here in the comments if you enter this challenge. Prizes to be determined buy may involve me mailing you a 3D printed object at some point.
That’s enough about the hammer. It’s time to see the competition…
atartanian’s entry:
On the other side of the battle, atartanian brought some serious noise and basically crushed me with a Customizable Diorama model in which the user gets to literally draw three designs that then get put onto 3D-printable panels which slot into a stand to make a layered, multicolor 3D scene and world peace:

I need to see a 3D print of this but nobody has done that yet on Thingiverse. Go be the first:
Customizable Diorama on Thingiverse: http://www.thingiverse.com/thing:939697
Here’s what it looks like in the Customizer. In each Pane you get to draw and place three designs to make a one-layer scene. You then repeat that two more times and set parameters for size, style, and clearances:

Next time: Coin enclosures get a serious upgrade from hardware to gameware, atartanian designs something that will probably make it rain candy, and a new designer joins the weekly battle series…
——————
As an Amazon Associate we earn from qualifying purchases, so if you’ve got something you need to pick up anyway, going to Amazon through this link will help us keep Hacktastic running. Thanks! :)
Leave a Reply