
Also published in Shapeways Magazine
—–
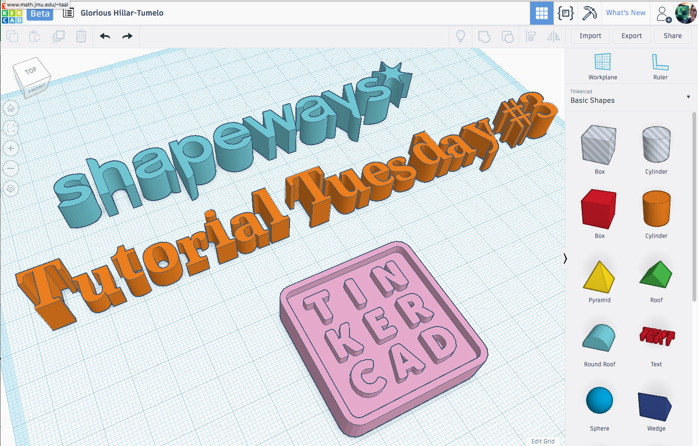
This week, Tutorial Tuesday is for beginners. If you’ve never designed a 3D model before, then this post will show you how to get started. We’ll start with showing you how to design simple 3D models with a free program called Tinkercad, and then how to send those models to Shapeways for 3D printing. It’s easier than you might think! Get a cup of coffee and join us. You’ll have designed and ordered your first 3D design before you’re done with your coffee.

First steps
If you’re completely new to 3D printing, then one of the best ways to get started is with Tinkercad, a free 3D modeling program that runs right in your web browser. The Tinkercad user interface is extremely intuitive — just drag, drop, modify, and combine 3D shapes to create a 3D design which can be exported for 3D printing. To use Tinkercad, you’ll have to set up an Autodesk account, which is free and only takes a minute. Go to www.tinkercad.com and sign up now before reading any further, so you can play along.
OK, let’s get started!
When you log into Tinkercad for the first time, you’ll start inside the Learning the Moves Tinkercad Lesson, which teaches you how to navigate around and move 3D objects. If you’re an absolute beginner, we recommend working through this and other Tinkercad Lessons to learn the basics. Click on the step arrows in the upper left for instructions within each Lesson, and to move ahead to the next Lesson.
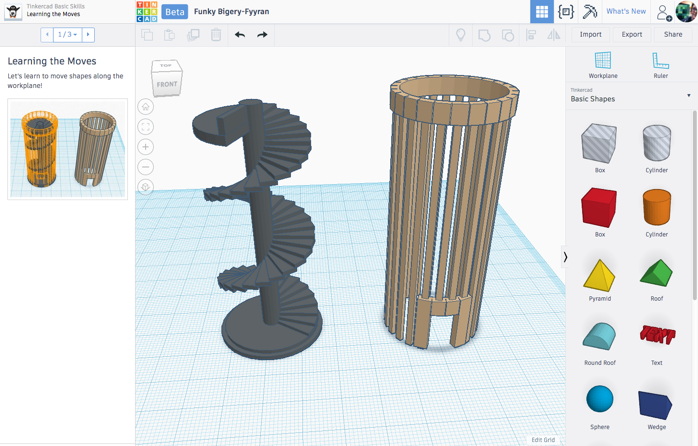
There are a LOT of Tinkercad Lessons, and some of them are more technical than others. Don’t feel like you have to complete them all right now. When you’re ready to exit the lessons and make your own design, click on the multicolored Tinkercad logo to go to your main Designs page, and click on “Create New Design.”
Designing a Model
To jump in right away, simply drag objects from the right sidebar in Tinkercad onto the blue Workplane, then use the “handle dots” on your objects to change their size or shape. For detailed instructions and tips on how to do this, watch Tinkercad’s beginner-friendly video Introduction to Tinkercad Beta.
Tinkercad switched to a new ground-up redeveloped Beta version last year, and there are lots of new features that make designing in Tinkercad even easier than it was before. If you’re already a Tinkercad pro and just want to know what’s different in the new Beta that came out this year, check out the Tinkercad video Updates: TinkerTour and Tinkercad Beta or the Tinkercad Beta Participant Guide. If you’re completely new to Tinkercad, the video Tinkercad Beta – New Features: Shape Controls is a good place to get started learning about the powerful new Beta features.
For a comprehensive one-stop-shop introduction to Tinkercad, including beginner and intermediate videos, links to 3D models and projects made with Tinkercad, check out the Tinkercad Jumpstart resource page on Thingiverse. While you’re there, be sure to learn about the key Tinkercad tools Align, Ruler, Workplane, Group, and Hole — they are the secret to creating interesting Tinkercad designs.

Tinkercad models on Shapeways
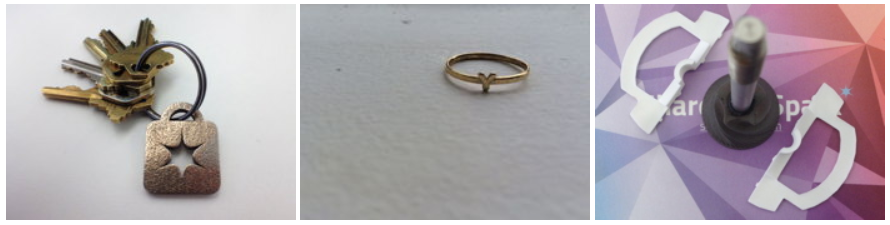
Tinkercad seems like a simple program, and it is, but you can still use it to make beautiful 3D models. Here are three products on Shapeways that were made with Tinkercad: on the left, a metal Shapeways Keychain made by Shapeways user The Void; in the middle, a simple but elegant Y Ring made by moyer; and on the right, a practical Hario Skerton Coffee Grinder Bottom Bracket made by erin.io.
So, how do you get your Tinkercad models to Shapeways for 3D printing, or even to sell in the marketplace? First, click the Export button in the upper right of your Tinkercad window, then export your model as an .STL file. Then, open a new browser window and navigate to the Shapeways upload page, and click “Upload a 3D model” to get started.
Pay close attention to the size of your model — its size will have a big impact on the cost and printability of your design. Large objects cost more to print, and models with very small design features may not print reliably. You can use the “Ruler” tool in Tinkercad to measure and scale your object before exporting, or, after exporting, use the Scale button on your model’s Shapeways page to change the size of your model. You should be able to order a small physical 3D print of your first Tinkercad model in Strong & Flexible nylon plastic for less than five dollars!
Share your work and join the discussion
We love to hear from you, and we’re here to answer any design/printing questions you have. Want some advice on aligning objects? Exporting to Minecraft? Importing 2D images into your designs? Let us know in the comments.
What’s more, if you make your Tinkercad design public, then you can share it with others. Click on the “list” icon that is third from the left in the top menu bar, then click on the “gear” icon near your design and select “Public.” Then, just copy the URL for your design and share it in the comments below to show off your design.
Better yet, you can easily make your design public on Shapeways so that your friends and fans can order prints of their own. If you’d like to do this, go to your model page on Shapeways and choose “Edit product with this model”, then check “Offer for sale to others” and “Display to the public,” and fill in category and pricing information. Share the URL in the comments, and maybe you’ll get your first customer!
——————
As an Amazon Associate we earn from qualifying purchases, so if you’ve got something you need to pick up anyway, going to Amazon through this link will help us keep Hacktastic running. Thanks! :)

Leave a Reply