
Also published at Shapeways Magazine
—–
When you’re designing for 3D printing, one challenge a lot of designers face is that 3D models often have thinner walls than can be supported by 3D printing materials. Fortunately, it’s a challenge that’s easy to tackle. In this Tutorial Tuesday, we’ll walk you through one way to thicken targeted areas of a 3D model using Meshmixer.
Weak Geometry
Why would you want to thicken just part of a model? One reason is that sometimes a 3D model might get rejected from Shapeways during the pre-production process due to weak geometry or thin connections. This happened to us recently with a Snub Cube model; here’s the picture that was sent to us by the Shapeways team, where the weak/thin connection areas are shown in red:
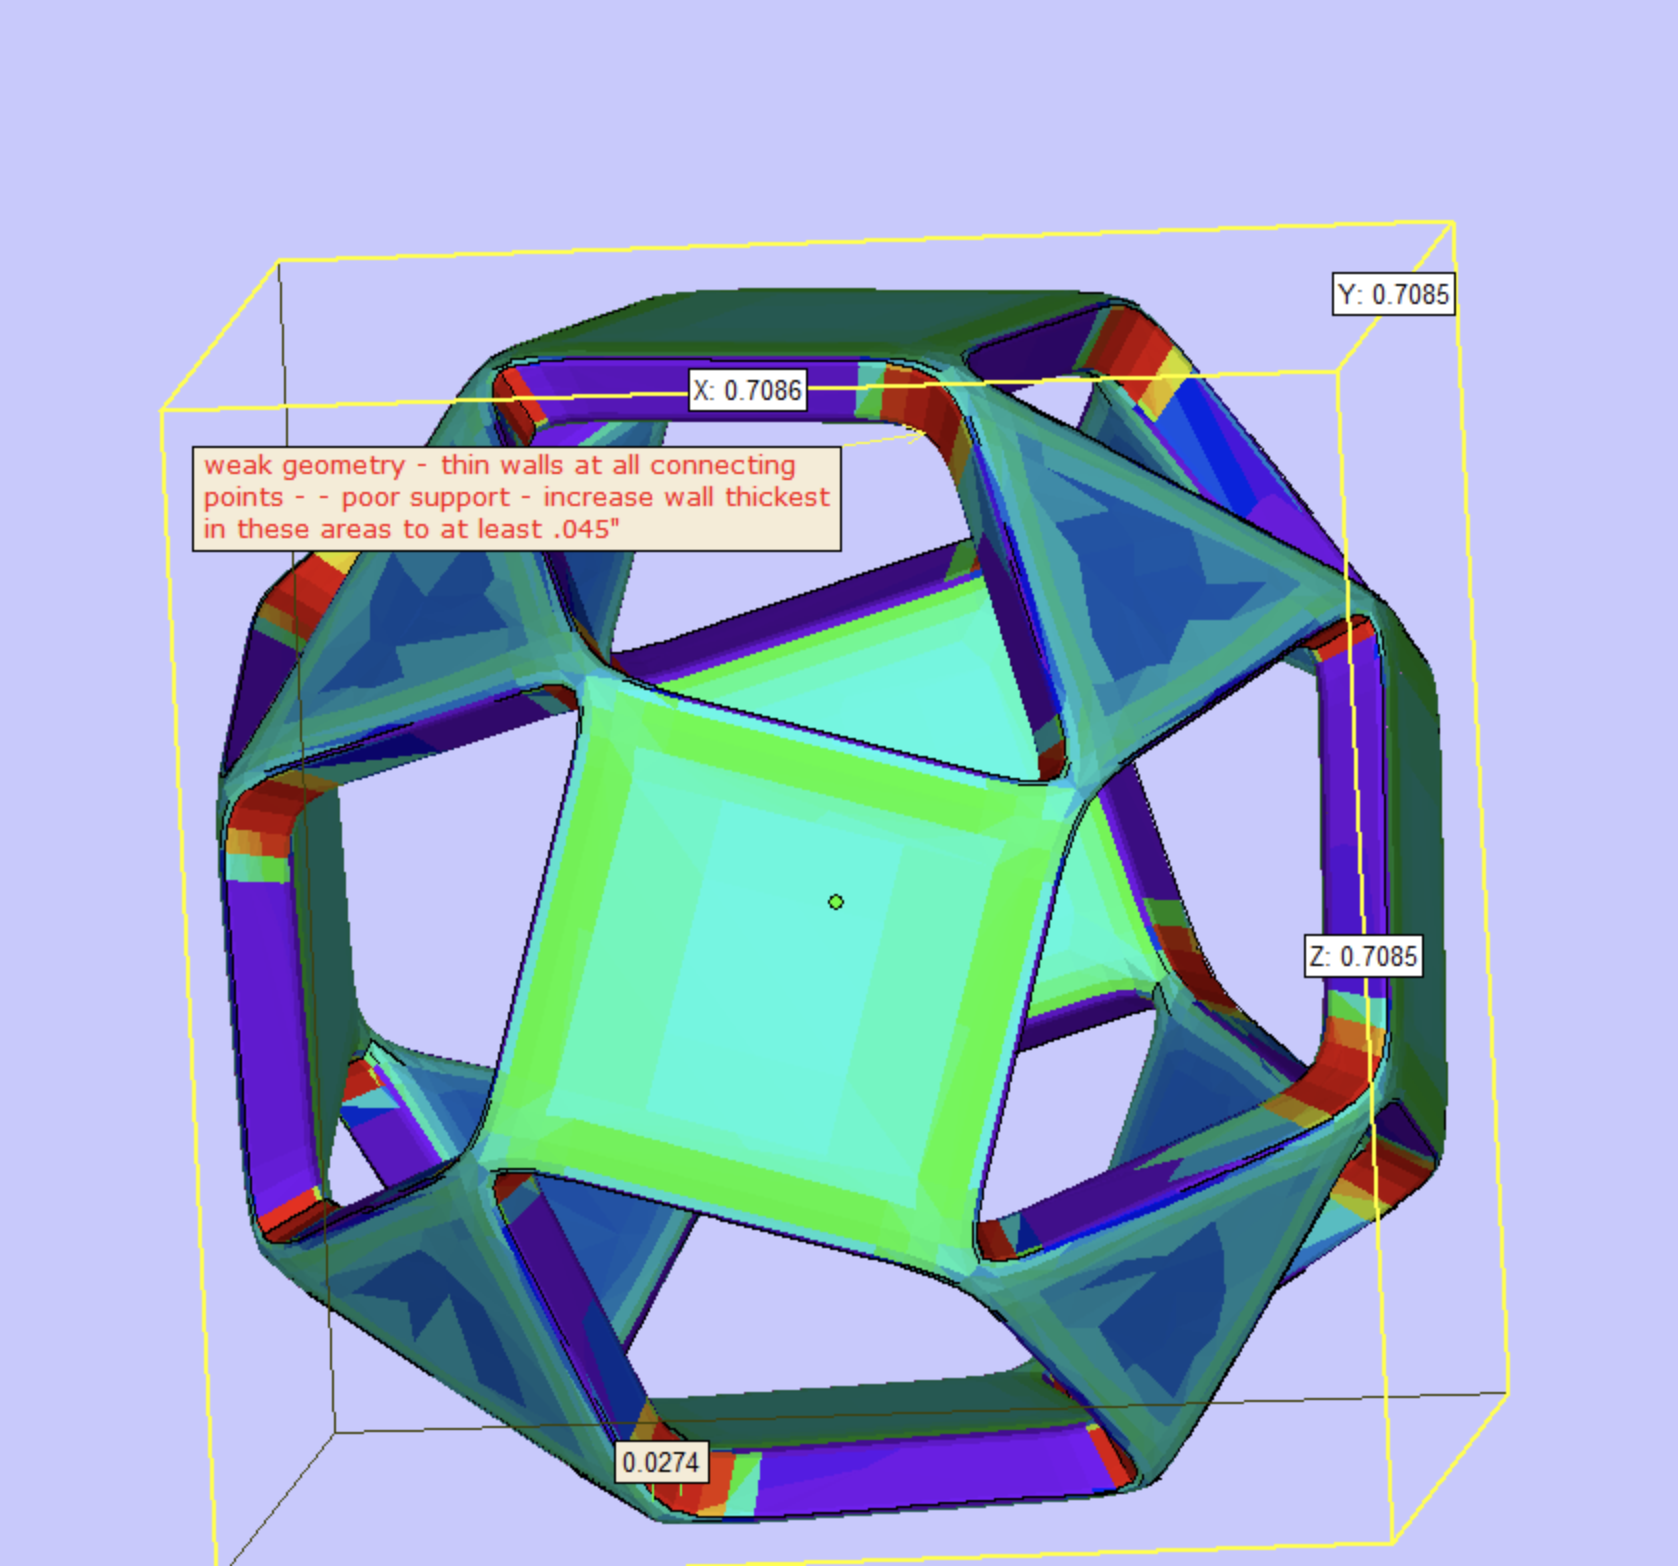
Although this model printed fine in Strong & Flexible Nylon, the connections between faces were too small to be produced successfully in Stainless Steel. With Stainless Steel, the produce is printed and then infused with bronze; before this infusion, the model is in a fragile “green state.” Or, as the Shapeways team put it when they rejected our Snub Cube: “The model has poor connections that require better support. It may be printable if more connection points are added, or made thicker. Overhanging or cantilevered features will collapse in green state.”
How can we thicken just those connections, without redoing our model from scratch, and without “poofing-out” the entire model and losing the sharpness of our overall geometry? Let’s find out!
Targeted Thickening
We’ll be following a “select, extrude, smooth” strategy in Meshmixer. We will include a lot of screenshots that show our tool settings, because sometimes tiny differences in those settings can make the software act very differently. If your Meshmixer menus don’t look like ours, then try updating to the latest version of Meshmixer.
Step 1: Select
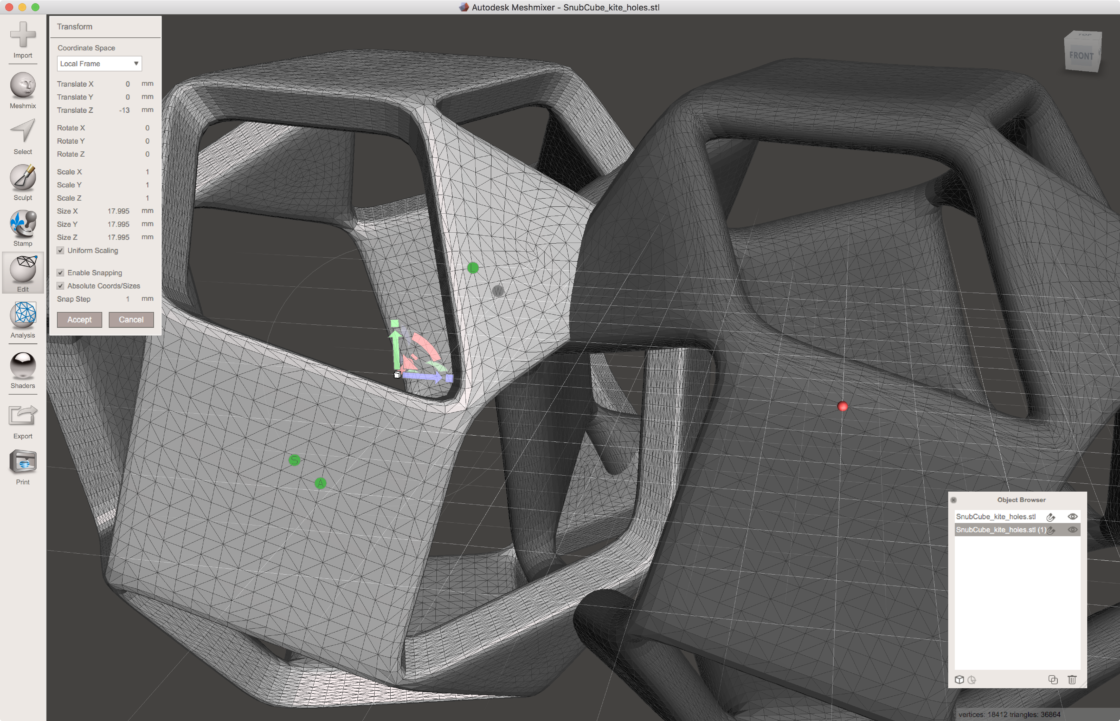
Import your model into Meshmixer. If you don’t see the triangles in your model’s mesh, press the “W” key to toggle their visibility. Then click on the Select tool, set to Brush mode, and make sure that Expand Mode is set to “Crease Angle,” with the Crease Angle Threshold set fairly high on the scale. This threshold controls which neighboring triangles are selected when you use the Brush tool to select a region of the mesh. Specifically, the threshold controls the angle between triangles that the selection tool is willing to select across. A higher threshold will make a tighter selection that won’t select nearby triangles if those triangles have even a slight angle different from the actively selected triangles. The right threshold really depends on the model you are working with, so experiment with this slider accordingly.
Select the region of your model that you would like to thicken. In our case we want to select the inside edges of all the holes and expand them inward, without changing the faces or overall thickness of the Snub Cube.

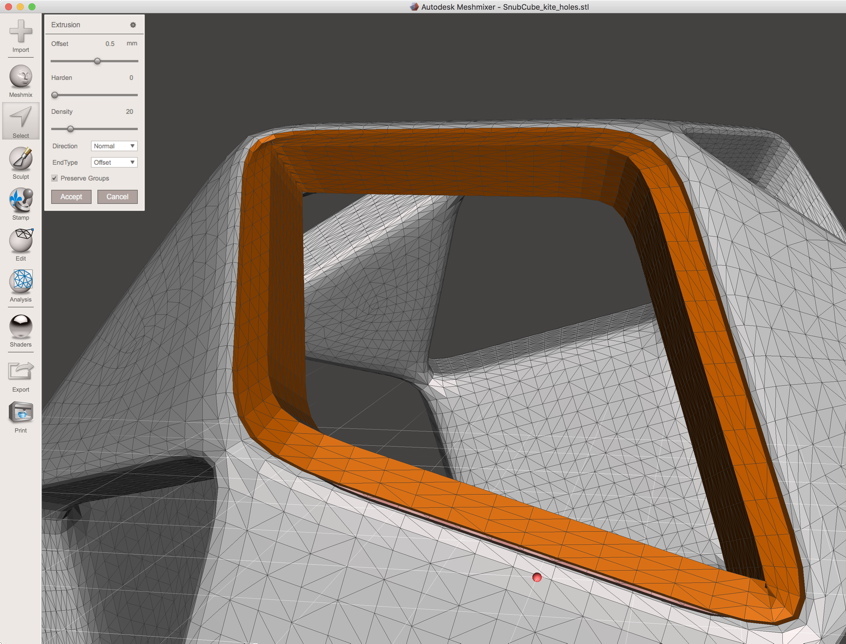
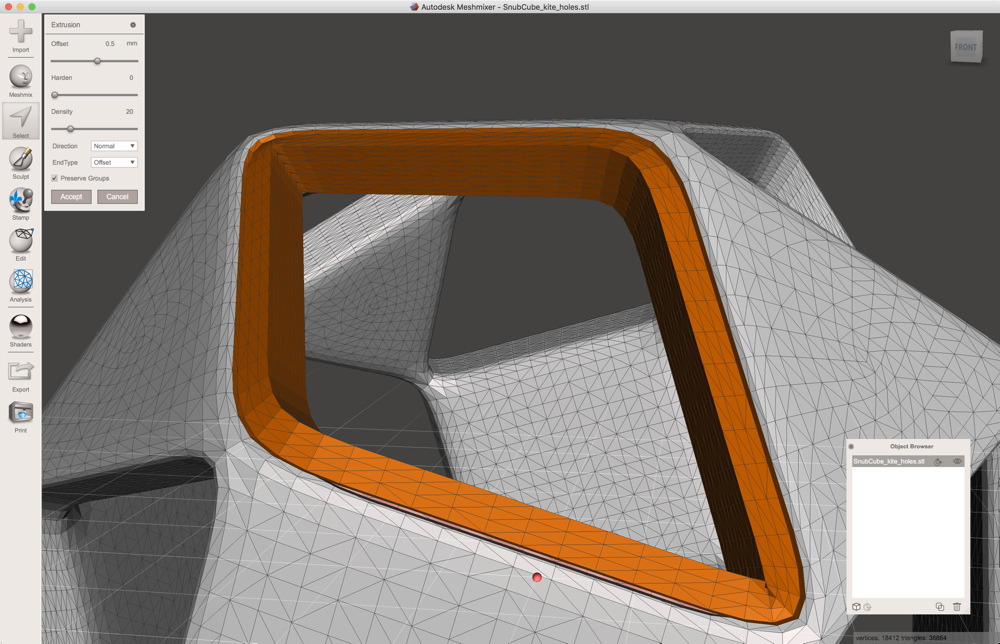
Step 2: Extrude
While your selection is still highlighted in orange, open the Edit menu in the Select popup window (shown in the upper left in the screenshot above), and select the Extrude option. Make sure that Direction is set to “Normal” so that the extrusion’s direction moves outward from the plane of your mesh selection. Set the offset thickness you need for your model and click “Accept” when ready. Sometimes the menus are a little finicky here, and you may have to reset some options or click away from a text box to get the model to update with changed settings.
Fun math fact: This word “Normal” doesn’t mean regular/vanilla here, it means mathematically geometrically normal, or perpendicular, to the tangent space of the mesh.
Step 3: Smooth
In our example, the resulting extrusion looked a little weird, especially at the hard-edge transitions between the extrusion selection and the rest of the model. Although we like the sharp geometry of our original model, in this case we are printing something that is very small, less than 18mm across. The sharp geometry of our model isn’t really visible at that size, but we worried that the hard transitions from our extrusion might cause the model to fail Shapeways’ automatic or manual checks again. So, we decided to smooth the entire model. The image below shows the result of smoothing after extrude-thickening just one of the holes, so you can see that the connections around the hole we thickened are much more robust than the other connections, say at the back side of the model.
To smooth the model, use Command-A to select the entire mesh, then from the Deform menu in the popup window select “Smooth.” We pushed the Smoothing slider all the way up to 1 so that the smoothing would flow nicely over our extrusion transitions. Experiment with whatever settings work best for smoothing your own model.
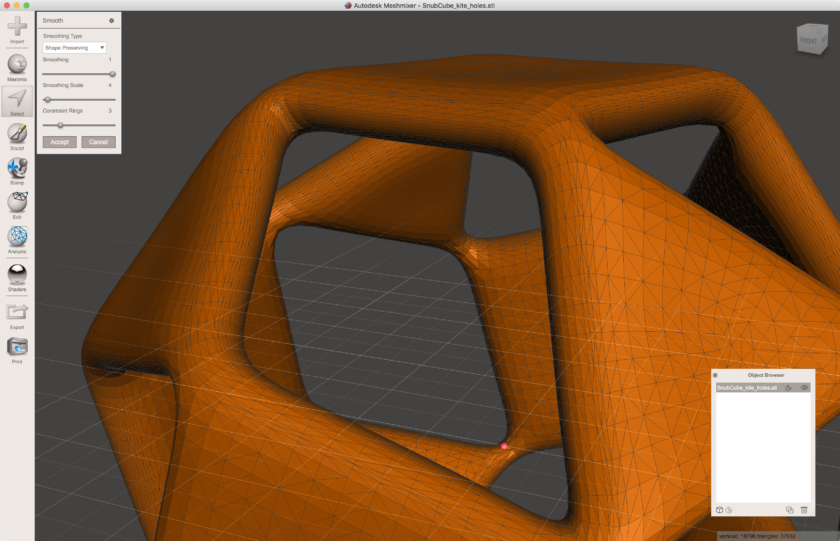
Here’s a screenshot comparing our original model with the one-hole-thickened model. Notice that the connections around the thickened hole are much wider, and should be able to support the “green state” stage when printing in Stainless Steel.
Do you have technical suggestions for repairing or resubmitting fragile models to Shapeways? Let us know so we can share your work in future Tutorial Tuesday columns!
——————
As an Amazon Associate we earn from qualifying purchases, so if you’ve got something you need to pick up anyway, going to Amazon through this link will help us keep Hacktastic running. Thanks! :)

This is perhaps the best single MeshMixer “tutorial” I have stumbled across..
Like your Snowflakerator, very useful and presented with clarity.
Thank you.