Knitting Machine Punch Card Trials

Knitting Machine Punch Card Trials

Knitting Machine Punch Card Trials 398 302 mathgrrl

We’re finally getting back to our Brother KH-881 punch card knitting machine project (check out our previous knitting machine post)… and it’s time to make some punch cards! The KH-881 reads 24-stitch repeat punch cards, and uses the punched holes to determine where stitches are slipped, tucked, or knit in a differerent color, depending on the settings on the machine.

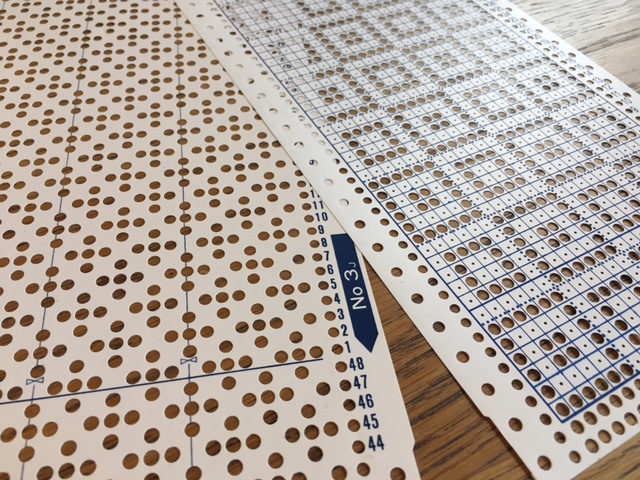
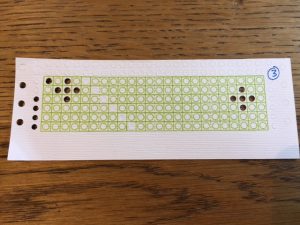
Some punch cards come standard with the machine, like the one on the left in the photo below. You can also hand-punch custom cards, like the one shown on the right:

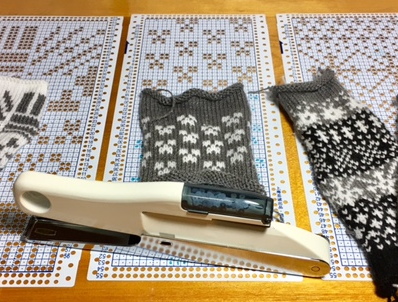
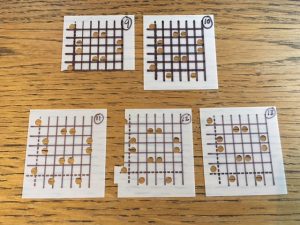
It’s not difficult to make interesting custom designs by hand-punching cards. Here are some test patterns that I made using a special punch card tool, and two-color test swatches for each pattern:

Punching Faster

So, that’s nice and everything, but it turns out that punching cards is a PAIN. I thought it would be kind of fun, but after about a quarter of a punch card it is no longer amusing; there is a lot of squinting my eyes and lining up the punch and hunching over the card. And errors are a pain to fix; you have to tape the tiny holes back in if you punch things by mistake! In addition, I really want to be able to “fail faster;” if one trial of a punch card design isn’t quite right, I want to be able to modify it and try the new version again relatively quickly. Repunching an entire card is a slow and irritating way to do this iteration.

So, as if an antique knitting machine wasn’t enough of a craft money hole, I decided to get a Silhouette Cameo 3 cutting machine. As you can see from the marketing image below, the Cameo is a hobbyist-grade craft cutter that people use for scrapbooking and other artsy paper/sticker/vinyl projects. My goal is to use this machine to create knitting-machine-readable punch cards.

Screen Shot 2018-09-26 at 10.16.28 AM

First Iterations on the Cameo

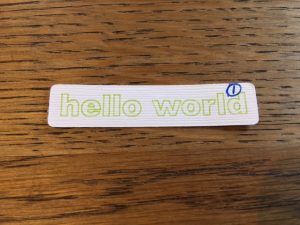
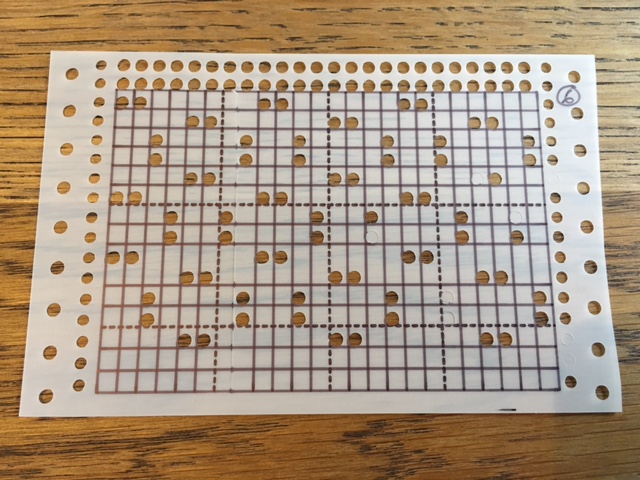
People so often show just their finished designs or products, but the story of iteration and failure behind every project is perhaps even more useful. So I took pictures as I learned to use the Cameo to make punch cards. Here’s the first thing (well, the first successful thing) I made with the Cameo:

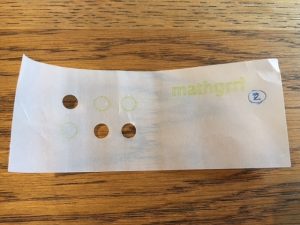
The knitting machine punch cards are made of some kind of flexible plastic or laminated material. I went to the Michael’s big box craft store and got a handful of different types of paper to see what it would work. All of them were awful, including this crinkly one:

The only other type which came close to working was the original cardstock I had tried. But even that material only sometimes let me cut out the holes the whole way, even after adjustments to the cutter setting. In addition, the cardstock stuck to the cutting mat and was obviously not durable enough for the knitting machine:

Dura-Lar Iterations

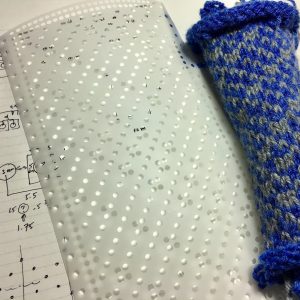
At my local craft store an actual live person recommended that I try sheets of Dura-Lar. It turned out to be perfect, so here is a picture of it in case you want to order your own. (I think this product on Amazon is the same.)

FullSizeRender

The Dura-Lar material is strong and flexible but doesn’t damage easily; it’s really sturdy. The holes cut perfectly into this material, but the pen refused to draw on it half the time, and was smudgy:

Replacing the Cameo pen with an Ultra-Fine Sharpie did the trick, but with this new pen, the drawing and cutting tools didn’t seem to be aligned properly:

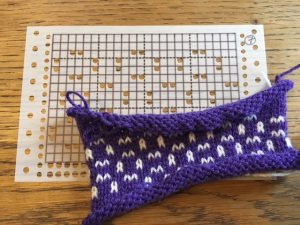
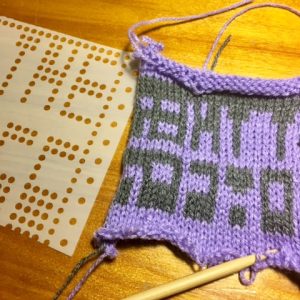
The heart of the problem was that the Dura-Lar could only be drawn on with Sharpie pens, but those pens were not exactly the correct diameter for the Cameo pen holder. Luckily, the knitting machine doesn’t give a crap about the printed lines, and only cares about the holes.  So even though our next trial still had messed-up lines, we could use it to knit a pattern swatch with the KH-881; it worked!

Playing with cutting settings and alignment to try to get things to match up only made things worse:

At this point we realized we could do our tests with much smaller pieces, and save material. We tried using tape to build up the pen case width, and we tried using a custom pen holder. After many adjustments we almost got things to line up correctly.

Stay Tuned…

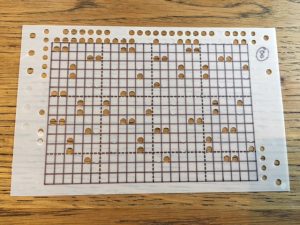
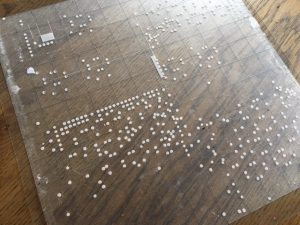
Although we did almost get things to work, the alignment process was really fiddly and sort of random. Worse, it wasn’t clear that the process was even going to be repeatable for future designs. Time for a break, and to wash all the dots off our cutting mat:

In our next post, we’ll solve our problem with (what else) some 3D printing…


——————

As an Amazon Associate we earn from qualifying purchases, so if you’ve got something you need to pick up anyway, going to Amazon through this link will help us keep Hacktastic running. Thanks! :)


14 Comments
  • 3D Printed Spacer for Using Sharpies in the Silhouette – Hacktastic October 15, 2018 at 2:07 pm

    […] our first post of this series, we cleaned and set up a Brother KH-881 knitting machine. In our second post, we learned to create punch cards on Dura-Lar paper with Silhouette Cameo 3 craft cutter. In […]

  • Designing Knitting Machine Punch Cards with StitchFiddle – Hacktastic November 16, 2018 at 3:35 pm

    […] Knitting Machine Punch Card Trials […]

  • I’m so excited to see this post! I went through some very similar iterations with DuraLar, trying to make 40 stitch punch cards for a Passap Jac40. I had real trouble getting the Cameo (I think mine is an earlier model) to cut through the DuraLar, and the little cut holes would pop off the mat and wedge themselves under the blade.

    I used a sharpie fine liner for the drawing which barely fit the pen holder. Staedtler Lumocolour permanent pens are very skinny and work on regular punch cards so might be good on duralar too! Ditto with Pilot DVD markers.

    I got so frustrated with the whole thing that I sold the JAC40, and I punch cards by hand for my Singer machine. I think I’ll re visit the Silhouette after reading these posts, thanks again for showing your process!

    • Wow, a 40 stitch card? That would be amazing. I think I’ve got the Silhouette almost worked out, and when I get it together I’ll post files for the software in case anyone wants to try. I’m excited that you also tried the Cameo/DuraLar! Great minds :)

      • Yep Passap do a 40 stitch repeat and it’s marvellous!

        That would be great if you’d share! There is an online generator somewhere(not sure if it’s yours?) that outputs cut-able punch card files but they are in svg and I don’t have the Silhouette upgrade to import svg files. I’d love to see what cut settings you use when you are successfully cutting cards in Dura-Lar! :)

        • So I just realized that the above post is from 2018, but I just wanted to let you know that it was still super helpful in 2022! I just got a Singer 700 for Christmas and found your sit via a search for new patterned punch cards. Low and behold… I already own two Silhouette machines and now I’m off to get some of the Dura-Lar paper to play with! Did you ever get your setting right? Also did you try to use the old Projector Film/clear sheets that they used to use long ago in school prior to Smart-boards? I’m wondering if that would work. I have cut it pvsly. with my Silhouette and it went well… I might give that a try.
          Also just as an FYI you might be check Chromas Creations – no idea if she’s still around – and she may have a pen/pencil/marker holder that would work better for you.

      • Ooh and I forgot to mention, if you find Dura-Lar a little too thick, try a polypropylene paper called Nevertear Premium :) it comes in 2 thicknesses I think…

      • Hi,

        Did you ever try to make the 40 stitch cards? I have passap machine and would be interested to use the Cameo.

        Please let me know, than you.

        • I didn’t but if you email me we can chat. Maybe I can make some guesses in the OpenSCAD and send to you, and you can try it out to see what tweaks need to be made to fit your machine exactly? Even if you’ve never used OpenSCAD before it’s not so bad to learn and I can help

          • I’ve read your post and downloaded OpenSCAD.

            I copied and pasted the code and could see the punchcard. From there I tried exporting as a STL file to see how it cuts using a Brother Cut and Scan.

            I’m a little lost as it was unable to export.

            I have no clue as to how to use OpenSCAD. I have only just started learning how to use TinkerCAD to print 3D.

            How/what do I do now? I was also looking to see how to design my own punchcards and I’m a little confused as to how you would input this into OpenSCAD to convert to a STL for cutting..

            You mentioned that you dont want your code modified etc, however dont we need to do this in order to make a different pattern?

            As I said, I dont have a clue on what to do and I would love some assistance please.

          • Hello Susan – I’m sorry to have not seen your post until now, but I would be happy to help you get started with the OpenSCAD code! First of all, yes please do modify the patterns in the code for what you want to make. Second, to use OpenSCAD you press “F5” to compile until you get what you want, then when you’re ready to export press “F6” to generate the file and then File/Export SVG to save the file. It’s an SVG you want because that is a flat image rather than a 3D-printable file. Then you can open that SVG in the Cameo software to set for cuts and drawing. Feel free to email me (laurataalman at gmail) and I can help some more as needed :)

  • Very cool to connect with others on this type of thing. I initially went to buy a KH-910 that someone made an Arduino shield to retrofit (Adafruit made something to fit models with data cables, this was AYAB and took flash memory or something).

    My wife and I got home only to discover it was a KH-868 (or KK-98) — the totally non-electric punch card type inside a KH-910 box. Since then I really could not be happier with the mistake on the seller’s part.

    How wonderful it is to go paleo and get a break from replacing old capacitors or troubleshooting. It really makes you think about how non-new digital design is. When designing a new punch card, using sized-down graph paper for true-to-life appearance, I really connect a bit to people 4 millennia ago weaving designs into fabric. Except I get to sweep the carriage across the bed and watch the fabric fall out.

  • I also dealt with the material, and the laminating foil worked for me. Before cutting, I pass it through a laminator, it is firm, it cuts perfectly.

  • Thanks for your efforts, ideas, geniality, and for sharing them with us!

Leave a Reply

Back to top