

Does the world need yet another filament sampler model? Probably not. But we made one anyway. Along the way we tested out Thingiverse’s new Send to Fusion 360 feature for adding fillets and revisited our Blender Bake method for enabling OpenSCAD to add text to an existing STL file in a way that can be used in the Thingiverse Customizer.
Why even do this?
When I first got started with 3D printing, I typically used whatever name-brand filament belonged with each type of 3D printer I was using. I figured this could eliminate at least one of the many variables that can lead to failed prints, since Ultimakers might run best with Ultimaker filament, MakerBots might run best with MakerBot filament
, and so on, at least at the default slicer settings.
But eventually… I got bored. I wanted to try new types of filament. And new colors. And sparkles. Also, I was running out of all the discounted and free filament that was left over from when I worked at MakerBot and Ultimaker, so it seemed like a good time to branch out and try the brands I kept hearing about, like Proto-Pasta, Faberdashery, Polyalchemy, and ColorFabb
.
It got confusing fast. Some filaments worked really well for certain prints, but not others. Some didn’t look the same at all after printing than they did when they were originally on the spool. And there were so many brands and types of filament, not always recorded accurately on the spools. And once a spool was used up, I didn’t have a good record of what the filament was like, so I didn’t always know if I should reorder the same type. And another kicker – half of my printers have their filament loaded *behind* the machine where I can’t see it! It would be nice to have something to put in front of the machine to remind me what’s in there.
There are a number of very nice existing models on Thingiverse for testing and sampling filament, including test cubes, texture and transparency testers, samples for display and to put on chains and loops, and even some that were customizable. Somehow none of these were quite what we wanted. Even our Speed Racer Testbots didn’t seem like quite the right thing.
Design Requirements
Our goal was for the filament samples to be:
- Elegant, not fussy… but also not just a plain cube or rectangle
- Descriptive in terms of the color/type/brand of filament
- Customizable! Of course :)
- Stackable, with a loop for hanging, and able to stand up on their own (like near a printer or something)
- Not a 3D printing torture test full of tiny posts, overhangs, and infill samples
- Rather, a hefty sample that feels good in your hand so you can easily see and feel the filament at a basic level
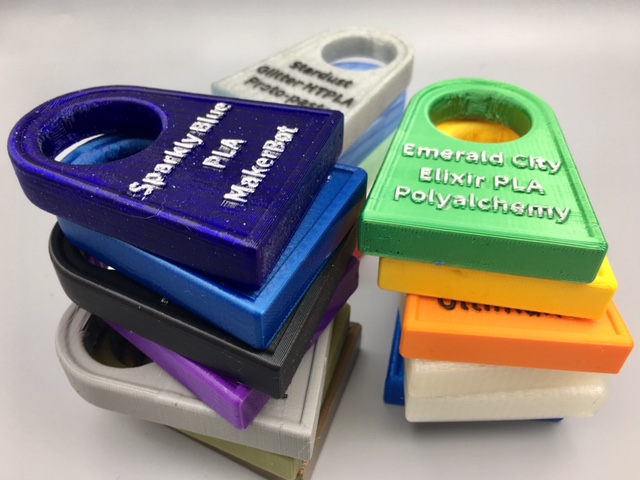
We settled on the “tombstone” shape shown below. This was the most elegant solution we could think of that would maximize text area and have both straight and curved elements. We chose to emboss the letters because then we could easily color the letters with Uni-Paint pens (these pens tend to bleed into the filament layers a lot less than Sharpies). But letters that stick out of the front and back would make the samples more difficult to stack, so we also included a raised lip around the entire object, effectively making a flat, stackable surface. Here they are both stacking and standing on their own:

We made the hole really big so the samples would fit over just about anything:

And especially so that they wouldn’t be fiddly to pick up and carry around!

Tinkercad-to-Fusion
Tinkercad recently launched a long-awaited feature: the ability to send basic objects from Tinkercad to Fusion 360 for fillets, bevels, and other cool features. Of course, we could always export STL files from Tinkercad and send them to Fusion 360, but those models would be meshes instead of the types of basic geometric objects that Fusion 360 knows how to work with for fillet/bevel modifications. This new feature is really exciting because it allows people to design in a really simple environment (Tinkercad), and then pop over to a more difficult environment (Fusion 360) for just a few simple targeted operations.
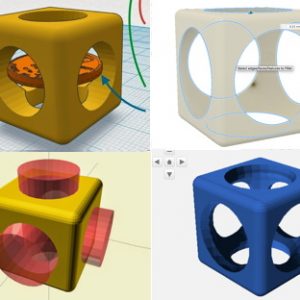
The green model on the left below is what we created in Tinkercad, and the gray model on the right is the filleted version that came back from Fusion 360:

And yes, we *could* have just designed this object in Fusion 360. In fact if you already know Fusion 360 it is easier; you just make some sketches and do some extrusion and a little push-pull. But for beginners whose main design software is Tinkercad, it’s really great to be able to pop into Fusion just for a second and then get out. Here’s what it looked like in Fusion 360 when I was adding the fillets:

This is seriously great and it’s really exciting this new feature of Tinkercad has launched. HOWEVER, it’s still a bit fiddly; you have to know a few things about Fusion to use it; and you can only apply it to simple designs made with basic shapes. Still, this is the beginning of something fantastic and if you try to keep things simple then this is a nice way to add fillet/bevel options to Tinkercad models.
How to add fillets to a Tinkercad model in Fusion 360
First, read Tinkercad’s blog post about the release of this feature and the basic steps for using it. Once you’re done with that, check out these tips for filleting Tinkercad-made objects in Fusion 360:
- You can only use Basic Shapes in your model; if you use a Shape Script then that part of your model will not appear in Fusion 360 after the transfer.
- Fillets are really just inherently fiddly things and they don’t always work. Any kind of even mildly interesting geometry like overlaps or corners can unexpectedly make it impossible for Fusion 360 to generate a fillet. If you notice a little red “x” at the bottom right of the window, then Fusion 360 was unable to make your fillet for some reason. Sometimes it helps to choose a smaller fillet radius; sometimes it helps to select many edges to fillet at once; sometimes it helps to select edges just one at a time and in some magical order; and sometimes there is nothing you can do.
- Also keep in mind that the design you bring over from Tinkercad might have some weird overlaps or double-edges, and sometimes you won’t be able to see the entire edge you are selecting. If you have a problem getting fillets to work, then I recommend trying a lot of random things to see if something somehow does the trick. If all else fails, try to make your Tinkercad design a little simpler somehow.
- For some reason my Tinkercad designs showed up in “Sculpt” mode in Fusion 360. If that happens to you, then you may want to change to “Model” mode from the leftmost square in the toolbar menu.
- The fastest way to make fillets in Fusion 360 is to press the “F” key, then select a bunch of edges in sequence, then type a number to set the radius, then press Return/Enter.
- Navigation in Fusion isn’t the same as navigation in Tinkercad; in Fusion you Rotate by pressing Shift while dragging with the Middle mouse button and you Pan using the Middle mouse button. If out of habit you press and drag with the Right mouse button, a weird menu or some other thing will pop up; just press “Escape” if this happens.
- To export your model from Fusion 360, right-click on the “FusionComponent” text at the top of the Browser list, then select Save as STL. A window will pop up and you’ll have to click “ok” before you can save the file to your computer. Of course you can then print your model, or maybe Import it back into Tinkercad.
- If you bring your model back into Tinkercad after filleting or making other modifications in Fusion 360, you won’t be able to ungroup or separate that model anymore. It will act the same way as any imported STL file, as one piece.
After filleting in Fusion 360, you can add text or whatever you like to the sample in Tinkercad. You can try it yourself, and also modify the shape of the object before or after the filleting step, at this Tinkercad link.

Thingiverse Customizer
If we had made our model in OpenSCAD, then adding text and porting to the Thingiverse Customizer would be pretty easy. And yes, we *could* have just made this model in OpenSCAD, and even acheived most if not all of the fillets with Minkoswki sums and other tricks. But we didn’t; what we have is an STL file from some other program, not a parametrizable model based on OpenSCAD code. We could easily import this STL file into OpenSCAD and add text, no problem. However, the resulting file wouldn’t work in the Thingiverse Customizer, because it would involve an external file. There is currently no way to import an existing STL file into the Customizer.
However, there is a way to embed an STL model into OpenSCAD as a list of mesh/triangle data that generates a polyhedron in the shape of the model… and once you’ve done that, everything is self-contained in one OpenSCAD file, just like the Customizer wants. This method was shown to me by atartanian and uses a Blender plugin written by graphicsforge. You can read a step-by-step in my previous post Beefy Trophy – Baking meshes into OpenSCAD from Blender. Basically it involves importing your STL file into Blender and then using the plugin to export it as text that can be used inside an OpenSCAD file:

Here’s what the model data looks like after opening it in OpenSCAD:

And now we can use the model inside OpenSCAD by calling the polyhedron anywhere we like within our code. Note at the top we have user-modifiable parameters for three lines of text and for font size; these are the elements that people will be able to change inside the Thingiverse Customizer.

When we upload to Thingiverse we have to include the .scad file and click the “This is a Customizer” button.

This activates the “Update in Customizer” button on the front page of our model on Thingiverse (see the bottom right of the screenshot below):

Pressing this button takes the user to a screen where they can change the text and font size parameters:

3D design for everyone
Notice the running theme here of creating hacks that enable people to do things above their current design skill level:
- First, the Thingiverse Customizer enables even beginners to modify the filament sample text, without having to work with any of the actual OpenSCAD code.
- Second, the new Tinkercad-to-Fusion feature enables beginner designers to leverage some of the tools in Fusion 360 without having to get too deep into that more complicated software.
- And finally, the Blender Bake method enables Customizer designers to use OpenSCAD to modify existing models, or models that they created in other software, without having to design from the ground up with OpenSCAD code.
All of these things make 3D design a little bit more accessible, at different levels. Will someday this stuff just be… easy? Maybe. But for now, baby steps.
tl;dr
Hey, here is a new model for making filament samples. You can easily customize the text yourself on Thingiverse at this link: Customizable Filament Samples. Or, play with the model in Tinkercad, at this link: Filament Samples and Tinkercad/Fusion test. Or, learn how all of that came together by scrolling up :)
——————
As an Amazon Associate we earn from qualifying purchases, so if you’ve got something you need to pick up anyway, going to Amazon through this link will help us keep Hacktastic running. Thanks! :)
Leave a Reply