

Time to level up! This is the first in a series of posts about converting desktop 3D printer models into designs optimized for printing on industrial-level 3D printers. So far most of my 3D-printable designs have been designed for printing on fused deposition modeling (FDM/filament) machines like the Ultimaker 2 and the Replicator 2, because that’s what I have at home and at work. My goal for this spring is to set up a Shapeways store with modified models that are designed to 3D print well on higher-accuracy machines and with interesting materials.

Shapeways is like a personal remote factory that gives you access to 3D printers that use stereolithography (SLA/resin), selective laser sintering (SLS/powder), and other high-accuracy technologies. You upload 3D designs and choose the materials you want to use, and then Shapeways prints the models and mails them to you for a fee. That sounds easy, and basically it is, except for one catch: designing for industrial-level 3D printing is not the same thing as designing for filament-deposition 3D printing.
In most cases, the process of turning filament-prototyped 3D models into Shapeways-ready designs means modifying our designs in one or more of the following four ways:
- Increasing mesh resolution and accuracy;
- Modifying thicknesses and clearances to match material specifications;
- Finding ways to make prints as inexpensive as possible; and
- Potentially incorporating greater design complexity.
For example, below left is a picture of a snowflake ornament design that was created with my Snowflake Machine, a Customizer model on Thingiverse designed with OpenSCAD code. On the right is a render of a new model that I optimized for printing at Shapeways. This render is just a picture of what the printed object will likely look like if it works; the physical 3D print is in production at Shapeways and will be mailed to me in a couple of weeks, so stay tuned.

So what did we change? First, we modified the generation parameters in the Snowflake Machine to get a more complex design (see design footnote [1] below), making sure to set thicknesses parameters to satisfy the guidelines for the material we wanted to use, Metallic Plastic. Our design has what Shapeways calls “unsupported wires”, which in Metallic Plastic must be at least 1.5mm thick. We also have “engraved detail” in the snowflake plates which needs to be at least 0.7mm deep. Finally, the clearance for any gaps between snowflake branches in this material must be at least 0.5mm.
It’s also good to keep in mind that we aren’t going to be bound by the usual rules of filament printing. Since we selected the Metallic Plastic material, our snowflake will print in an SLS powder bed and not flat on a build plate, and therefore our design doesn’t have to have a flat base like our original snowflake model. To take advantage of this, we exported a half-thickness model from the Snowflake Machine and mirrored the design with Blender to make it two-sided (see note [2] below).
Depending on the material you choose, the cost of 3D printing an object at Shapeways is calculated based on factors can include the volume and/or surface area of your model, the amount of space your piece will take up in the machine, and a fixed per-part setup and handling fee. For example, according to the Shapeways Materials page, both Metallic Plastic and Strong & Flexible Plastic have a per-part setup fee of $1.50. You can save on per-part costs by including multiple models in one file, packed together closely and connected by a loop or cage so that they are counted as one part for handling purposes.
To test multi-part results we made a model with three different snowflakes stacked on top of each other, just over the 0.5mm clearance value for Strong and Flexible Plastic. To do this, we imported three different designs from the Snowflake Machine into OpenSCAD and translated them into position, lined up by their hanging loops (see note [3] below). Then we used some simple OpenSCAD code to make a square loop that passes through all three hanging loops, still obeying that clearance; see the photo below. When we get the printed model we’ll just cut the square loop to get three separate snowflakes. I’m curious to see if this arrangement causes any problems with cleaning, separation, or finish for this model.

DESIGN FOOTNOTES
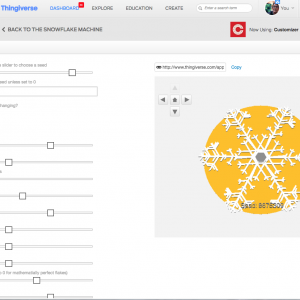
[1] To change size parameters in the Snowflake Machine, go to the link and press “Open in Customizer”. Under the “global-size-settings” dropdown menu, select your Target Diameter and overall desired Thickness. Once you’ve set those parameters, use the Fat and Organic sliders in the “set-snowflake-style” dropdown menu to determine the thickness of the snowflake branches.
[2] To mirror a design in Blender, first open Blender and click to turn off the three eye, arrow, and camera icons in the Scene menu in the upper right, if they are on. Then use File/Import/Stl to bring in your STL model file. Click the tiny wrench symbol in the right menu column (you may have to widen the window to see it) and select Add Modifier/Mirror. Select or de-select the X, Y, and Z axis buttons in the tool until you get the effect you want, and click Apply. Then use File/Export/Stl to save your mirrored model.
[3] To import an STL file into OpenSCAD so you can position, scale, or add to the design, open a new OpenSCAD file and save it in the same directory as the STL file you want to import. Type import("filename.stl",convexity=9); in the edit window and then compile with F5 to load in the file. You can then modify the imported model by preceding the import command with translate, scale, rotate, or other transformations. In fact we could also have done our mirror operation in OpenSCAD!
UPDATE!
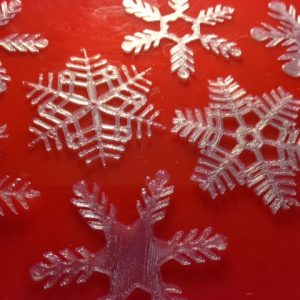
The snowflakes are back from Shapeways and they look like this:

It took a long time for Shapeways to send these to me because I included them in an order with some Porcelain and Stainless Steel prints, which have a long production time. Since the snowflakes were printing in strong and flexible, I could have had them in just a few days, but with the more complicated material order it took weeks. Pro tip: If you want something fast, don’t combine it with an order that takes a long time. :)
Because I test-print and iterate a lot before I send models to be printed at Shapeways, my Shapeways deliveries tend to break immediately into three categories: (1) perfect, (2) needs just one more iteration, or (3) not working out at all. These snowflakes were in the second category; on the single snowflake print the embossing could have been a bit deeper, and on the three connected snowflakes the square connector was a pain to deal with. The models are also pretty fragile, so I might make them a little thicker. After those minor updates the snowflakes will be ready to go into my Shapeways store as singles or as connected packs of maybe eight.
——————
As an Amazon Associate we earn from qualifying purchases, so if you’ve got something you need to pick up anyway, going to Amazon through this link will help us keep Hacktastic running. Thanks! :)
Leave a Reply