

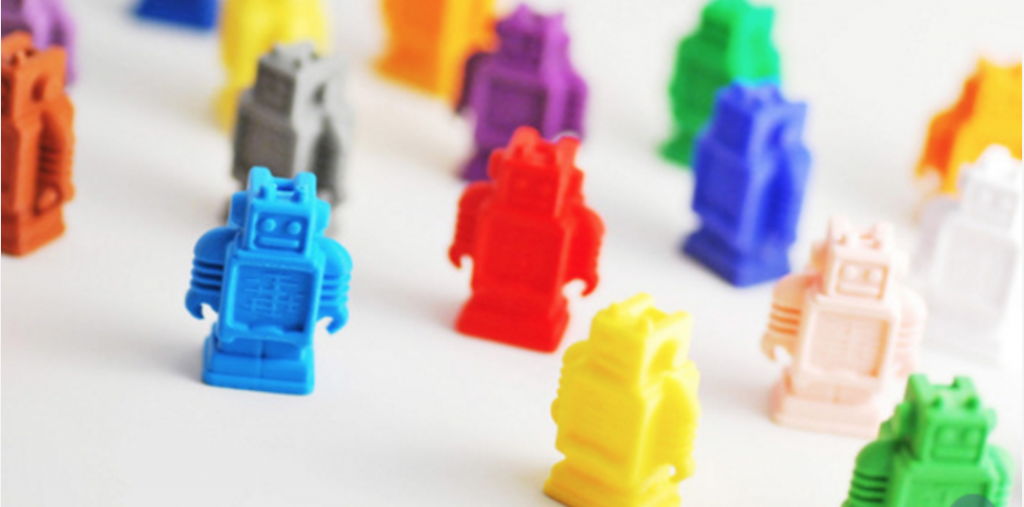
It’s hard to find a better test print than the Ultimaker robot; it has insets, embossings, overhangs, bridges, posts, and fine features, all wrapped up in a model that’s less than an inch and a half tall. Plus, it’s cute. Here’s marrit‘s remix that includes removable supports for the hands, based on Siert Wijnia‘s original design from YouMagine:
This robot is small and prints quickly, but… on an Ultimaker with standard Cura settings, not quickly enough! Theoretically, Ultimakers should be among the fastest desktop 3D printers, because with their Bowden tube construction they have the heavy feeder motor mounted on the back of the machine instead of weighting down the print gantry. Ultimaker is a Dutch company, and from what I can tell the Dutch are willing to slow down to make things nice, so their Cura settings are optimized for mind-bending quality but not so much for speed. On the other side of the pond, I’m an ugly American and I want speed like Racer X. Time to put theory into practice and speed things up.
How fast is fast?
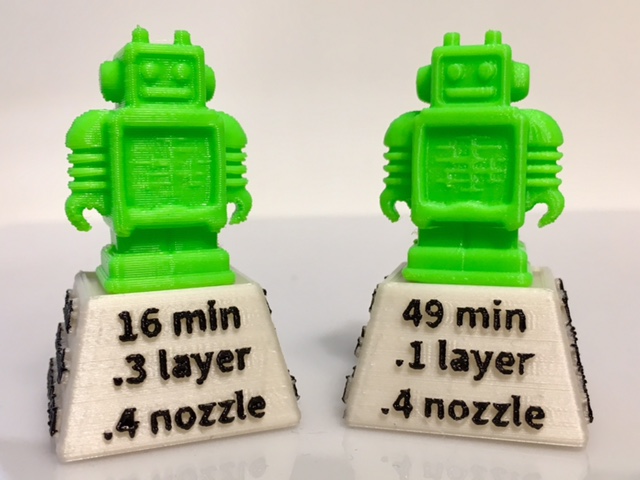
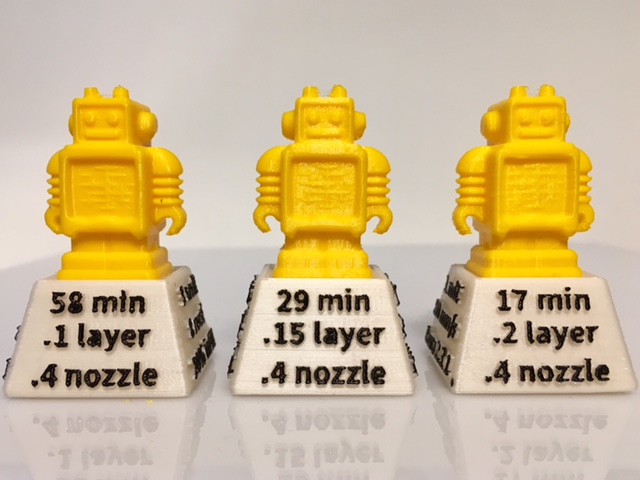
On my old friend the Replicator 2, the default “High” quality settings print at 0.1mm layer height, “Standard” at 0.2mm, and “Low” at 0.3mm. Back in the MakerHome blog days, nearly everything I printed was at the 0.3/Low setting, because that was fast, sturdy, and good enough for me. In contrast, Cura’s “Fast” default setting for the Ultimaker 2+ prints twice as nicely and twice as slowly at half of that layer height, 0.15mm. Ultimaker’s “Normal” is 0.1mm layer height (same as the Replicator’s “High”), and Ultimaker’s “High” is 0.06mm (what?!). Because of these high-accuracy defaults, people sometimes think that Ultimakers print too slowly, at least compared with other printers they mght be used to. For example, the Ultimaker 2+ prints the test robot in 29 minutes on its lowest quality default Cura setting, or 96 minutes (!) on its highest. In contrast, the Replicator 2 can print the test robot in just 16 minutes at its lowest default setting, or 49 minutes on its highest:
Testbot bases
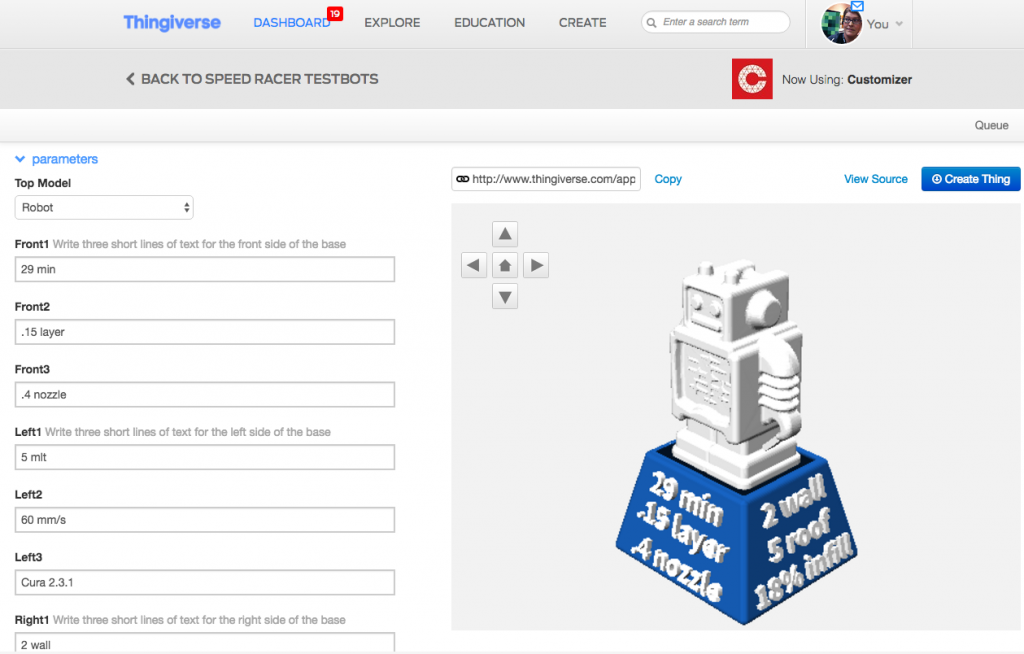
The bases under the robots in the picture above were made in OpenSCAD and allow you to enter three lines of text on four different sides of the base, with or without a robot printed on the top. For my testbots I printed the robots separately from the bases and then glued them on. The times listed on the bases are just for printing the robot, not the base, and the settings listed around the base describe the slicer settings, nozzle size, machine model, filament type, or whatever you want.

The OpenSCAD code for these bases was created using the same method described in the Customizable Beefy Trophy + Blender Bake Tutorial on Thingiverse. This means that if you want to make your own testbot bases, then you can design them right in the Thingiverse Customizer instead of having to deal with the OpenSCAD code. Follow the link below to get started.
- Speed Racer Testbots on Thingiverse
Speed it up
Our goal is to identify simple Cura settings that allow our Ultimaker 2+ to print as fast as the old Replicator 2. The process is: Play with slicer settings to see how fast we can speed things up, print a lot of test robots, figure out where that quality line is that we don’t want to go under, and then create and print a Speed Racer Testbot base with the corresponding settings and glue that robot to the top of it. Here’s an army of test robots we printed as we experimented to make Cura faster and faster. Can you print an 8-minute robot on an Ultimaker 2+ with an 0.4mm nozzle? Yes, but as you can see, it isn’t pretty.

We decided we were most happy with the 17-minute robot for its balance of quality and speediness, printed at 0.2 layer height. That’s just one minute longer than the same robot printed at the lower-resolution default 0.3mm/Low setting on the Replicator 2. Even the 14-minute robot we tested looked pretty good, but I guess I have some Dutch in me after all, because I wanted that tiny bit of extra quailty and chose the 17. :)
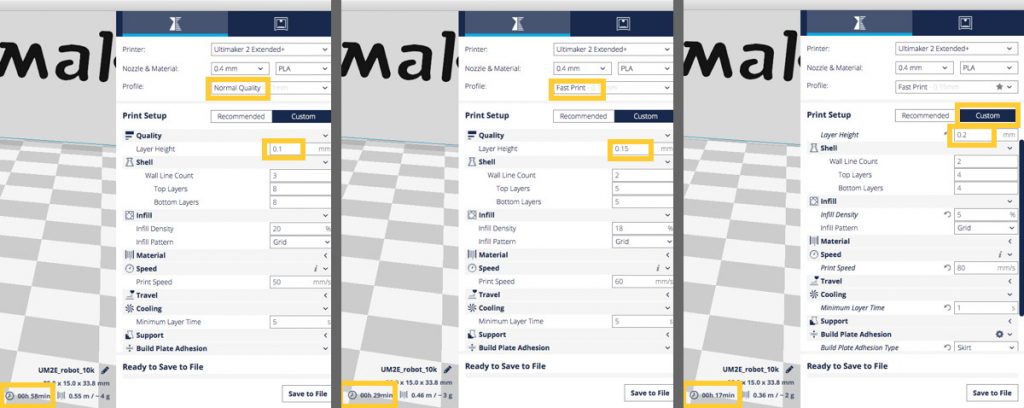
So, what settings did we end up using? There are a LOT of settings in Cura, and in the newest version you can customize your interface to include whichever of those settings you like. (Pro Tip for Cura 2.3.1, or what I couldn’t figure out until I actually asked someone where all the settings were hiding: Click on the “gears” that appear when you hover over the setting submenus, then check boxes to indicate the settings that you want to add to each submenu.) There are some pretty fancy things you can do to speed up print times, but I wanted to find something that would be easy for even a beginner to do quickly. In the screenshots below you can see the settings I decided to focus on: Layer Height, Wall Count, Top/Bottom Counts, Infill Density, Print Speed, and Minimum Layer Time. The leftmost screenshot shows the default Cura slicing profile for 0.1mm/Normal on an Ultimaker 2+, with our focused slicer settings made visible. At this setting, Cura estimates that it will take 58 minutes to print the test robot. The middle screenshot shows Cura’s default for 0.15mm/Fast (29 minutes), and the rightmost screenshot shows our custom settings at 0.2mm layer height (17 minutes!).
Here’s how the robot prints under each of those profiles. The 58 minute robot is amazing, and the 29 minute robot is really great, but if you’re iterating a design or want to print quickly, then the 17 minute robot is the way to go.
These printed Speed Racer Testbots will help us share best practices and slicer information with students and faculty who use the 3D printers at JMU 3SPACE.
Tables!
Let’s collect all the data in one place for easy reference. The yellow columns of the table below show the values of our focused silcer settings for the three yellow robot Ultimaker 2+ prints shown above. The green columns show the corresponding values for the default High and Low Replicator 2 slicing profiles.
| Rep2 High | Rep2 Low | UM2+ Normal | UM2+ Low | UM2+ Custom | UM2+ 0.8mm | |
|---|---|---|---|---|---|---|
| Layer Height | 0.1 mm | 0.3 mm | 0.1 mm | 0.15 mm | 0.2 mm | 0.3 mm |
| Wall Count | 2 shells | 2 shells | 3 shells | 2 shells | 2 shells | 1 shell |
| Roof Count | 10 layers | 3 layers | 8 layers | 5 layers | 4 layers | 4 layers |
| Infill Density | 15% | 10% | 20% | 18% | 5% | 5% |
| Print Speed | 40 mm/s | 40 mm/s | 50 mm/s | 60 mm/s | 80 mm/s | 50 mm/s |
| Min Layer Time | 5 sec | 5 sec | 5 sec | 5 sec | 1 sec | 1 sec |
| Print Time | 49 min | 16 min | 58 min | 29 min | 17 min | 9 min |
The setting that makes the most difference will almost always be Layer Height. For example, consider that doubling the Layer Height will cut in half the number of layers that have to be printed, which in turn could cut the total printing time in half. Although it is possible to print at 0.3mm layer height on the Ultimaker, the printer just doesn’t seem to be optimized for it. I had trouble finding reliable settings to go with 0.3mm layer height, which is why we used 0.2mm in our UM2+ Custom settings.
In general, I’ve found that you don’t want to set Wall Count below 2 shells, unless you are using a larger nozzle (as in the last column of the table). The “Roof Count” shown in the table is my shorthand for the Top and Bottom Layer Counts. I’ve found that Infill Density can be lowered a lot, especially if your model doesn’t have a lot of large, flat roof areas or thin, fragile columns. If your model is wireframe or spindly then I’d actually recommend bumping up the Infill Density, even if you’re trying to speed print; it won’t cost a lot of time but it will make your model a lot less breakable.
Print Speed is something you can experiment with; when your Layer Height is lower then you can increase Print Speed even more, because smaller Layer Heights require less filament to be extruded. My tests showed that for 0.2mm Layer Height, 80 mm/s is the highest you can go without sacrificing quality.
Finally, the “Min Layer Time” setting can also make a big difference if your model is small; it measures the minimum number of seconds that the printer will spend on each layer. A layer that prints very quickly might not have time to cool, so the printer will actually wait until the minimum number of seconds have elapsed before it moves to the next layer. By reducing this number we can try shaving off those extra seconds, which can add up if many layers of your model are small.
That part in Mythbusters where they take it a little too far
Can we go even faster? YES; if we bounce up our nozzle size to 0.8mm (hooray Olsson block!), then we can print a superfast rough-draft Speed Racer robot in just 9 minutes.
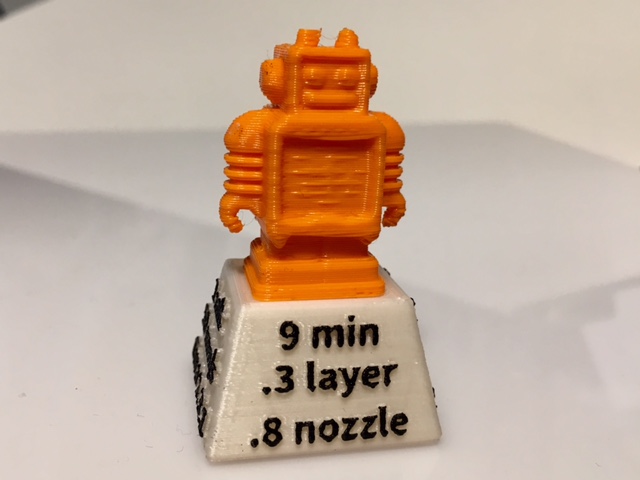
We can actually print one in *6* minutes, but quality starts to suffer. In the photo below you can see a comparison of the 9-minute and 6-minute prints from the back and the front. Remember that these are printed with an 0.8mm nozzle and these robots are just over an inch tall, so we don’t expect a whole lot of quality in this test; considering the large nozzle size, the quality of the 9-minute robot is actually pretty good.

What about the other Cura slicer settings? There are lots, and you can probably do better than I did above, especially on a per-model basis when you could optimize for the particular features of the design you are printing. Or, you could do worse, as I did when I accidentally unchecked “Enable Print Cooling” in one of the tests:

tl;dr
The short version of the long story above is that if you want to quickly set up Cura to slice quicker prints for Ultimakers, use the type of slicer settings in the UM2+ Custom column of the table above. Specifically:
- Bump up Layer Height to 0.2mm.
- Bring down Wall and Roof Counts as much as possible.
- Reduce the Infill Density unless your model has a lot of thin columns or wires.
- Experiment with increasing the print speed, keeping in mind that you can get away with faster speeds at lower Layer Heights.
- Reduce the Minimum Layer Time, if your model has a lot of small layers and if cooling does not seem to be a problem.
- Bonus speed tip: Switch platform adhesion from Brim or Raft to Skirt (the one that just makes a ring around the model). Or, if you have to use a Brim or Raft, decrease the Brim Width or Raft Extra Margin setting.
Good luck and print faster!
P.S. to Steve Albini / Big Black fans: I managed to get two Hammer Party references in earlier so here’s a third one: Cables!
——————
As an Amazon Associate we earn from qualifying purchases, so if you’ve got something you need to pick up anyway, going to Amazon through this link will help us keep Hacktastic running. Thanks! :)
Leave a Reply