
Also published at Shapeways Magazine
—–
So, you have a 3D model, but it’s too thin to print reliably — or too thick to have the fine detail you want. How can you fix it? In this week’s Tutorial Tuesday, we’ll focus on that one specific modeling skill. There are a lot of tools you could use for thickening or thinning a model, but today we’ll explore Blender, which produces reliable results and a good mesh, even with challenging designs.
Hello Blender
Blender is free 3D modeling software that includes capabilities that rival expensive professional modeling programs like Maya, Zbrush, 3ds Max, and Rhino, including subdivision modeling, animation, rendering, character modeling, sculpting, and even visual programming like Grasshopper. To properly learn to use everything that Blender offers would take months, if not years, of training. But we don’t need to do that; we’ll poke our heads into Blender just long enough to thicken a model, then get back out!
For the purposes of this post, we’ll assume that you’ve never used Blender before. If this is the case, then when you first open Blender you’ll see three things on the work surface: a Camera, a Cube, and a Lamp. Before doing anything else, turn these off by clicking to deactivate the three eye, arrow, and camera icons in the Scene menu, shown in the uppermost right menu of this screenshot:

Upload a model to thicken
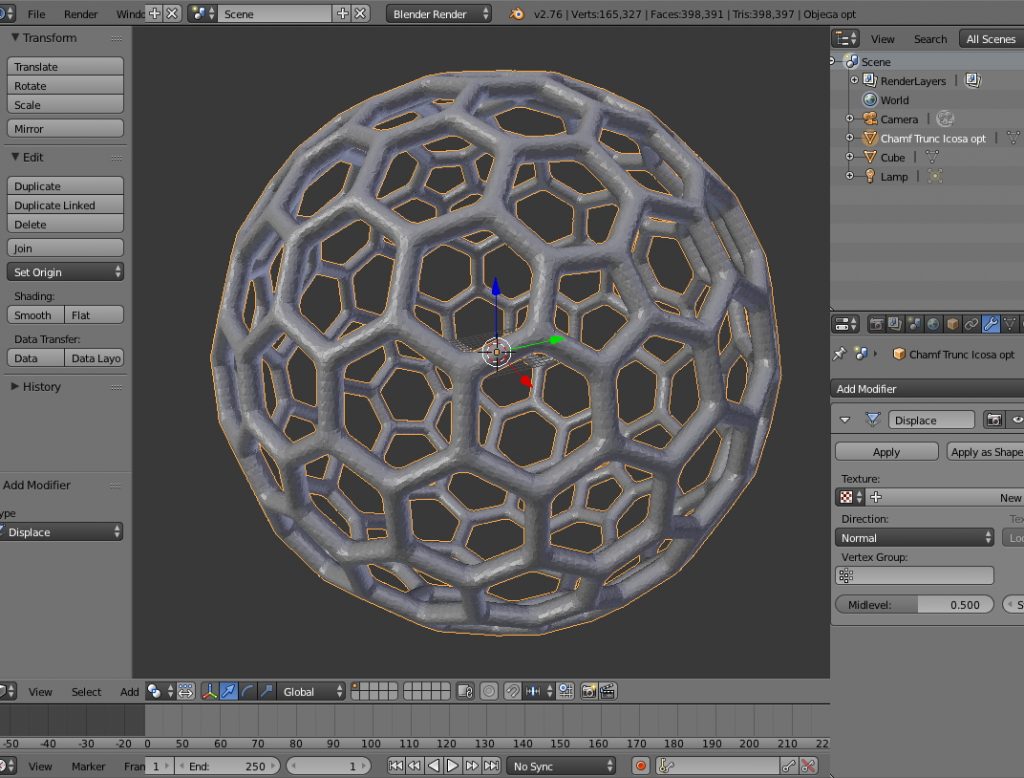
We’ll use our delicate wireframe model Polyornament – Chamfered Truncated Icosahedron as an example of something to thicken:

We could reconstruct this model from the ground up and create a thicker wireframe, but sometimes going back to the beginning is not an option, or is more difficult than just implementing the thickening step. By using Blender, we can easily thicken the wireframe edges of the existing model without remodeling from the beginning. Load the 3D model into Blender using File < Import < STL.
Thicken the model with displacement
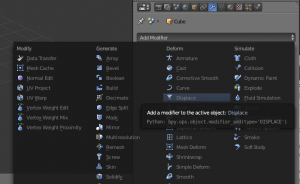
Blender has a LOT of buttons, be we only need one. Select the tiny “Wrench” icon from the middle right menu. If you don’t see this wrench at first, try making your Blender window larger. Then from the Add Modifier menu, choose the Displace option, as shown in this close-up screenshot:
You can control the amound of thickening/thinning offset by changing the Strength parameter in the lower right part of the Displace menu; here we chose Strength=1.5, which results in 150% thicker wireframes. Strength=0 would cause no change in thickness, and negative values of Strength would cause the wireframes to be thinner.

Repair if necessary
Although Blender does a good job preserving a watertight, manifold mesh when thickening or thinning models, in our case the original model had a bit of less-than-ideal geometry that got amplified in the thickening step, so we had to run the model through the cloud repair service MakePrintable to fix the mesh (and for a full primer, check out our MakePrintable Tutorial Tuesday):

Blender with MakePrintable is the heaviest tool combination you can use for thickening or thinning models, and can sometimes succeed when other tools can not. For example, Meshmixer can sometimes do both the thickening and repair steps above, but in the case of our example model, Meshmixer either crashed or was unable to perform these operations successfully.
Do you have another pathway for thickening or thinning models that you want to share? Or is there another modeling technique you want to hear about in a future Tutorial Tuesday? Let us know!
——————
As an Amazon Associate we earn from qualifying purchases, so if you’ve got something you need to pick up anyway, going to Amazon through this link will help us keep Hacktastic running. Thanks! :)

Leave a Reply