
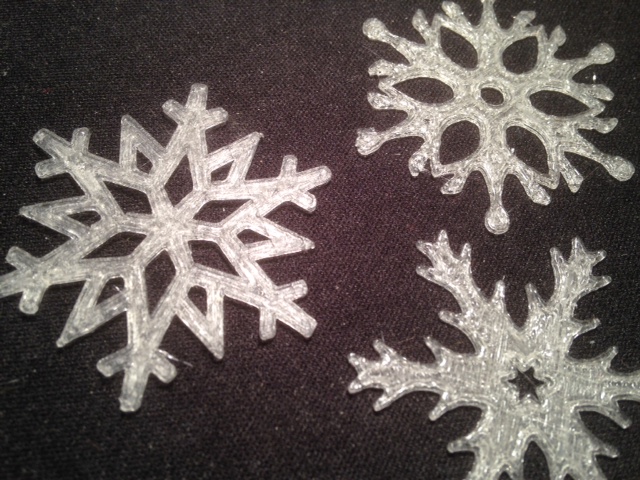
Last winter we made 3D-printed snowflakes by starting from an image of 16 snowflake icons, converting to bitmap with Inkscape, and then extruding in Tinkercad. You can read about how to do that on the old MakerHome blog, Day 70 and Day 71, or download the models from Thingiverse as ornaments or plain old flakes. The reason we made 3D snowflake models that way last year is because that was all we knew how to do. I’m somewhat wiser now, and one whole year older, and this time I’m ready to break out the OpenSCAD and go for an infinite collection of unique snowflakes. Here are three of them:
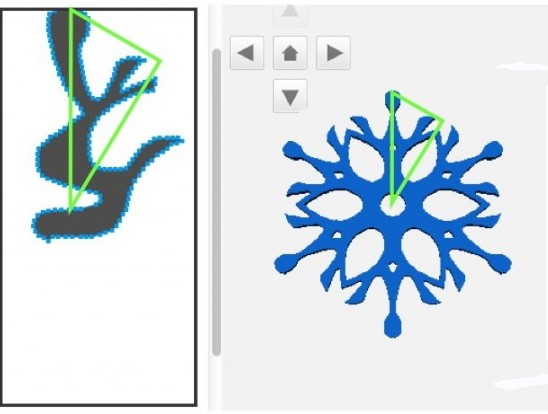
To make one of these, sketch one-twelfth of your desired snowflake in the Thingiverse Customizer link below. The code then crops, mirrors, and rotates your drawing to make a full snowflake pattern. Try it out yourself, and post a “make” of your unique design if you print one. You’ll be surprised at the crap you can get away with drawing; even a random squiggle can result in a seriously beautiful snowflake after the crop-and-rotate procedure. Give it a try! Just keep your eye on on the green triangle area (which you’ll have to imagine; it doesn’t actually appear in the Customizer).
Create your own unique 3D-printable snowflake:
Customizable Cut Snowflake model on Thingiverse
This snowflake design mimics what you do when you cut out a paper snowflake from folded paper. Within the Customizer, whatever you draw will first get cropped by a 30-degree triangle as shown below on the left. Then that pattern is mirrored across the vertical axis and the original and the mirrored designs are then copied, rotated, and pasted in 60-degree increments to fill up a circular area. Here’s a picture that shows how what you draw turns into a 6-fold symmetric snowflake:
 Anything you draw outside of the green triangle will be cropped out. Here’s a more extreme example of that:

And another example. If you don’t like what you get the first time, just draw again. It’s pretty fast to render, so you can try out a lot of designs. However if you see something you like, be sure to save it. It’s very difficult to make anywhere near the same pattern twice!

Here’s the beginning of the OpenSCAD code that makes the design from the drawing. The code makes use of the astoundingly awesome “draw_polygon” feature on the Thingiverse Customizer, which allows the user to actually trace out a drawing which is then captured as a sequence of pairs of values that can be read in OpenSCAD’s polygon command. In the default sketch is a short list I typed in myself, but when you make a sketch the output will be a much longer list of coordinates.

The “snowflake” module takes the piece you drew, mirrors it, and then rotates and pastes six copies of those two patterns around a point. The draw_polygon drawing window is 1mm x 1mm by default, and the “scale” command scales that up to the user’s desired diameter.

The piece itself is formed by drawing a polygon from the points and path-vertex orders specified in the draw_polygon data, extruding that into a 3D object, and intersecting that object with a 30-degree wedge to crop out anything beyond the triangular drawing area.

The code itself took less than an hour to figure out once we had the idea to make a snowflake cutting design. However what works in OpenSCAD doesn’t always work in the Customizer, so it took another couple of hours to figure out that to make things work in the Customizer we had to use linear_extrude before taking the intersection, that the drawing window didn’t work exactly like we thought it did, and so on. In the end, however, this code is really fast on the Customizer and it is very easy to quickly try out a lot of drawings. The snowflakes themselves print up in just a minute or two; make sure to turn off your raft and that your build platform is level.
It is worth pointing out that snowflakes have SIX-fold symmetry, not eight-fold. This makes them more difficult to cut properly out of folded paper, but it is possible; see this Instructables for a great example. The key is in the folding. The surprise is in the cutting!
UPDATE: I put in a toggle for adding a hanging loop to the top of your snowflake, and also noticed that you can draw a shape inside a shape in the Customizer draw_polygon window and it will actually remove the second shape from the first! Here is an example illustrating both of these things; note the hole at the top and the three disjoint white regions drawn within the black region:

And here’s what it looks like printed out. One more snowflake down, still infinitely many to go…

——————
As an Amazon Associate we earn from qualifying purchases, so if you’ve got something you need to pick up anyway, going to Amazon through this link will help us keep Hacktastic running. Thanks! :)


Hi Laura,
This looks like a really cool project. I write on behalf of 3D Printshow: an international series of technology events, and I’m interested in developing some collaborative installation work – all of which to be 3D printed.
Could you drop me an email on the address below? We’re producing our 2nd edition of 3D Printshow New York in April next year, and I’d love to connect to discuss a potential project.
Best,
Faith Robinson
Content Curator, 3D Printshow
faith[at]3dprintshow[dot]com