
It’s time for another design walkthrough. This time we’ll be making polyhedral covers for LED string-lights. We made them for the holidays, so that the string of lights would effectively be the ornaments on our tree. Each “ornament” is a hollowed-out instellated Archimedean solid or dual. And yes I did just make up the word “instellated.” More on that later.
Let’s begin at the end: If you want to tinker with the ornaments and modify the size of the holes at their bases to better fit your particular strings of LED lights, you can do so at the following Tinkercad links.
Tinkercad link for polyhedra ornaments: Polyornaments 1
More will be added here: Polyornaments 2

If you just want to download the finished models then head over to Thingiverse and drop us a “like.”
Thingiverse link for polyhedra ornaments: Polyhedral Light String Ornaments
Here’s what the ornaments look like when printed and strung on our holiday tree. Each polyhedron is snapped onto an LED string light, so they are lit from inside. They look amazing in person but are difficult to photograph well, at least with my phone and with me taking the photographs. You’ll just have to trust me and print them out to see for yourself. From left to right and top to bottom, these are ornaments based on the following polyhedra: the Great Rhombicosidodecahedron, Snub Cube, Deltoidal Hexecontahedron (from the second of the Tinkercad links), and Disdyakis Dodecahedron.

Now back to the beginning: How did we make these? Once we have the files, it’s not hard to send them to a 3D printer. But how did we make the files themselves? Since I’m just a hack at 3D design, for me the answer always involves using a chain of software programs, each of which I know how just enough about to get by. In this case my design chain included Mathematica, TopMod, Tinkercad, and MakerBot Desktop:
1. Get data from the PolyhedronData package in Mathematica.
2. Scale the model using Tinkercad.
3. Modify mesh and Stellate Extrude in TopMod.
4. Hollow out and add a hole in Tinkercad.
5. Level and print with MakerBot Desktop.
Can you scale a model in Mathematica or TopMod and then skip Step 2? Probably, although I knew how to do it in Tinkercad so I went with that. Can you hollow out objects and add holes in TopMod? Maybe, with rind modeling, although I’m not sure, and in any case, I don’t know how (yet). If you don’t own Mathematica (it’s one of the only tools I use that isn’t free), can you obtain the polyhedron data another way? Sure, you can get vertex coordinates from Wikipedia and then construct the polyhedron yourself in OpenSCAD. Can you make the whole design in Rhino or Blender because you are awesome? If you aren’t me then maybe yes! My design chain above is just one of many paths you could take to make polyhedral ornaments. Based on what you’re familiar with, you might swap out different steps with your own go-to methods. The key to designing 3D models is having a toolbox of small steps that you can chain together to get where you need to go. In this and the next few blog posts we’ll work our way through the five-step polyhedral-ornament-making chain above. Let’s begin the begin:
Step 1. Get data from the PolyhedronData package in Mathematica.
Mathematica’s PolyhedronData package contains vertex and graphics information for many exotic classes of polyhedra, including the classic Archimedean solids and their duals, the Catalan solids. Last year on the old MakerHome blog, we printed lots of polyhedra that started with data from this Mathematica package, including an Icosahedron Jawbreaker Trap (Day 32), various meshes of a Gyroelongated Pentagonal Bicupola (Day 192) and a full set of Stylized Catalan Wireframes (Day 212). The PolyhedronData package is a built-in part of Mathematica. You can see its full functionality at its package documentation page, but for exporting simple models you’ll just need to know the following basic commands:
PolyhedronData["Classes"] |
List of available polyhedral classes |
PolyhedronData["Name_of_Class"] |
List of available polyhedra in a given class |
PolyhedronData["Name_of_Polyhedron"] |
Obtain a 3D graphics object of a polyhedron |
After each command just press Shift-Return (or Enter) to run the command and obtain the desired output. Luckily, the 3D graphics objects that are output by PolyhedronData are exportable to STL files that are suitable for 3D printing. This isn’t always the case, even when STL export is possible; Mathematica is great at rendering mathematical objects for viewing on a screen, but those graphics objects do not always produce good 3D-printing meshes. For example, the Gabriel’s Horn model we printed for JMU 3-SPACE was made with Mathematica’s RevolutionPlot3D, whose exported STL file was an infinitely thin surface that had to be solidified in MeshLab. If a Mathematica 3D graphics object is exportable to STL then you can export it with the following command:
Export["Name_of_file.stl",%] |
Export the previous output into an STL file |
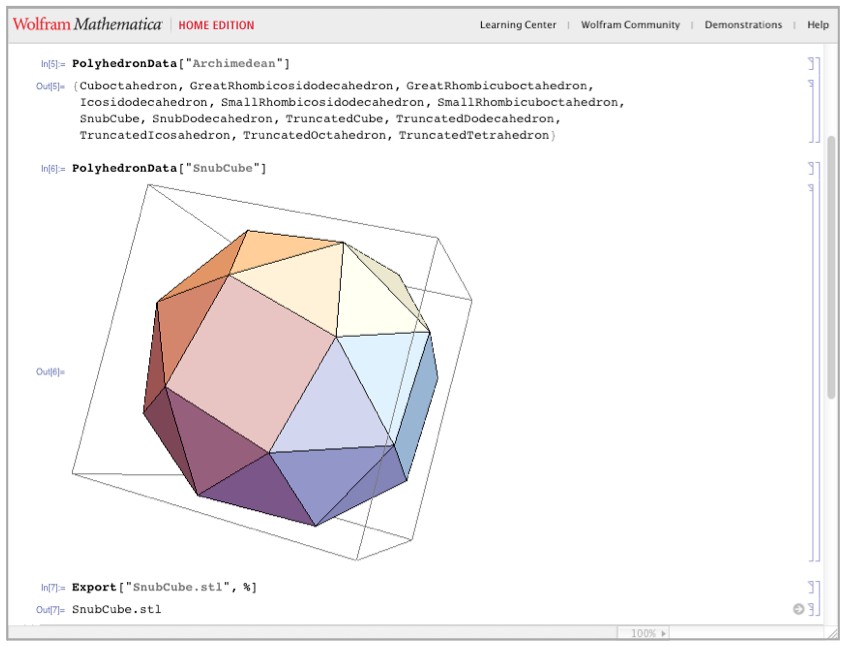
The “%” in the code above refers to the immediately previous object that was output by Mathematica. This is not necessarily the same as whatever is immediately previous to the “Export” line on the screen, but refers to the output of whatever line of code was run immediately before running the “Export” line. In Mathematica you can run the lines of code in whichever order you like, as many times as you like, by using Shift-Return/Enter on each individual line. If you don’t like using “%” then you could also give your polyhedron’s graphic output a name (just put “the_name =” before the PolyhedronData code) and then use that name in the place of “%” in the Export code. By default, Mathematica will save the STL file to the top-level of your user folder. Here’s what exporting a Mathematica STL file for the Snub Cube looks like in action:

In case you want to play along with this design process but don’t have Mathematica, here is a link to the Snub Cube STL file exported by the process above.
Snub Cube exported from Mathematica: http://www.geekhaus.com/hacktastic_files/SnubCube.stl
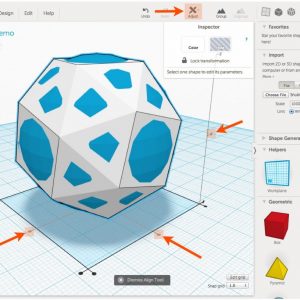
At this point the exported STL file looks like this (opened in MeshLab):

In this picture we’ve used some MeshLab tool buttons to make the mesh lines visible and to measure across the diameter of the object. Notice that the square face at the front of this snub cube has been subdivided into two triangles; this is because an STL file is literally a list of triangles in three-dimensional space. Here’s just one of the 44 triangles in this particular model, straight from the STL file, made up of three sets of (x,y,z) coordinates in three-dimensional space:
 outer loop
 vertex -1.142614e+00 -6.212264e-01 3.377540e-01
 vertex -1.142614e+00 -3.377540e-01 -6.212264e-01
 vertex -6.212264e-01 -1.142614e+00 -3.377540e-01
 endloop
From the coordinates we can see that this is a very tiny triangle. In fact, according to the measuring tool, the distance across the diameter of our current Snub Cube model is just over 2.58 millimeters. That is very small! We’ll handle these two issues in Step 2 and Step 3, in the next two blog posts…
——————
As an Amazon Associate we earn from qualifying purchases, so if you’ve got something you need to pick up anyway, going to Amazon through this link will help us keep Hacktastic running. Thanks! :)

Leave a Reply