
This post was written by 11-year-old Calvin Riley, with only minimal editing and help from his mom, mathgrrl.
Recently, we unboxed the Ultimaker 2Go and did a first test print on the machine. This post will walk you through what it was like to use this printer.
But what this post is really about is that when you are 3D printing something, errors happen. A lot. Sometimes those errors are from your design, and sometimes they are from the filament or something you forgot when printing. We had all of these kinds of errors happen to us. Here’s how it went.
Unboxing
The printer was much smaller than I thought it was going to be! Here is the printer when we first took the top of the box off:

This printer was a demo model from Ultimaker that had already been used before, so there was already a spool on the back. We thought it was cool that the printer is able to be put away with the spool still on. The packaging is nice and the box is a good size to make a stand for the printer after you take it out of the box.
Two years ago we unboxed a Replicator Mini. Here are both printers next to each other. The size difference is substantial. The Ultimaker 2Go is sooooo tiny! Although the Ultimaker is smaller, its build plate is larger than the one on the Mini.

First Print!
We decided to 3D print a stand that I designed in Tinkercad, because I have a ball of Lapis Lazuli that needs to be in a holder or it might roll around and maybe break. Here is what the design looks like:

We tried to print this as soon as we got the Ultimaker out of the box. After a couple of minutes of printing, the legs started to come off of the build plate. We canceled the print and tried to figure out the problem. Here is what the pieces looked like:

The legs didn’t stick to the platform because we hadn’t put glue or tape on the build plate! We were used to a regular-sized Ultimaker, which has a heated build plate that helps the print sort of melt onto the platform so that it sticks better. The Ultimaker 2Go is pretty much just a tinier version of the Ultimaker 2, but it doesn’t have a heated build platform. We put some glue stick onto the platform to help our print stick:

Try Again…
We printed again with the glue on the platform and it worked perfectly until it started printing the bowl, and it started printing in the air. We canceled again to see what was going on. Here’s what it looked like just before we canceled:

We thought at first that maybe it needed supports? If supports were the problem then the print would have been saggy – but for us, plastic was just going everywhere! We looked at the Cura file in Layer View and saw a big chunk missing. What?

We looked at the model in Tinkercad and it looked fine. Then we ungrouped the model and noticed that the ball hole in the middle and the ball for the physical holder were both the same height from the platform. They were both 36.44 millimeters up, as you can see in these screenshots:


Because the hole and the outside ball were both the same height off the ground, the bottom of the bowl was very, very thin. It was so small that the nozzle couldn’t print it. To fix this, we moved the hole-ball up 2 millimeters in our Tinkercad design, to 38.44 millimeters:

… And Again
After we fixed the design problem and printed it again, it looked just fine:

BUT, after we took it off the platform we noticed that one of the legs was broken. In fact, all the legs could be broken with just the touch of a finger.

We decided that it might be something wrong with the filament. Maybe it was old filament. So we switched it with some nicer, newer filament and tried again.
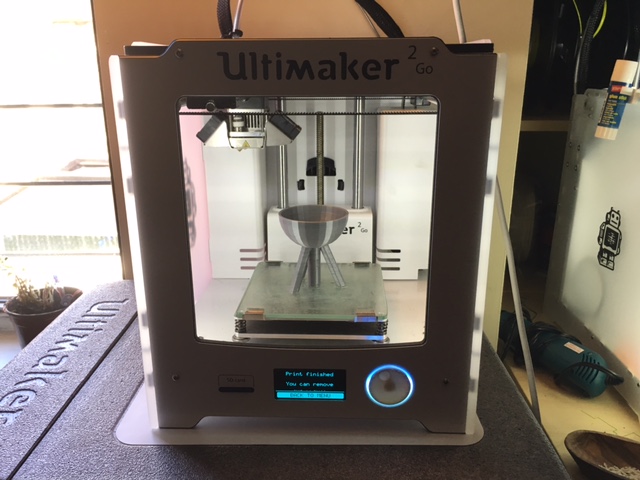
Success!
This is a picture of the middle of the print while it is printing with the new filament…

And here is the finished product!

We tested it for breaks and injuries and it was perfect. Here is a photo of our successful print holding my ball of Lapis Lazuli:

When you are 3D printing, errors happen and you need to know how to handle them. We hope this post helps you figure out how to fix your own errors and not to give up!
——————
As an Amazon Associate we earn from qualifying purchases, so if you’ve got something you need to pick up anyway, going to Amazon through this link will help us keep Hacktastic running. Thanks! :)

Leave a Reply