
Do you suck at sewing? Good, me too
Let me make something very clear: I do not know how to sew. Right now I can sew exactly ONE thing besides “curtains”, and it is the mask that this post is about. So if you’re new to sewing, that is fine. If you want to sew by hand (although that seems like that would be very slow), that’s also fine. In this post I’m going to assume that you know the very basics of operating a sewing machine (load thread and bobbin, sew forwards and backwards in a line, maybe a zig-zag stitch if your machine does that) but no other sewing or crafting knowledge.
When I started trying to learn how to sew a face mask a few months ago, this was my first, awful, attempt:
I mean, it did cover my face. But COVID-19 is a long game and I anticipate having to make a lot of masks for family and friends over the next… months? Years? Sigh. I figured I might as well take the time to figure out how to do it better.
Mask Style
Over the past weeks I’ve iterated mask designs many times, acquired a bunch of sewing supplies, and learned from a lot of online patterns and videos (especially these videos for Unity Point’s Olson Mask, Sweet Red Poppy, and Mimi G Style). I eventually found easy ways to do the things I wanted, while avoiding things that were difficult for an inexperienced sewer such as myself.
The final design has a sewn-in nose wire, elastic loops that go all the way around your head, a filter sewn inside the mask, and minimal exposed seams. It’s also fully washable. The design is reversible, so you can decide which side is the outside after you’re done sewing it, or each time you wash it.
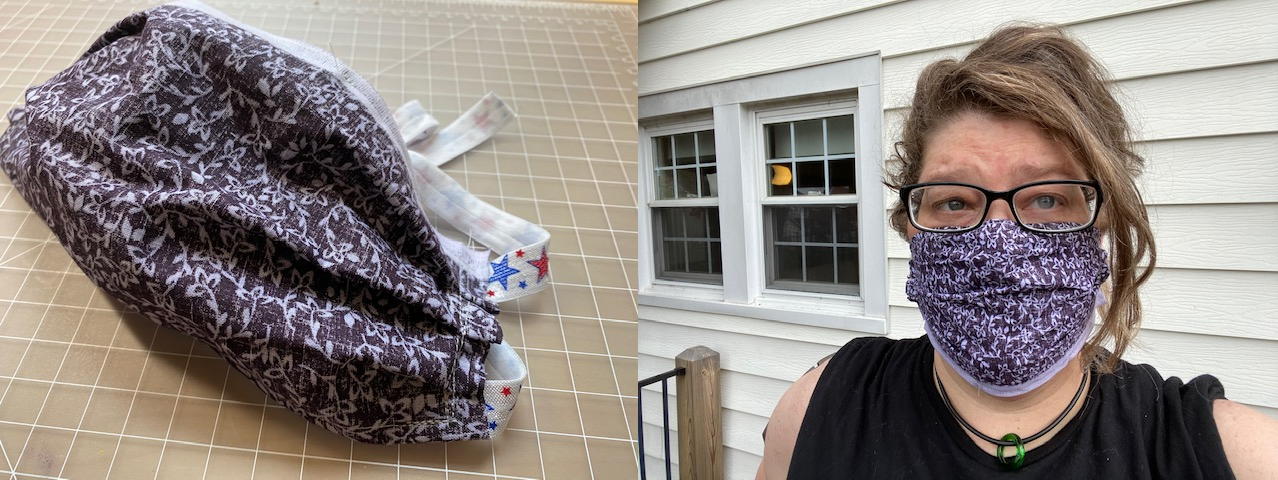
A couple of months ago when the only elastic I could find online was a crazy sampler set, here’s how the final design looked:
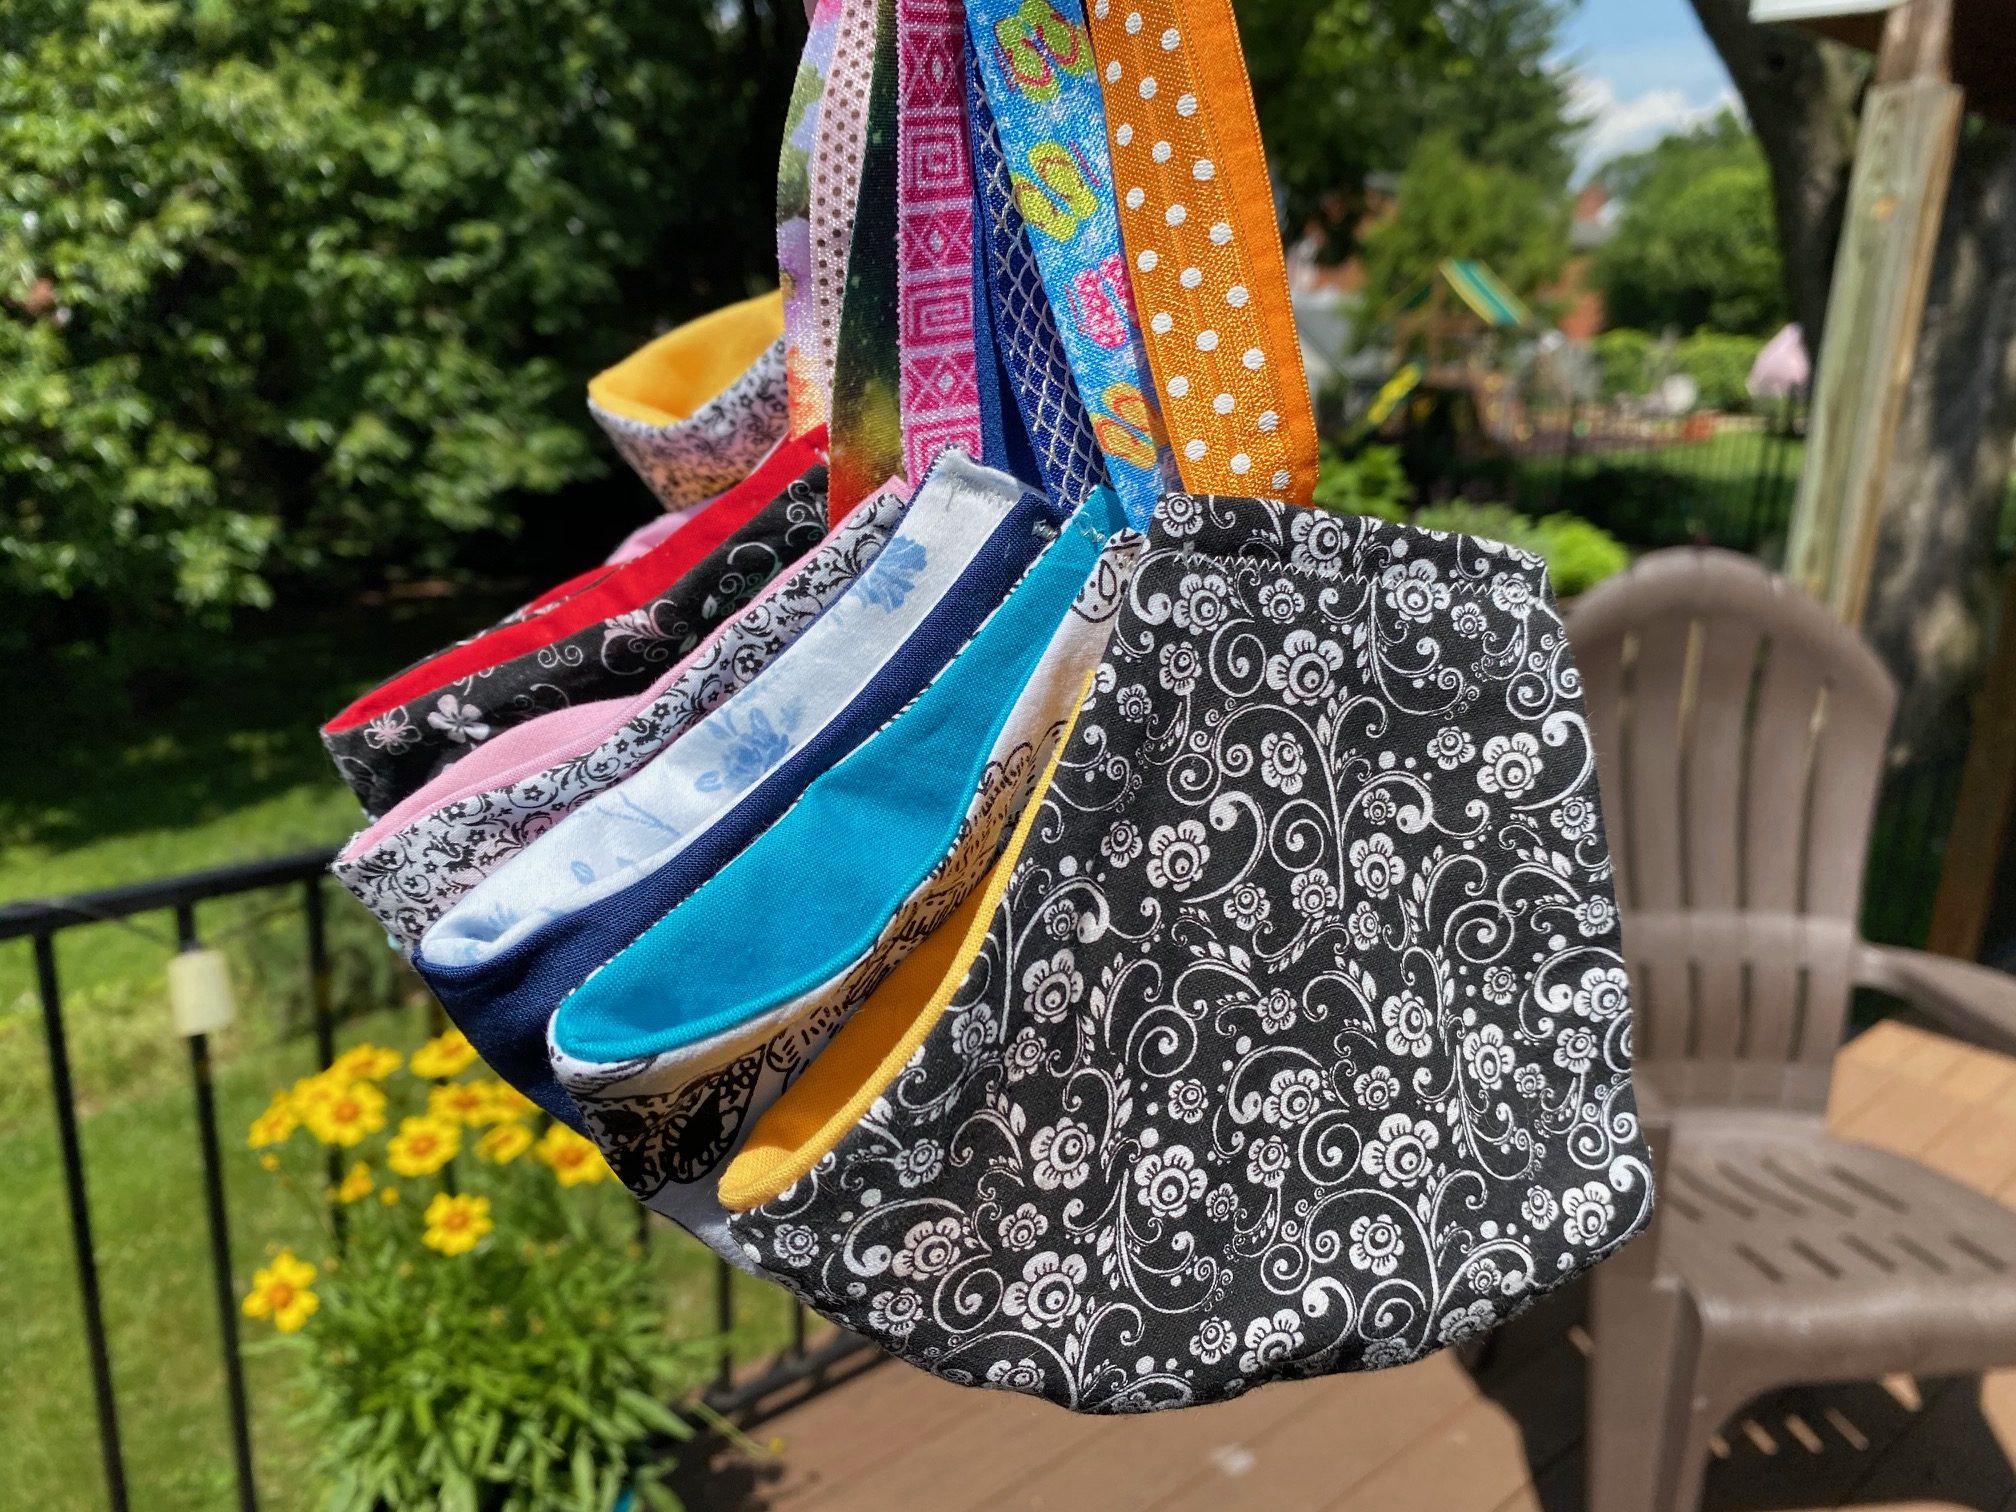
And here’s what the masks look like now that I can get normal elastic, nicer fabric, and a layer of interfacing for stabilization and filtering:

I have to tell you that these masks are NICE. So even if you are good at sewing, maybe you will like this pattern :)
Recommended Materials
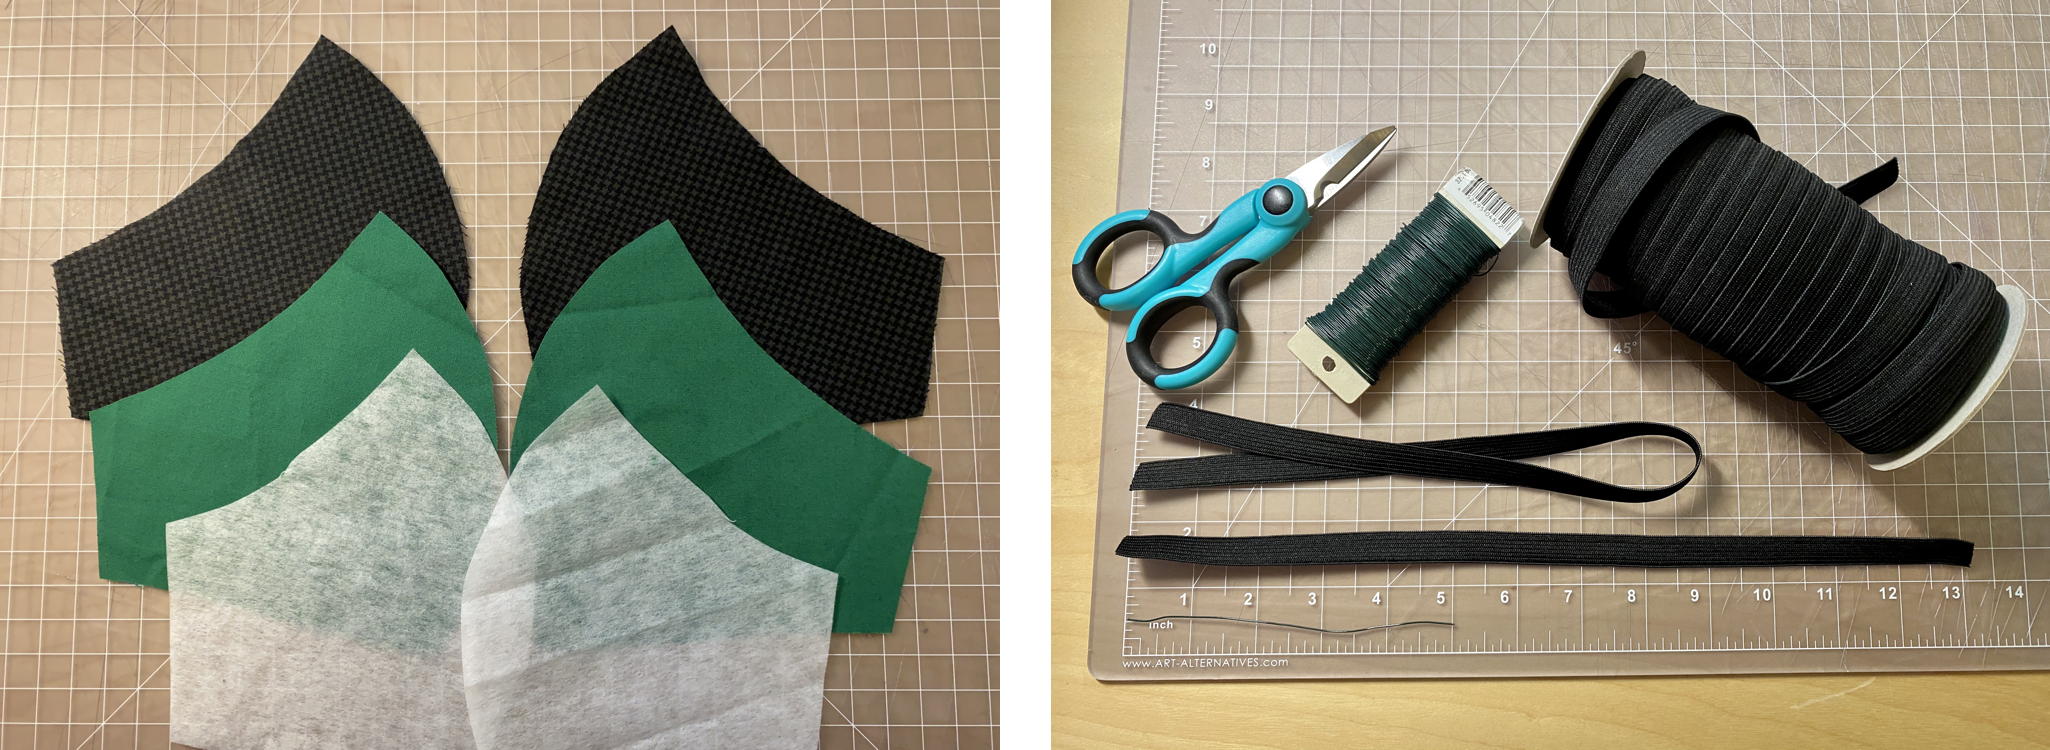
Based on my experience these are some of the materials you might want to acquire for masks, and affiliate links to find them online.
- Quilting cotton: Folks online seem to agree that “quilting cotton” is the right weight and weave-tightness for breathability and reasonable filtering. If you get what’s called a “fat quarter” then you should have enough fabric to make 8 cutouts (each mask needs 2 for the inside and 2 for the outside). Here are some fabrics I found online that are particularly nice, if you want to spend money: Connecting Threads monochrome and Cottonvill color solids. I also recommend the much, much cheaper quilting cotton from the crafting store Joann. I strongly recommend pre-washing any fabric that you use, or else your mask will shrink weirdly in the wash.
- Non-woven interfacing/stabilizer/filter: This helps your mask not crush into your face when you breathe in, and also it provides a breathable filtering layer. I don’t recommend “fusible” or iron-on material because it probably has chemicals or glue in it, and you are going to breathe through it. Both interfacing or stabilizer seem to be okay, as long as it is light and “sew-in”. Non-woven materials are supposed to be good for filtering, so look for that. This stuff is still really hard to find, and there are a lot of different weights and types available. I’m not entirely sure I found the correct thing, but here’s what I ended up using: Pellon 30 Lightweight Non-Woven Sew-In Stabilizer. It’s extremely light and breathable and the resulting mask isn’t too hot when you wear it.
- Elastic: For around-the-head mask styles like this one, I think 1/2″ Knit Band Elastic is the best. Different brands are more/less stretchy so you may need to adjust the lengths given in this pattern depending on the kind of elastic you can find.
- Nose Wire: You can use pretty much any kind of bendable thing for the nose wire, but I recommend this floral-style wire called Darice Paddle Wire.
- Sewing machine: Use what you have or even sew the stitches by hand. If you’re in the market for a sewing machine then I recommend the Singer Heavy Duty or something like that if you can get it. I feel like if you’re not great at sewing then having a heavy duty machine means you can screw up and/or sew messily more often without really bad things happening.
- Sewing supplies: I got this Plliey Sewing Supplies Kit for the pins, but ended up using the seam rippers the most (which tells you about my skills). After stabbing myself with the pins way too many times I got these amazing Plastic Wonder Clips, which are better in absolutely every way, including that they don’t put holes into the fabric or stab you. To cut thread, fabric, and even the nose wire I recommend a pair of Heavy Duty Scissors with Power Notch.
- Essential but dangerous: I absolutely needed to have this Fiskars Rotary Cutter to get through this project. The reason is that it turns out to be really, really hard to cut fabric accurately with scissors. I know that it sounds like it would be easy but it is most definitely not easy, especially if you are cutting through multiple layers of fabric or trying to follow a pattern or a straight line. I find the rotary cutter completely terrifying and someday I may lose part of a finger, but it is indispensible for cutting around patterns and dealing with multiple layers of fabric. I strongly recommend from painful personal experience that you get into the habit of *immediately* retracting the cutter blade *every* time you stop using it.
What to Cut
Here is an image of the pattern that you can print and cut out from paper. Make sure that the 1″ square actually measures one inch after you print it! Here is a downloadable JPG version that should come out the right size if you make sure your printer doesn’t scale it (hopefully): mathgrrl mask pattern.
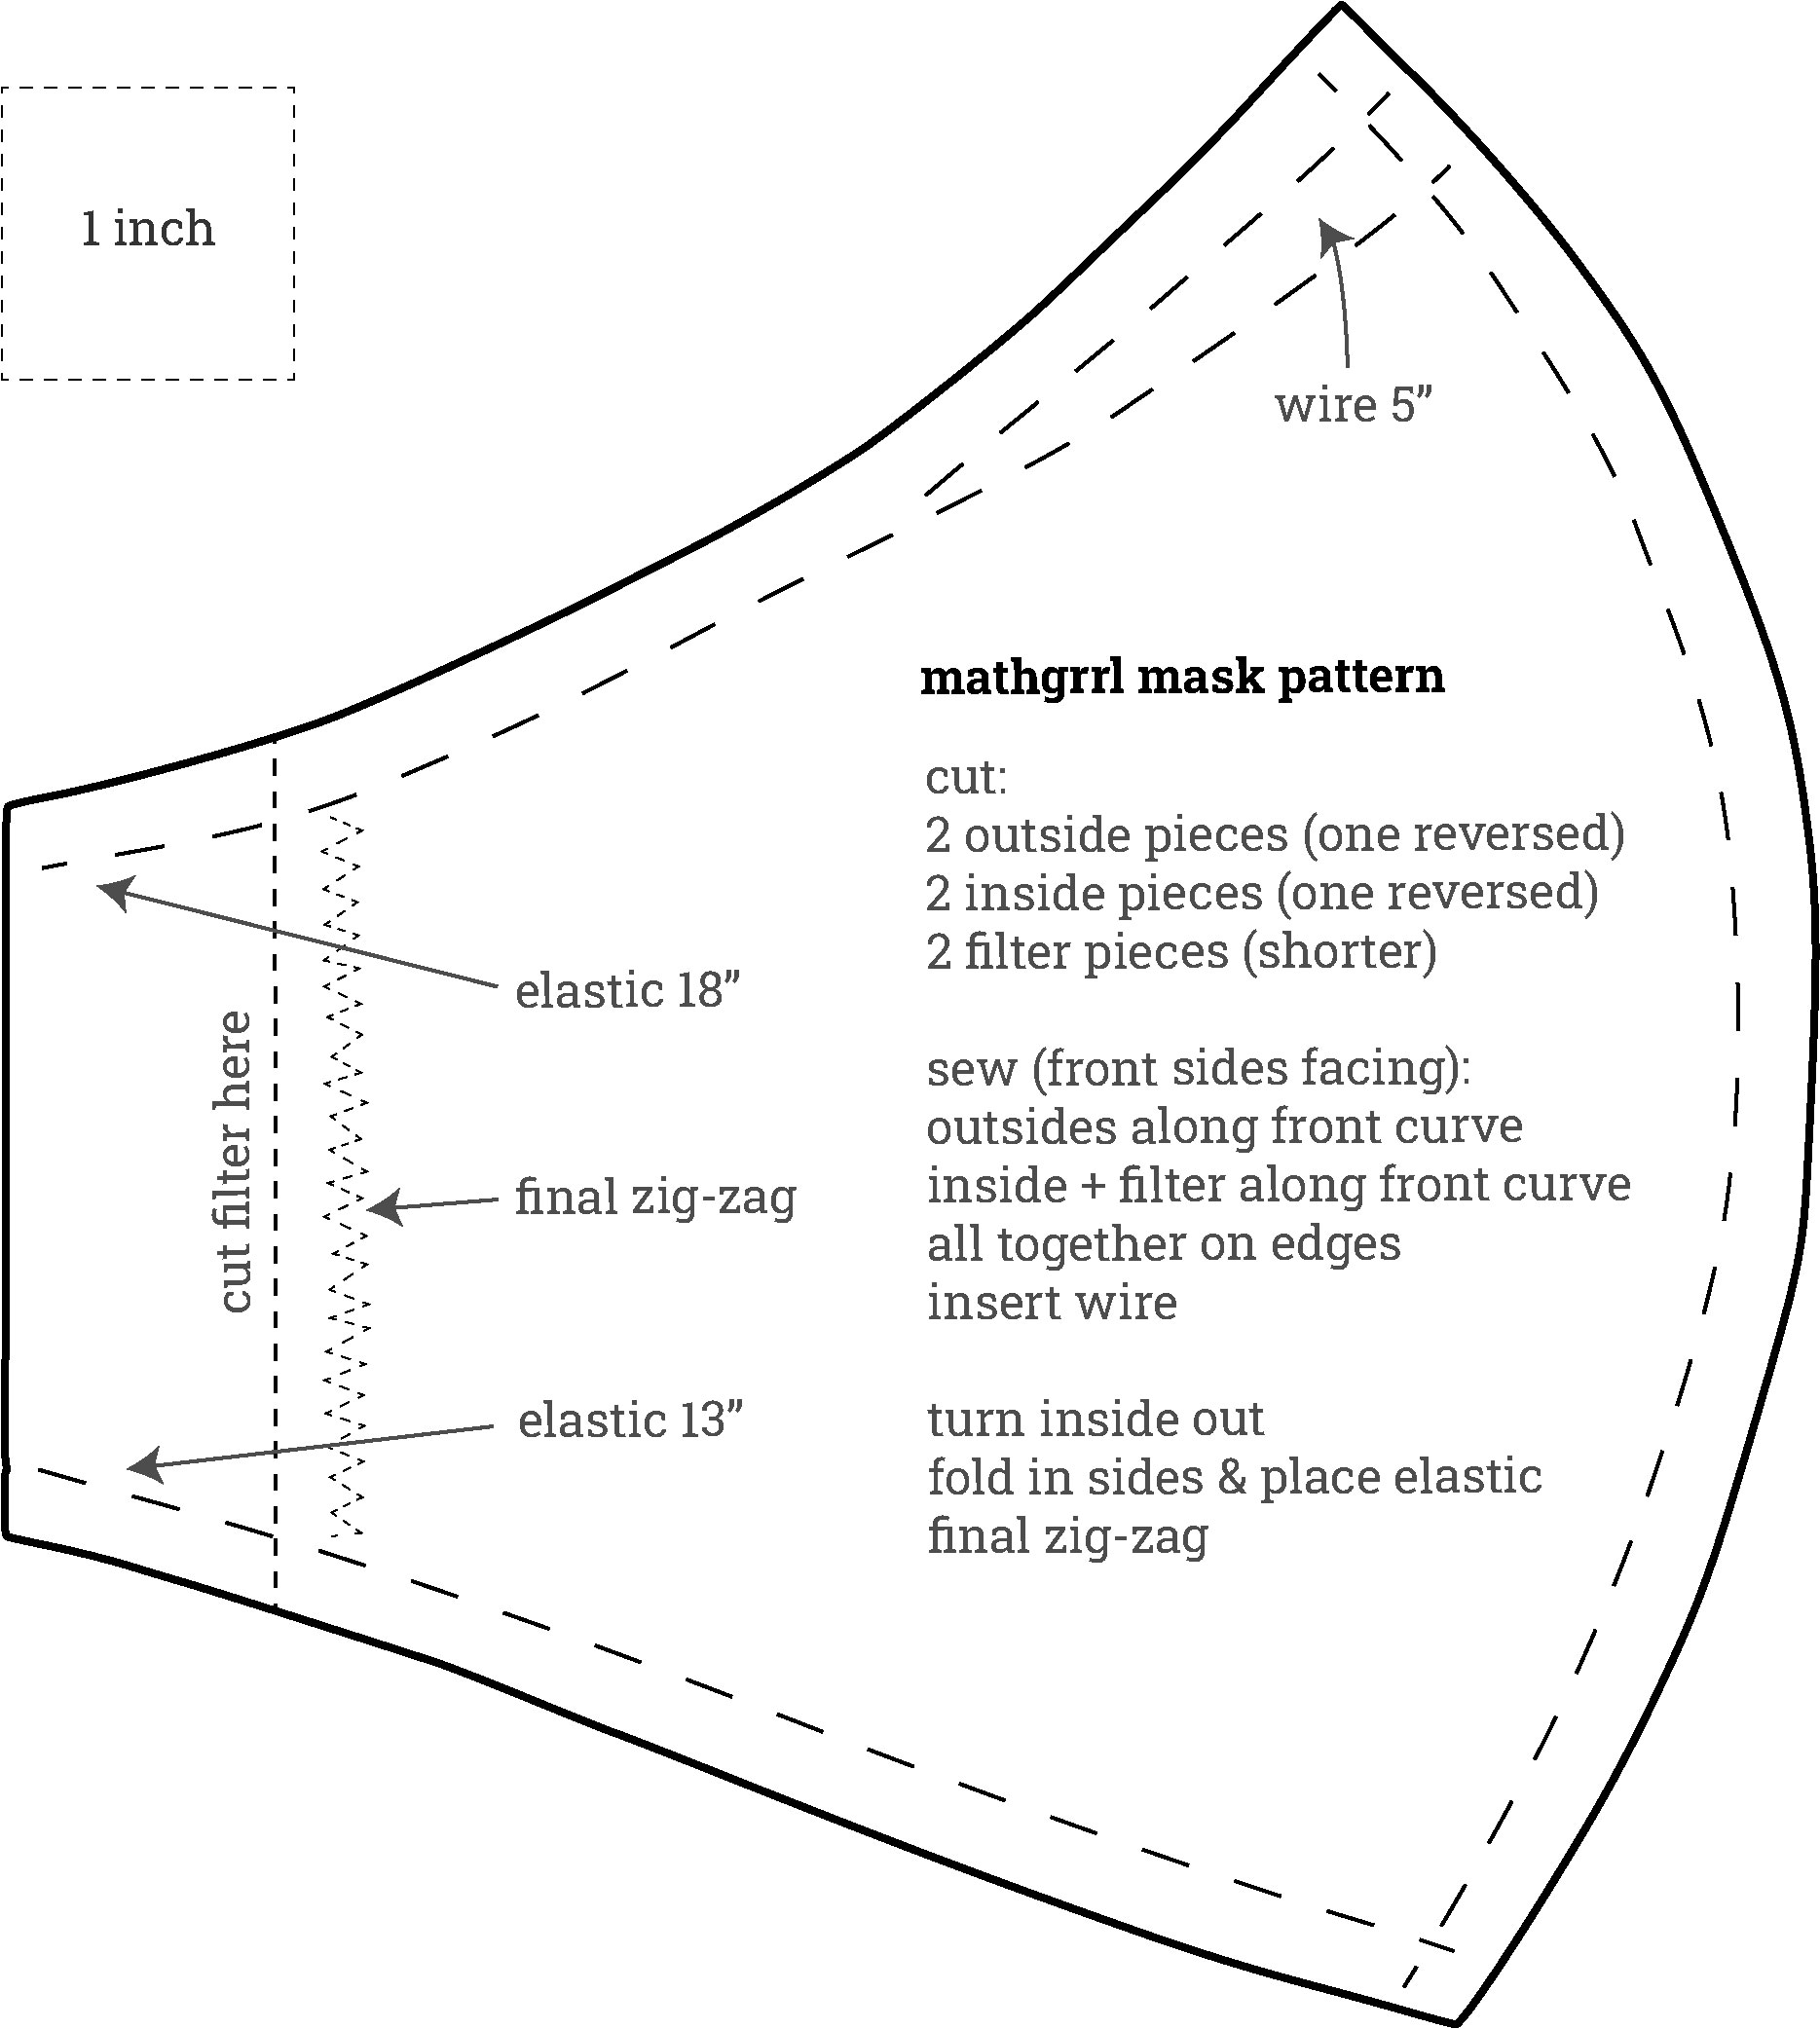
This mask shape is kind of an average of all the shapes that were in the videos I linked to earlier, with some modifications to get a better fit for how I ended up placing the elastic and nose wire. To modify the shape for kids’ masks or smaller faces, just cut the pattern a little smaller all around. For larger or bearded faces, add just a little bit of wiggle room to the bottom side and the front curve. The fit can also be adjusted by changing the lengths of the elastics.
I happen to have access to a 3D printer and knew that I’d need to make a lot of masks, so I also made a more durable 3D printed version of the cutting pattern. Together with the rotary cutter this is a really nice thing to have for bulk mask cutting. You can download the design for free from PrusaPrinters or from Thingiverse.
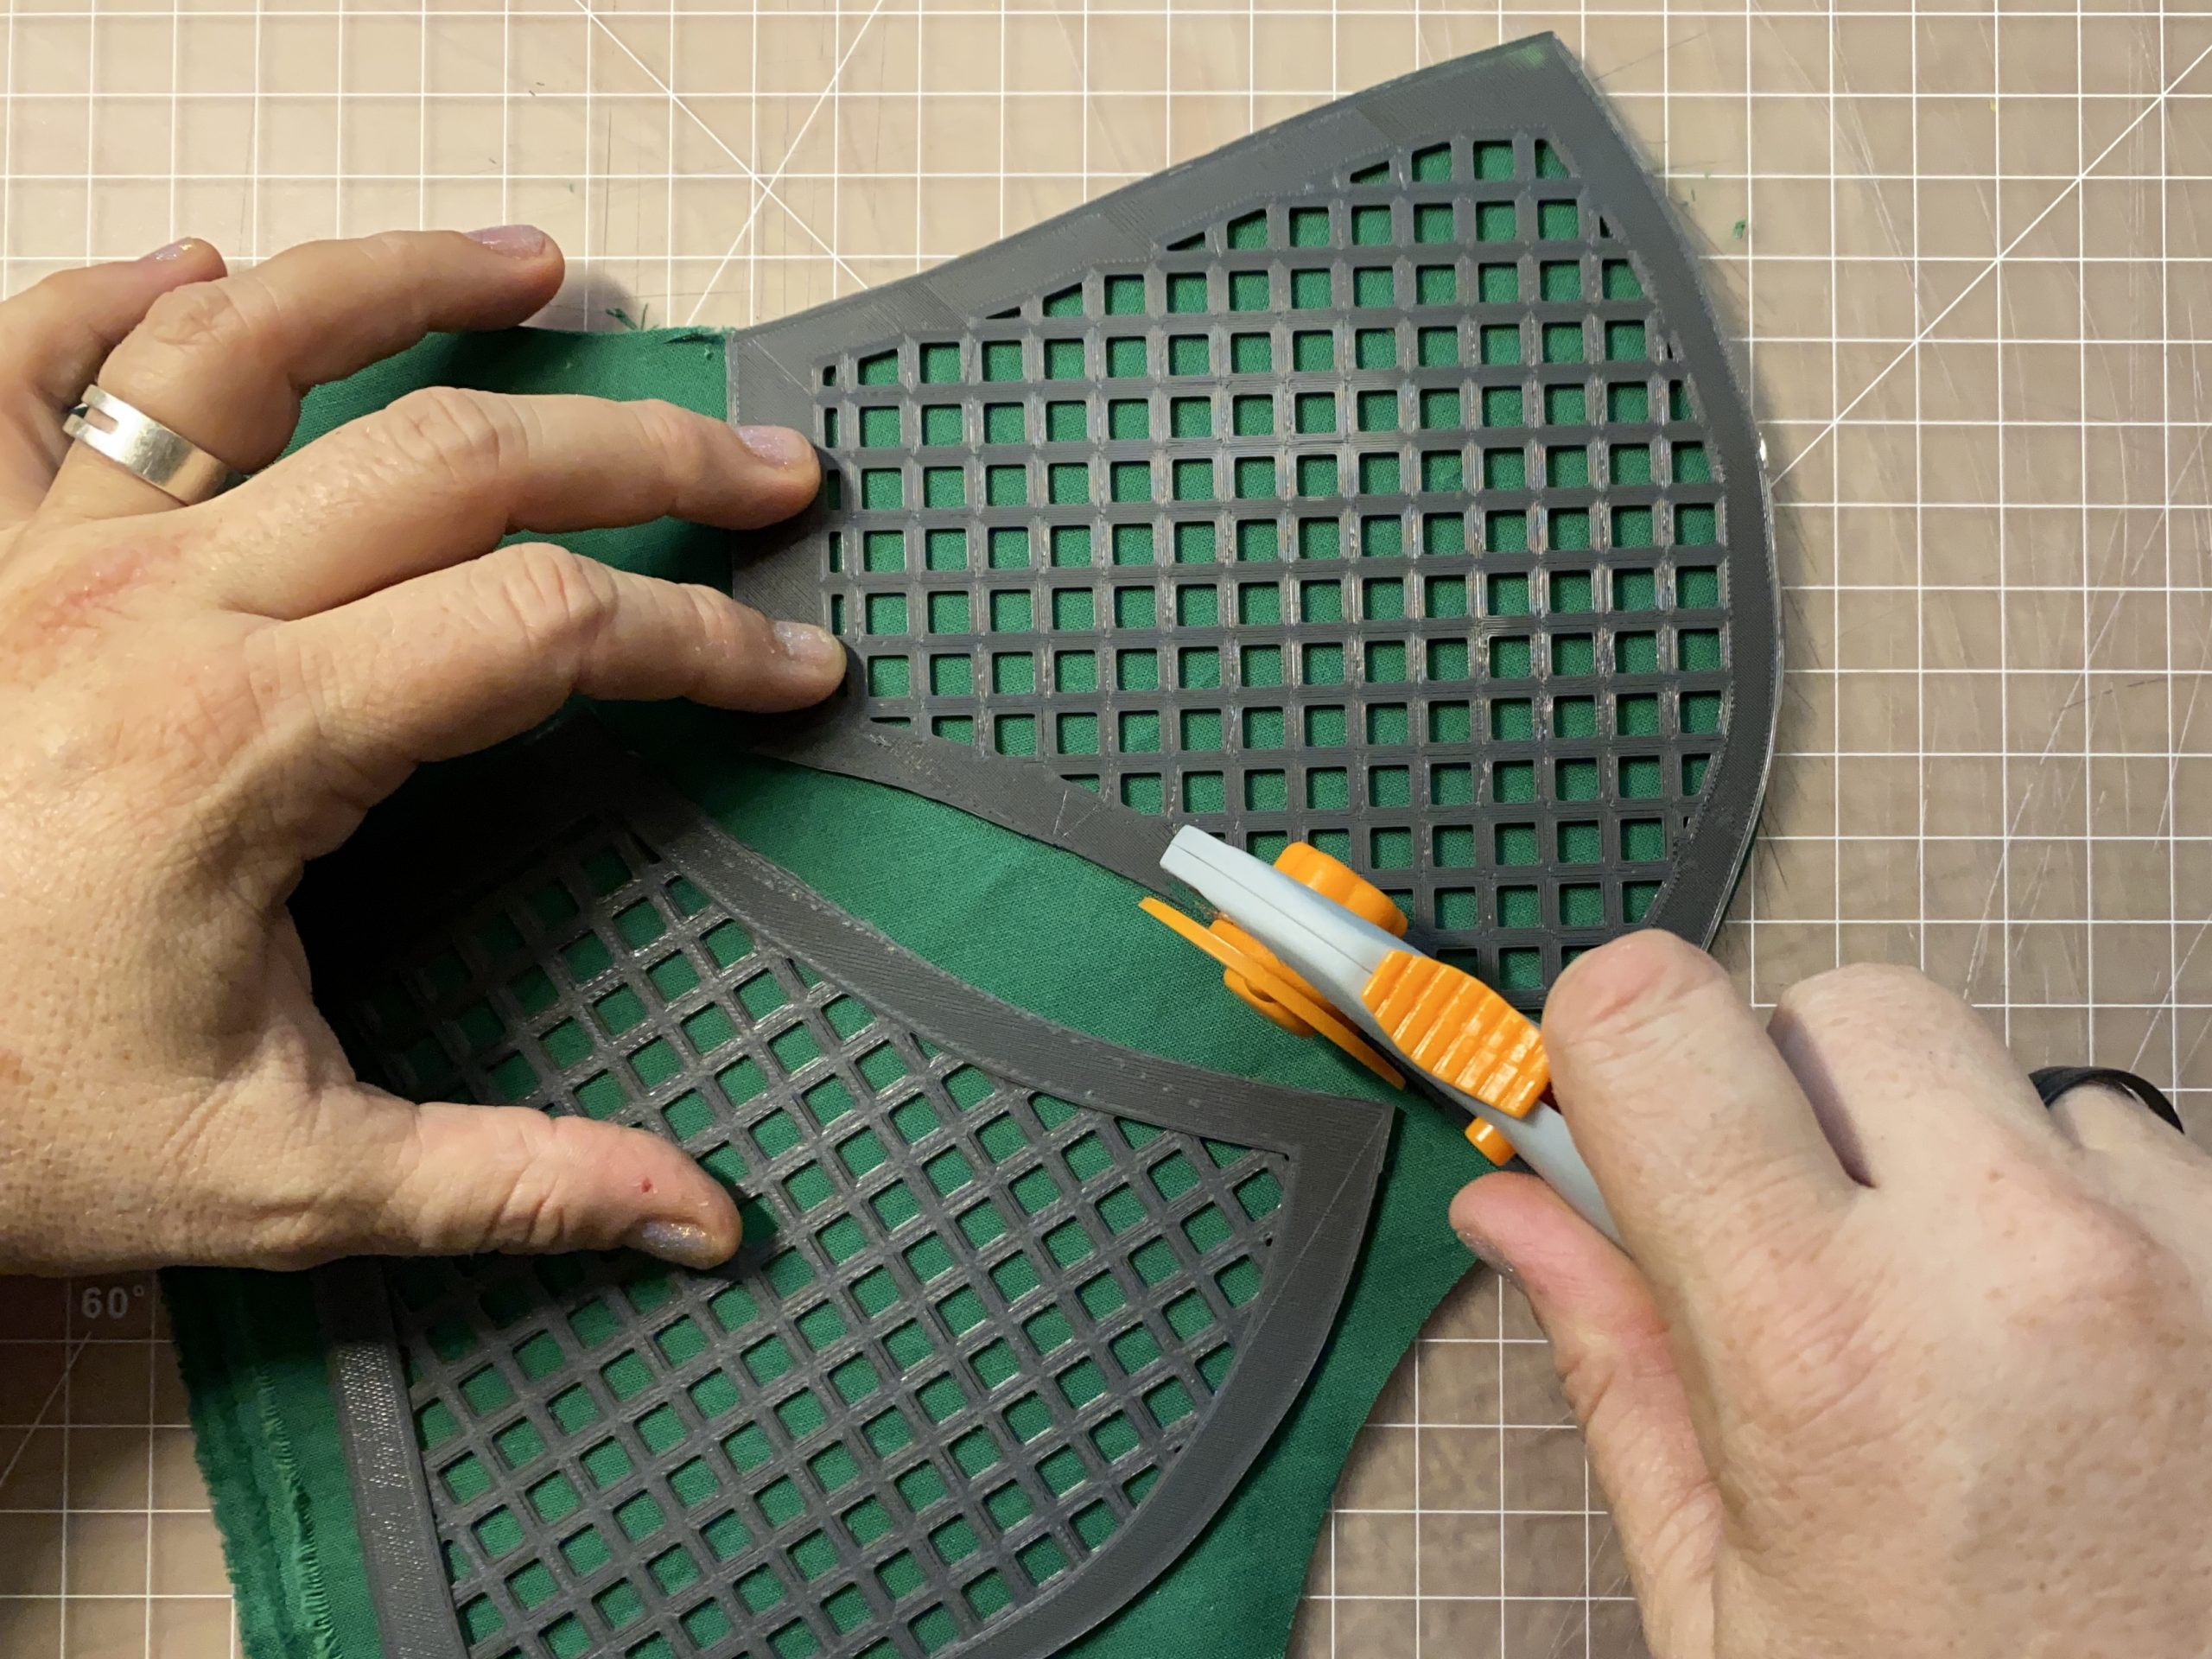
For each mask, you’ll need to cut:
- Two copies of outside material (one the mirror image of the other)
- Two copies of inside material (one the mirror image of the other)
- Two filter pieces (note these are shorter on one end)
- One 5″ piece of floral wire or similar bendy thing
- One 13″ piece and one 18″ piece of elastic (give or take depending on fit and stretchiness of elastic)
Pro tip: If your fabric is folded in half when you cut it, then the mirror-imaging will automatically happen. With a rotary cutter you can cut up to maybe 10 layers of fabric at once, and as long as it is an even number of layers you’ll automatically cut mirror-imaged pairs.
Sew front and back pieces
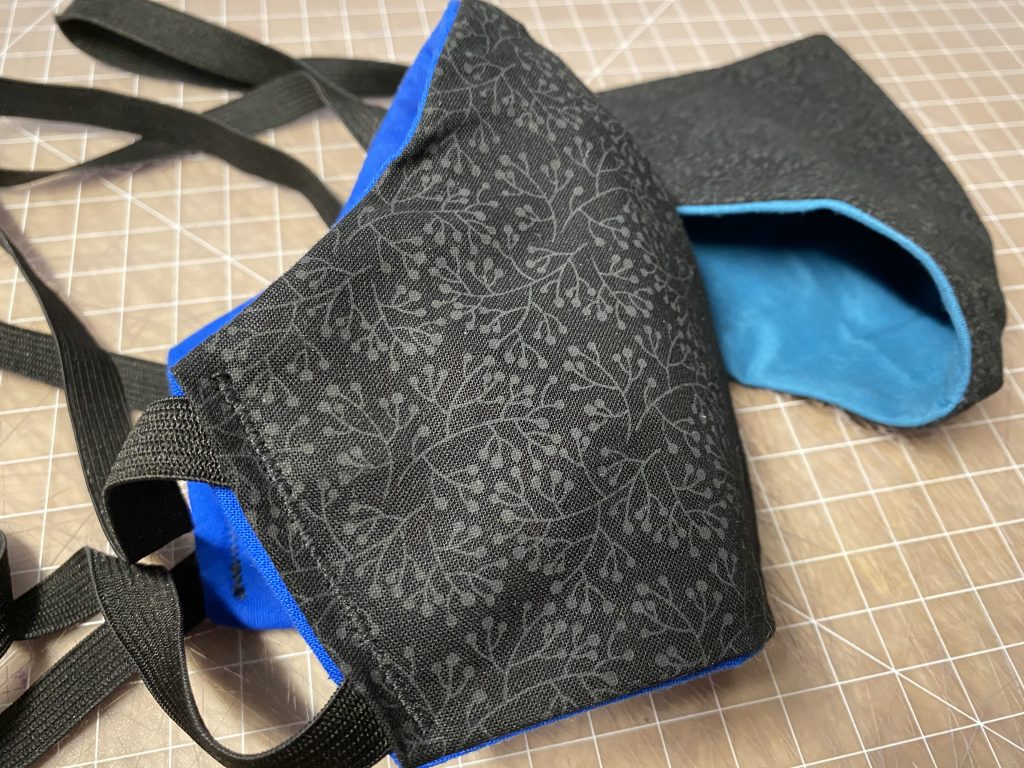
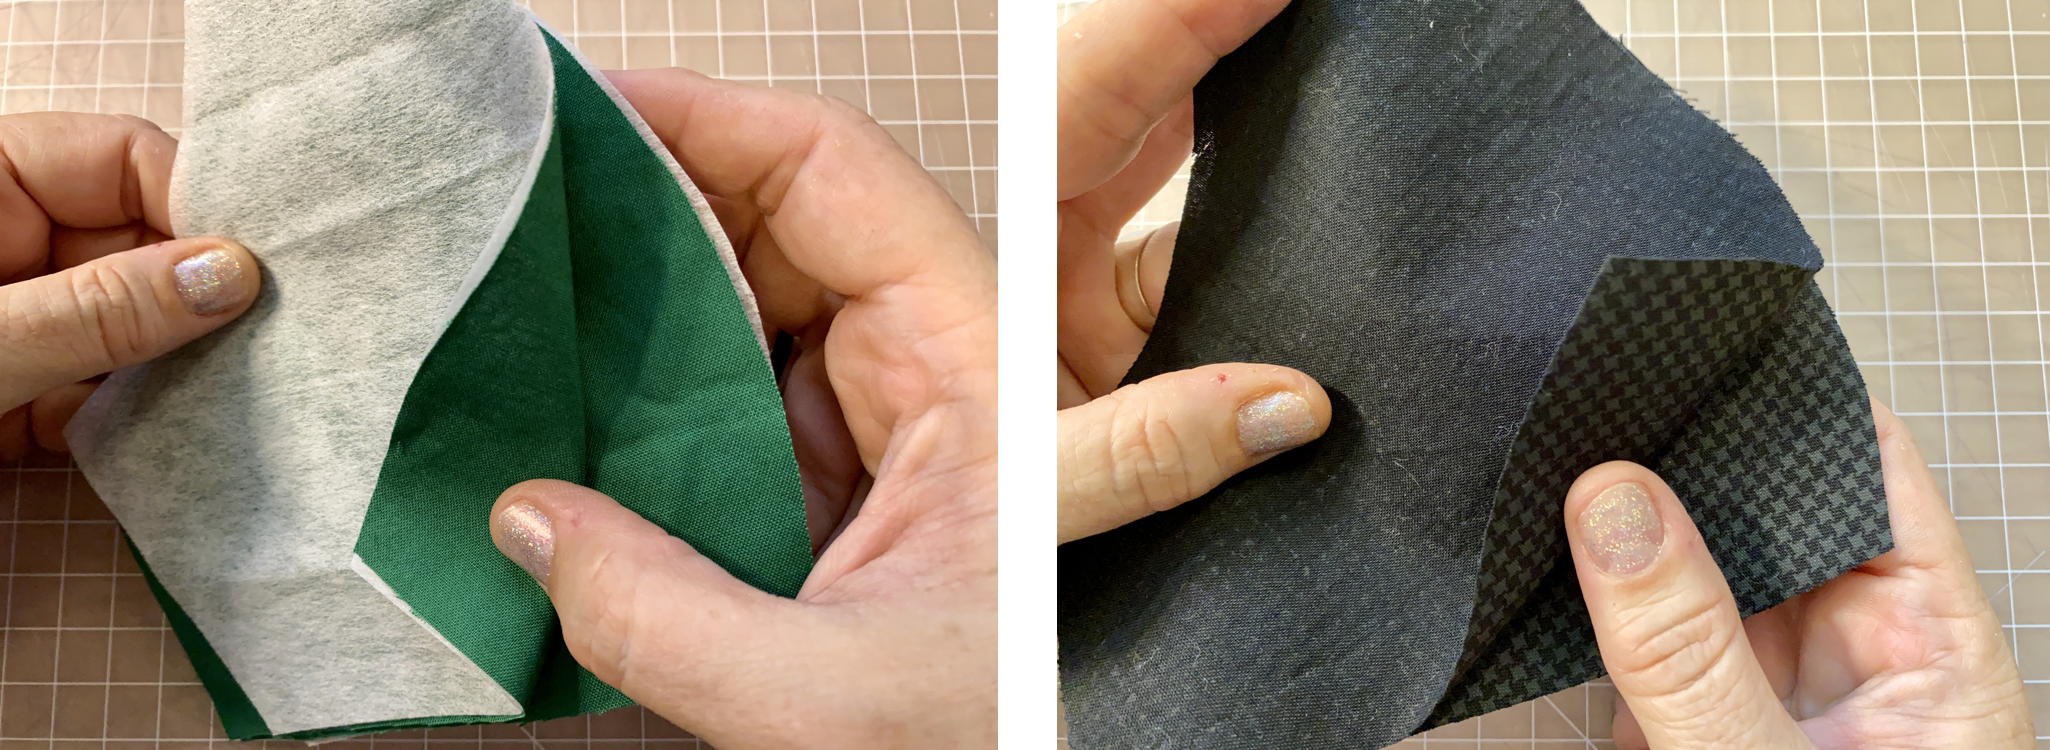
Put the inside and filter pieces together with the filters on the outside as shown in the left photo below, and put the two outside pieces together with front sides facing as shown in the right photo:
Now sew down the front curve on each piece, as shown below. You can trim the front curve a bit or cut notches into it to make it less bulky, if you want. I don’t do that because I like the bulk; I think it helps the mask be stiffer in the front and stay away from your face when you’re wearing it, especially when breathing in.

Sew front and back together
Okay, concentrate: this is the part that is easy to mess up if you’re not paying attention. Put the front and back pieces together so that the nice patterned side of the front piece is touching the nice side (if there is one) of the inside piece, as shown in the left photo below. You’ll be sewing the mask together inside-out, so you need to make sure that front sides are facing in this step. Pin or clip the mask together as shown in the right photo:

The photo below shows what you’re going to sew together. Note that you are NOT going to sew on either of the two sides; leave those open for now. Along the bottom, things are easy; just sew in one line across the entire bottom of the mask. Along the top I’ve drawn a long line with arrows for illustration purposes; sew along this line first. In a moment we’ll go through the rest of the stuff at the top of the mask in more detail, so only sew the long line with the arrows at this point.
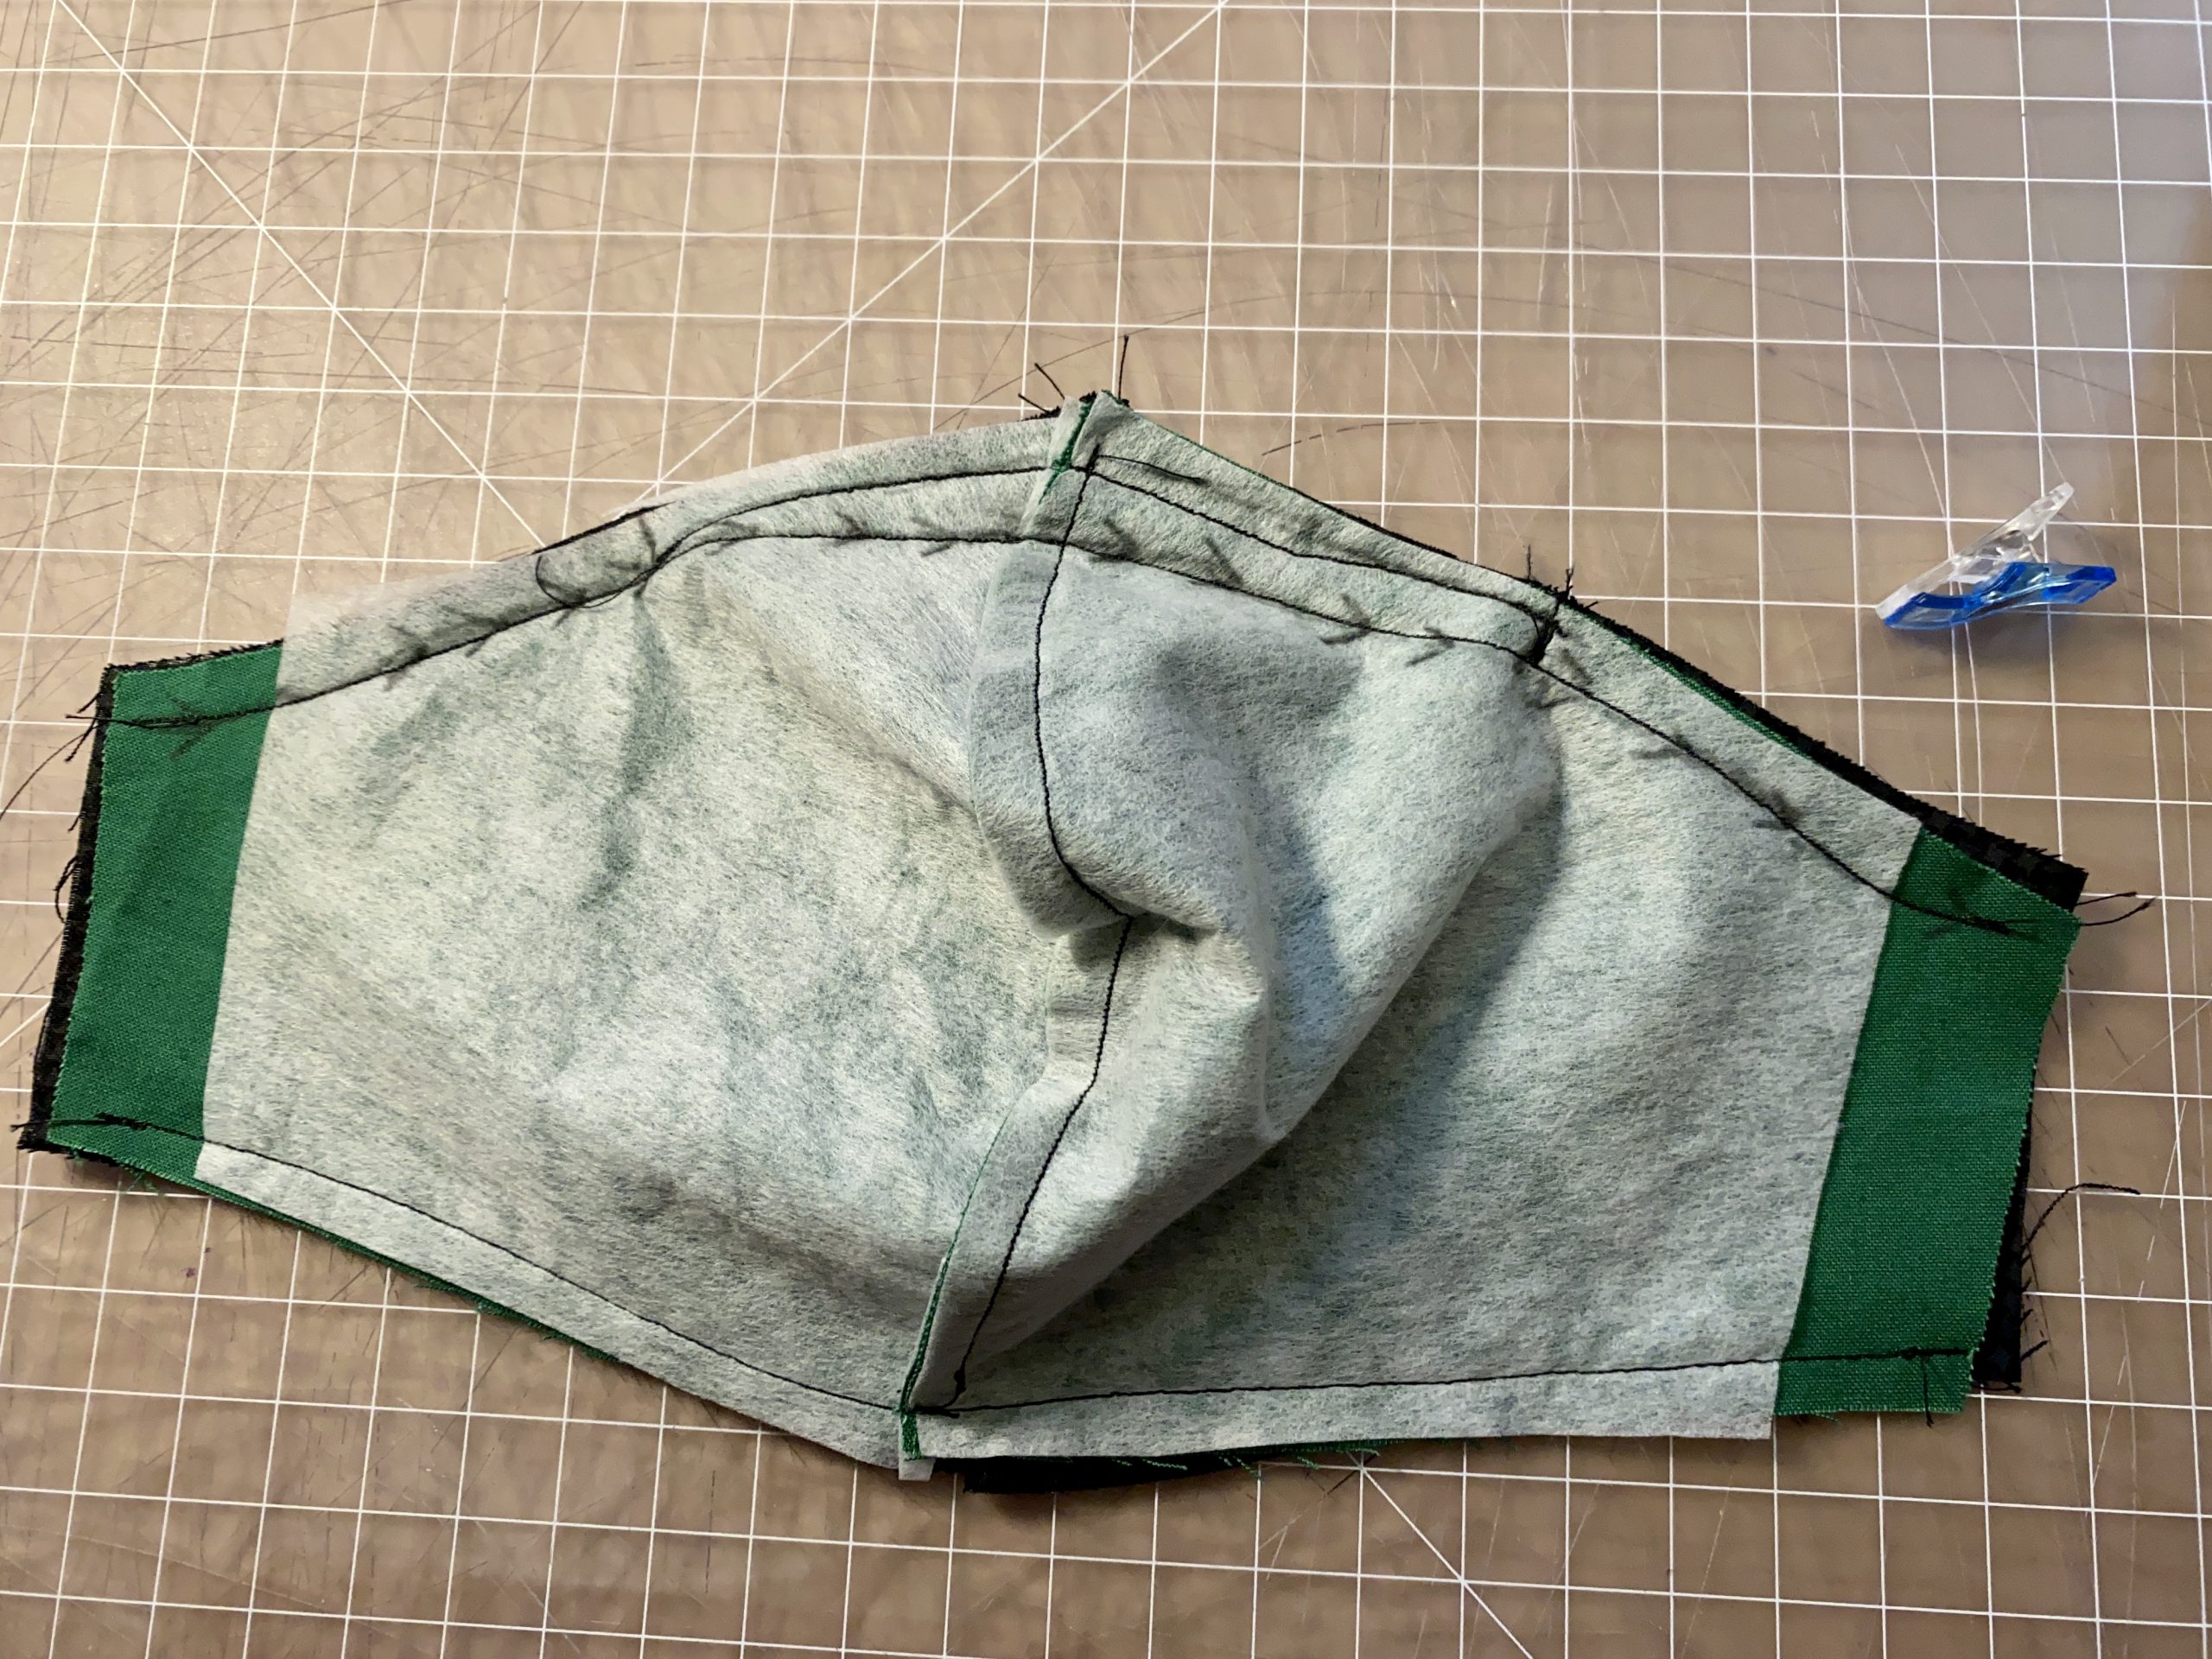
You should notice what a crappy sewing job I have done in the photo above. The fabric isn’t quite lined up anymore, the stitches are uneven, and I think a lot of thread got stuck on the right hand side of the nose wire part on the top. But it doesn’t matter. This is the *inside* of the mask and nobody will ever know.
Nose wire pocket
In the photo above, I’ve made some vertical pencil lines about two and a half inches to the left and right of the center top. The 5″ nose wire is going to go between those two lines. You’re basically going to sew a little pocket for the nose wire, but when the mask is right-side out this pocket will be hiding in the seam and invisible from both the front and the back (!). This is the (first) clever part of the mask; it took many iterations for me to figure out the topology that would make this solution work (although admittedly it does seem pretty obvious now).
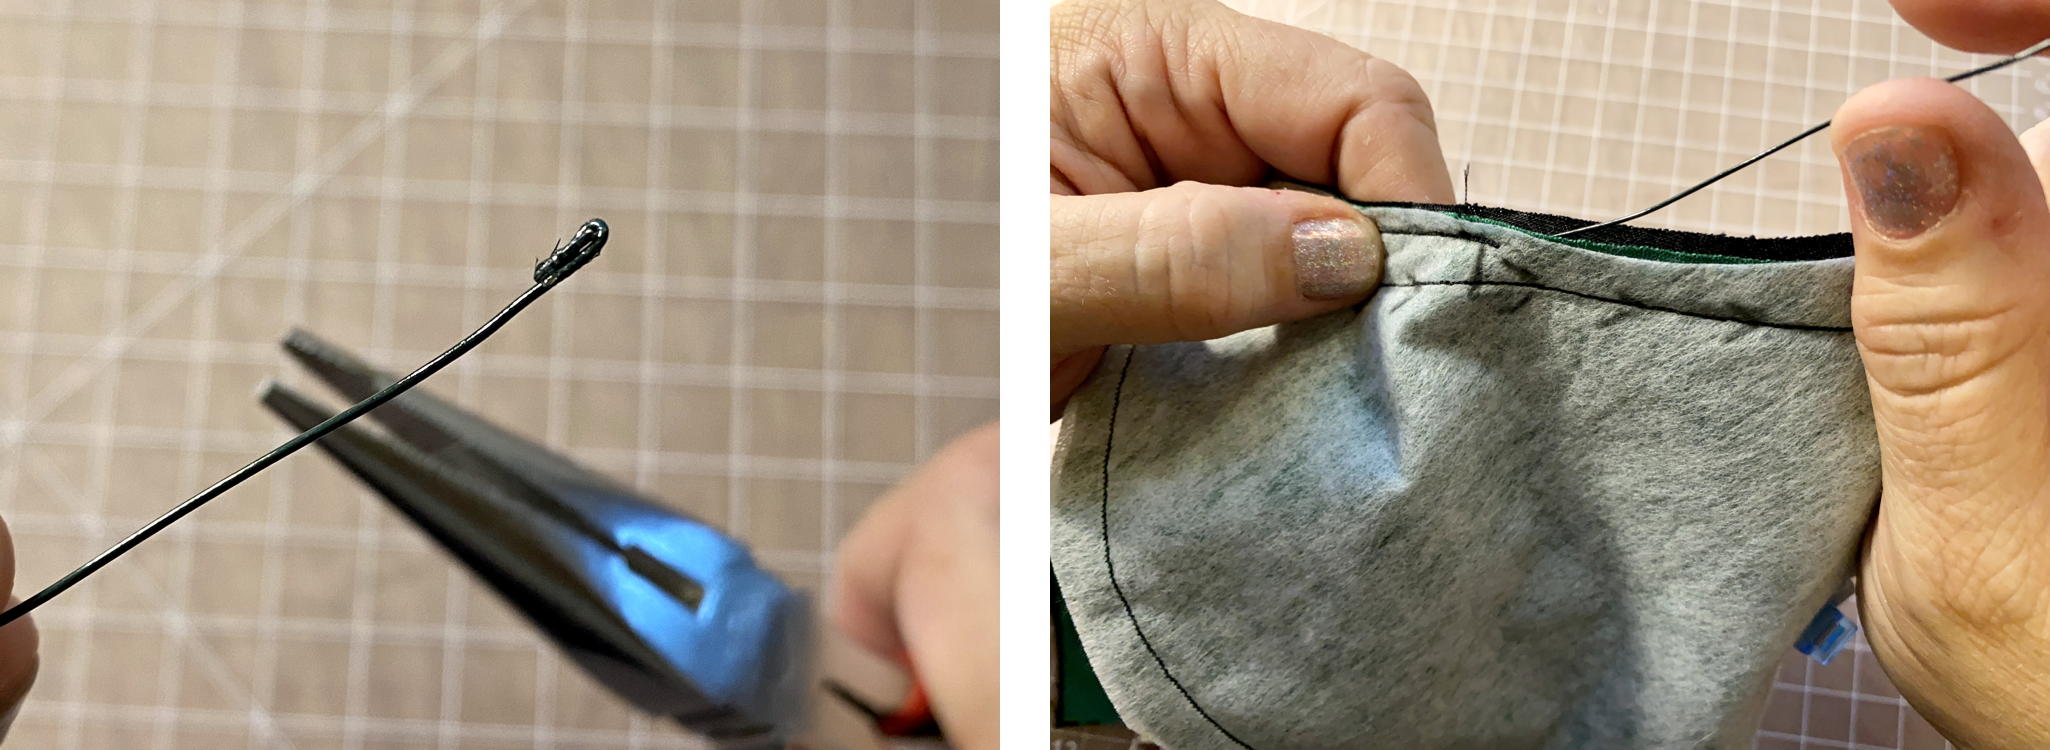
Okay here’s what to do: First make sure that your floral wire or other bendy thing doesn’t have sharp ends, by curling up the ends of the wire, as shown below left. Then sew a second, shorter line above the long line on the mask, starting from the leftmost pencil mark and ending at the rightmost pencil mark. Note in the photo above that this short line should touch the long line on the left side, but end slightly above the long line on the right side. That gap in the right side is where you’ll slip in the wire, as shown in the rightmost picture below. The wire should go between the inside fabric and the outside fabric, and not be near the filter layer. You may have to jiggle it a little to get over the middle part of the mask, but there *is* a path for it through there :)
Finally, close up the gap by sewing along the rightmost vertical pencil line.
Pro tip: DO NOT SEW OVER THE WIRE; make sure it is safely to the side of your sewing. Sometimes it is okay if you sew over the wire, but if your sewing machine needle happens to hit right *on* the wire then your needle will break and you’ll have to install a new needle and rethread the machine. I broke three needles trying out a design in which I sewed a pocket while the wire was inside before I realized I could just make most of the pocket first and put the wire in afterwards. (facepalm)
Turn right-side out and add elastic
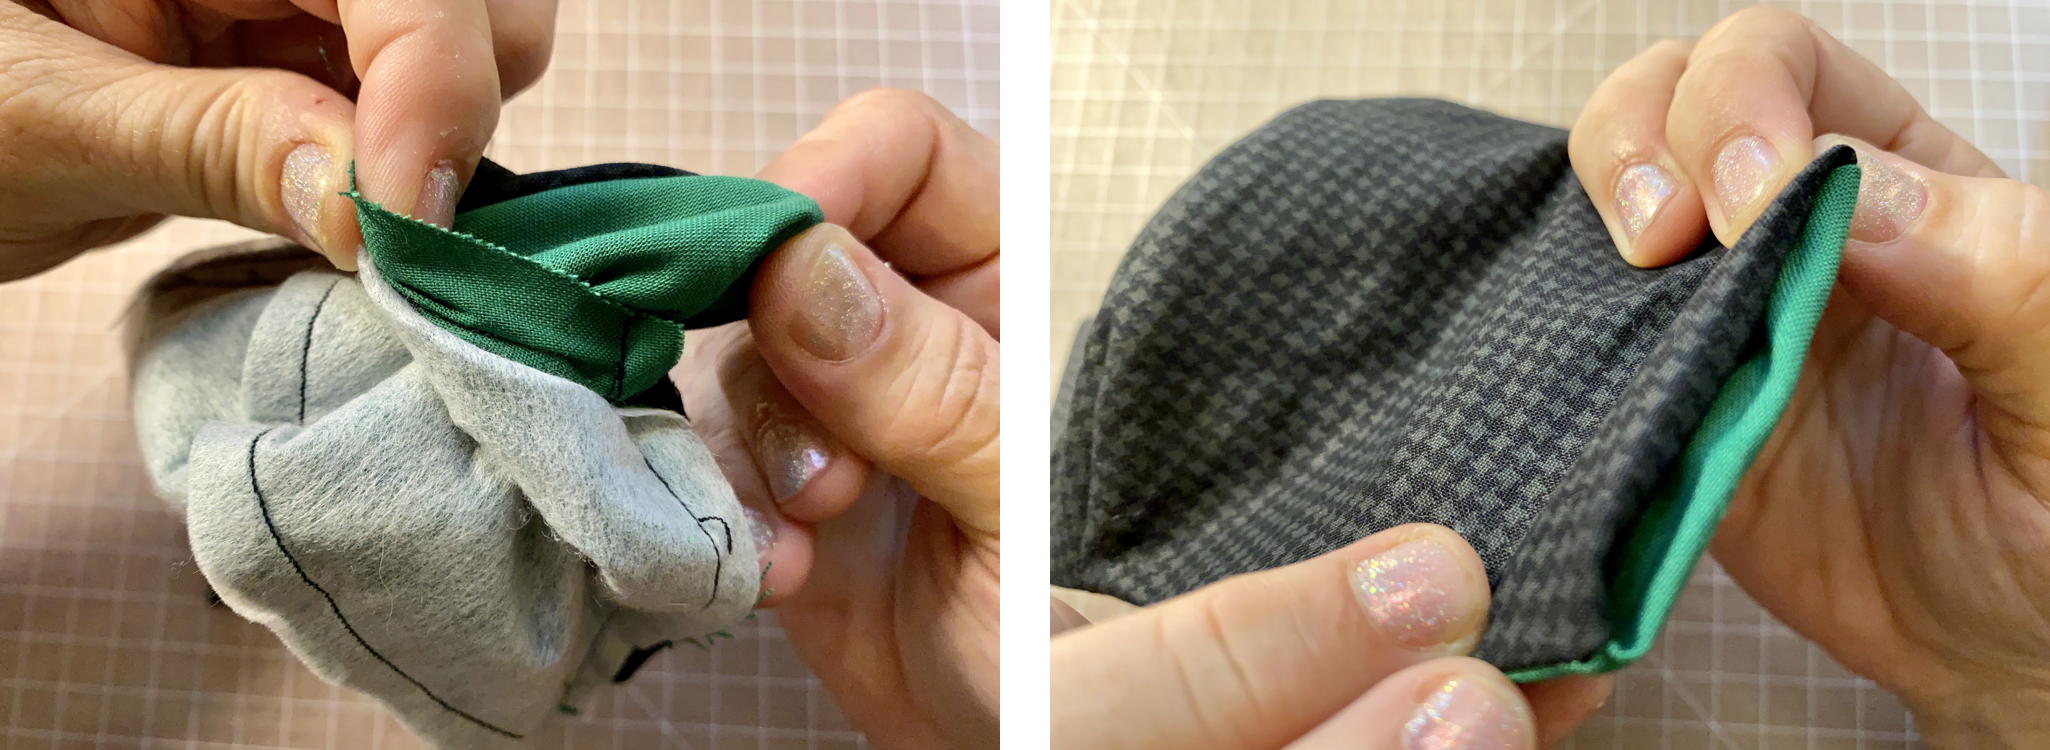
Time to turn the mask right-side out! Reach inside one of the sides and grab the end of the wire, as shown in the photo on the left below. Pull this through and then fiddle with everything until you get the outside of the mask on the outside where it belongs. Try not to bend the wire too much during this process. When you’re done, if you look inside each open end you’ll see the filter ending an inch or so into the mask. Fold the inside piece into the mask and over the filter, and fold the outside piece into the mask to match, as shown below right. Do this on both sides and make sure everything is somewhat symmetric.
Now you’re going to insert the top and bottom elastic pieces into the folds on the ends of the mask. The 18″ piece will connect the two top corners and fit high around the wearer’s head. The 13″ piece will connect the two bottom corners and fit around the back of the wearer’s neck. Make sure not to introduce a twist into either elastic when you pin or clip the assembly. This is the other clever part of the mask; I could never get the hang of adding the elastic when the mask was inside-out, so I found a way to put in the elastic after turning the mask right-side out. So much easier!
The left picture below shows the angles you should try to get with the top and bottom elastics. The top elastic should be angled up, probably more than you’d think. The more it angles up, the better it will fit. The bottom elastic should angle downward, but not as much. Make sure you have everything clipped and held down and then sew a line down the edge of the mask, as shown in the right photo. I recommend using a zig-zag stitch if your machine can do that, and going back and forth over the elastic part. This is the part of the mask that will be under stress, so make it strong.

The finished mask
When you’re done, the mask should look something like this:
At this point you could iron the mask and make it look nice, if you want. I’d avoid ironing over the wire because sometimes it marks the fabric when you do that (why?). The mask is washable but if you didn’t pre-wash your fabric before sewing then washing might make the mask really bunchy and weird. You can also make multiple masks and let them sit for a week (?) between wearings; this method might be preferable because repeated washing might make the mask less effective (??).
Here’s what it looks like when the mask is on. Note that the top band goes way up on my head in the back. This makes the mask fit really well without gaps, and it’s comfy. The elastic around the back of your neck doesn’t have to be tight, and the mask will be more comfortable if that lower elastic isn’t too restricting. Make sure to pinch and shape the nose wire for your face so that your glasses don’t fog up!

Good luck and stay safe out there :)
UPDATES
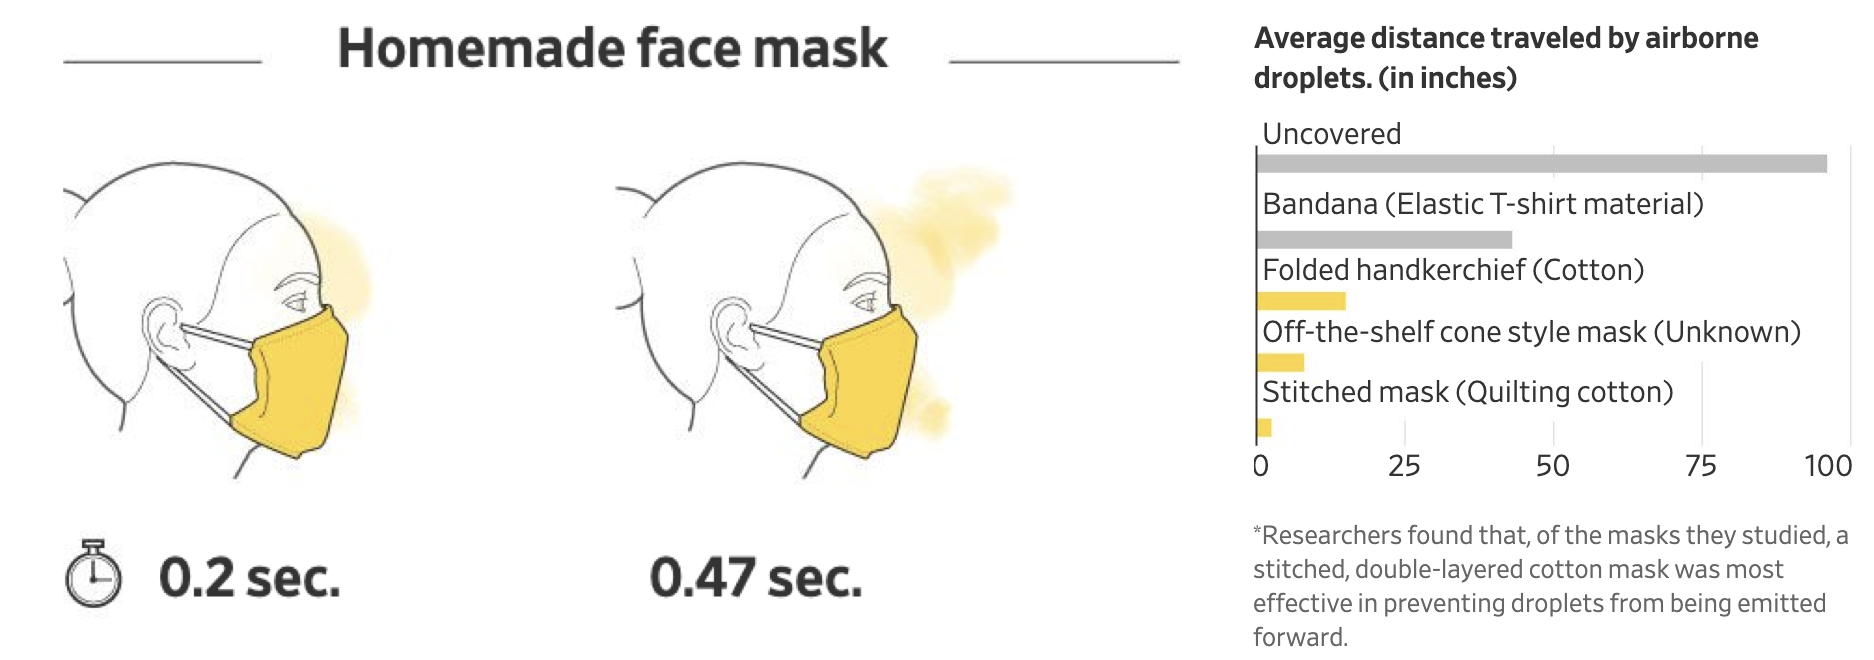
RESEARCH: A recent article from the Wall Street Journal (Face Masks Really Do Matter. The Scientific Evidence Is Growing) contains some results from researchers who simulated droplets through different mask types. Home-stitched double-thickness quilting cotton masks came out on top! Here’s the data:
MORE RESEARCH: Research article from ScienceAdvances titled Low-cost measurement of facemask efficacy for filtering expelled droplets during speech compared 14 types of face masks, from bandanas to N95s. The masks in this tutorial are the “Poly/Cotton” ones in the chart below; note they are nearly as effective at stopping (outgoing) droplets as a fitted N95. If you make the masks in this tutorial without the nonwoven interfacing/stabalizer insert then they will be the “Cotton4” masks in the chart, which is still pretty good!

ANOTHER COOL MASK TUTORIAL: Really lovely mask and instructional video from DIYCraft JP. You should watch this beautifully done video just to calm down if you’re feeling stressed out. And then maybe try making the mask too :)
——————
As an Amazon Associate we earn from qualifying purchases, so if you’ve got something you need to pick up anyway, going to Amazon through this link will help us keep Hacktastic running. Thanks! :)
Agh! You had me until you recommended the Singer Heavy Duty. That machine is such junk that most repairmen/shops won’t work on them. You’re much better off buying an older, used and refurbished machine from a shop with a repairman. You’ll get way more machine for your money and have someone who can help you with it to boot.
Sauce: have worked in professional costume shops for over 10yrs
3D printing the pattern is genius. Great tip!