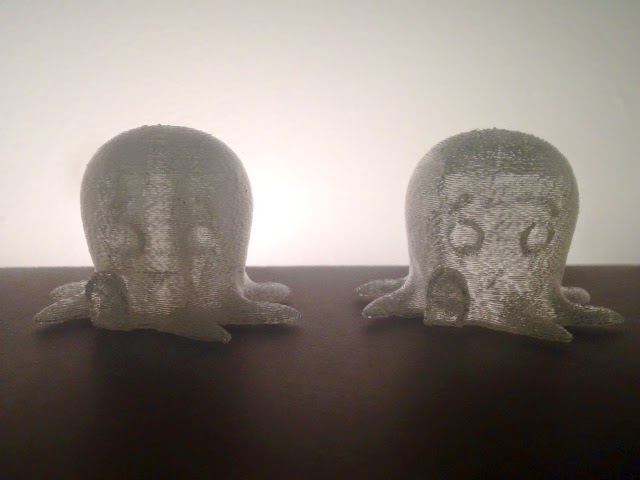
Yesterday we printed the Cute Octopus Says Hello model from Thingiverse as a first job for the MakerBot Replicator Mini. For that first print, we did everything the easy way; but you can’t get easy, fast, and cheap all at the same time. According to the Preview estimate it took 40 minutes to print our 50% scale octopus, and just over 7 grams of filament. Today we’ll try to optimize that print to save time and money. Yesterday’s print is on the left, and today’s is on the right. Can you guess what we are going to do?
Thingiverse link: http://www.thingiverse.com/thing:27053
Using MakerBot-brand filament on the Mini-sized spools is a good way to start when you first get your machine, but it’s expensive. A half-pound “Small” spool of regular filament costs 18 dollars, while a two-pound “Large” spool of the same filament is just 48 dollars (compare this with 4×18 = $72 if you bought those two pounds with four half-pound spools). Using the fact that half a pound is 227 grams, we can compute the cost of yesterday’s octopus:
If we wanted to, we could use a Small spool of filament to print just over 31 octopuses (227 divided by 7.18). If we were using a Large spool of filament then this octopus would instead only cost 38 cents, but a Large spool doesn’t fit in the back of the Mini. More on this another day. For now, it’s not so bad to pay half a buck to get a cool octopus. I mean seriously we just 3D-printed an octopus!
Still, let’s see how we can improve this by increasing the layer height, which is the amount by which the build platform moves down for each layer of the print, and the height of the tiny layers of plastic that you will see on the finished model. Increasing the layer height will decrease the print time of a model, because the printer will have to print fewer layers. The Mini is optimized for .2mm layer height, and for models with fine detail, hinges, or specific clearances you should stick with this default. Otherwise, I print almost everything in .3mm layer height because it is not only faster, but usually also stronger. Welcome to Level 2: Tinkering.
Step 1. Load, place, and size the model.
Load up the octopus, rotate and scale to 50% like we did yesterday.
Step 2. Advanced!
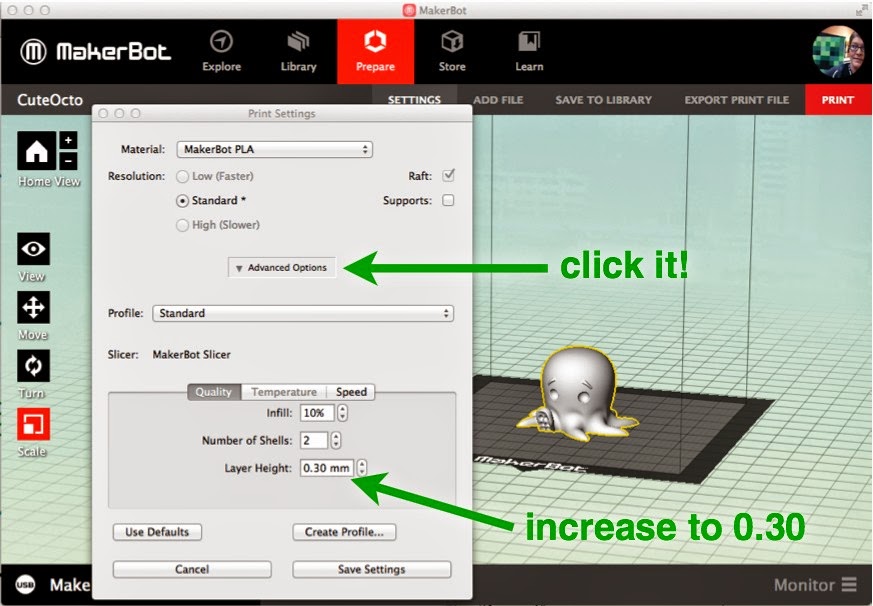
Click on the Advanced Options button and then immediately find the button for “Use Defaults” and press it. Why? Because some joker probably messed with these Advanced Options, and whatever settings were used for the last print are going to still be around. Yes, you are that joker. I know you haven’t messed with the options yet, but you’re about to. Future-you would be wise to press this button every time, if past-you ever messes with these settings.
Step 3. Increase Layer Height to save time.
At the bottom of the “Advanced Options”, increase the Layer Height to 0.30 mm.
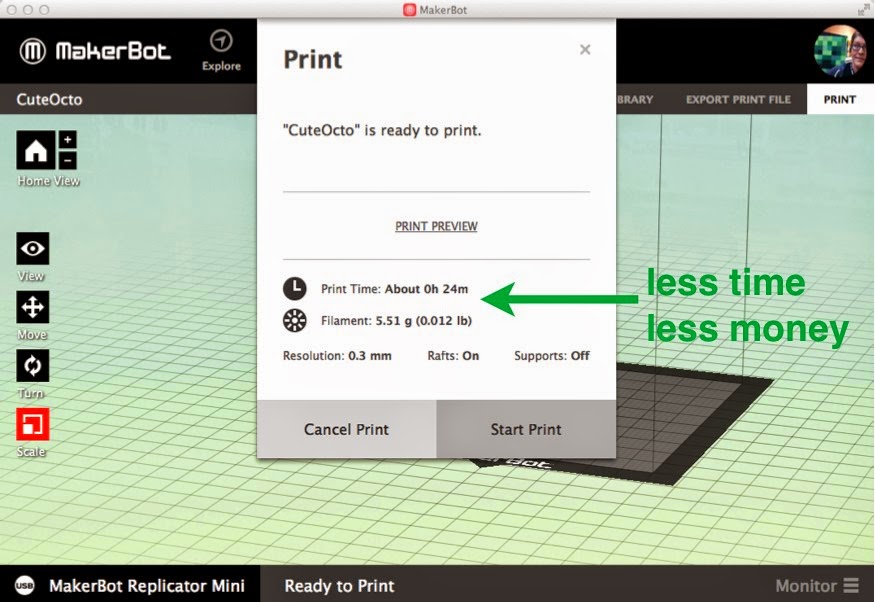
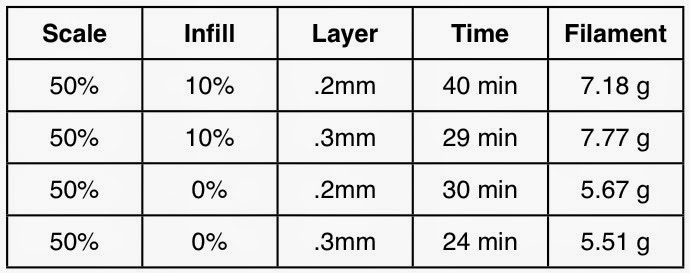
This one step of increasing the Layer Height to .3mm will cut print time of the octopus from 40 minutes down to 29 minutes!
However, the .3mm print uses about the same amount of plastic as the .2mm print – in fact, it uses a little bit more, up to 7.77 grams from our original 7.18 grams, according to the Preview. To cut down the materials cost we can decrease the amount of infill. The default infill percentage is 10%, and it’s the hexagonal infill that causes the stripes that you see in the leftmost model in the photo at the top of this post. It turns out that for the cute octopus model we can actually remove all of the infill material, because there are no drastic overhangs in the design. Most models are not simple enough to survive 0% infill, but for this particular model it is okay. The printer will be able to print this particular model as a hollow shell. More on overhangs later. For now let’s just print a hollow octopus.
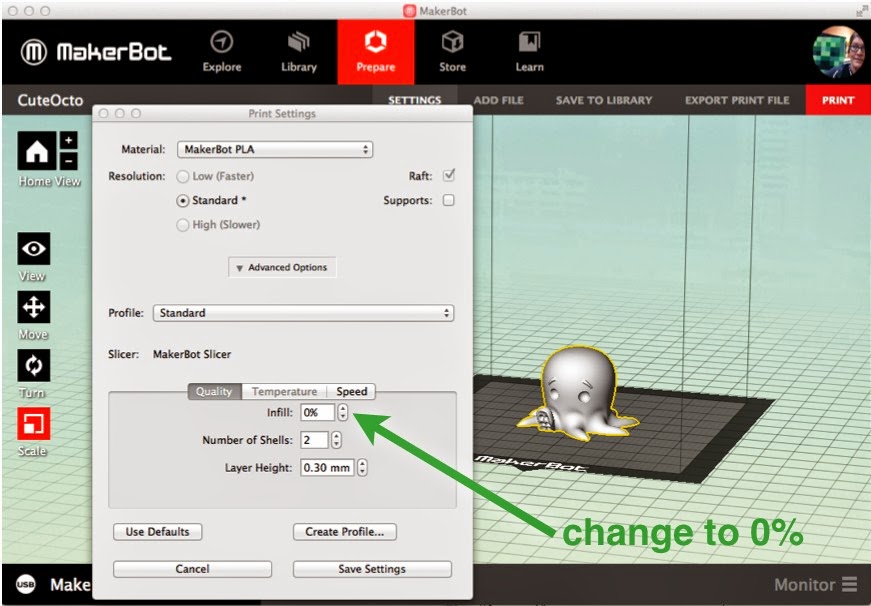
Step 4. Decrease Infill to save money.
From the same menu, decrease the Infill to 0%.
This cuts our filament cost down to 5.51 grams per cute octopus! That might not seem like much of a difference for this model, but the Mini can actually print some fairly large models. If this were a full-size octopus then the infill reduction could make a sizable difference.
Here is a table of the time and filament costs for the 50% scale cute octopus (based on the data from the Print window, not from real-life measurements), with different infill and layer height values.
The undersides of the three octopuses from yesterday’s picture are shown below. Today’s print was the one in the middle; it’s hollow but it does have a base. Tomorrow we’ll level-up to Pro and get that base layer off!


Leave a Reply