

In this post we’ll walk through the process of cutting knitting machine punch cards using the Cricut Joy mini craft cutter. Previously I had been cutting punch cards on a Sillhouette Cameo, but it’s kind of an irritating process (see my previous posts about the difficulties that can ensue). Using the little Cricut Joy instead of a larger Cricut or Silhouette craft cutter is quieter and more convenient, as long as you don’t mind buying blank punch cards as a base for your designs. This method will work to cut punch cards for Brother KH-881, Brother KH-260, and other standard 24-stitch punch card machines (Singer, KnitKing, Studio, etc).
The Joy is exactly the right size
Well, almost. A few weeks ago I was walking around a Michael’s and saw the adorable little Cricut Joy cutting machine… which looked suspiciously like it might be just big enough to cut a punch card. I ran home and got a punch card to test it in the store, and was astounded to see this:
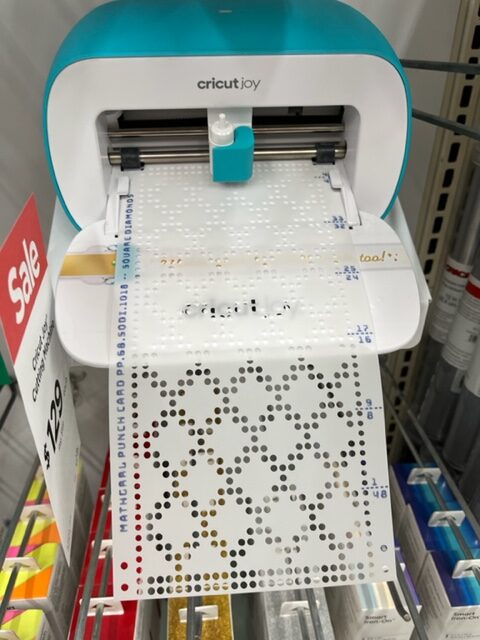
It fit perfectly! I could tell that I wouldn’t be able to cut the belt holes along the sides of the card, since they would fall too far to the left and right for the blade to reach, but it did seem like I might have just enough cutting width and height to get all the interior dots. It turned out to be both miraculously perfect for the cards and also an extremely fiddly process to get right. The video below gives an overview of that process, and the rest of this blog post fills in some of the more technical details and provides some close-up photos.
Preparing SVG files for cutting
To cut anything in the Cricut Joy you need to have an SVG file that you can import into the Cricut Design Space software. My preferred way to do produce those SVG files is usually OpenSCAD, since I can just code up exactly where I want each of the dots to go. You can use any method you like to create your SVG files, as long as you can place the dots very exactly. For a detailed walkthrough of how to use OpenSCAD to make punch cadrs, see our previous Hacktastic post Punch Card Knitting Machine Patterns with OpenSCAD. With OpenSCAD you write code as shown below left, and compile it to get a dot pattern that you can export to SVG, as shown below right. I’ve included OpenSCAD code for making such dot designs in an appendix at the bottom of this post.
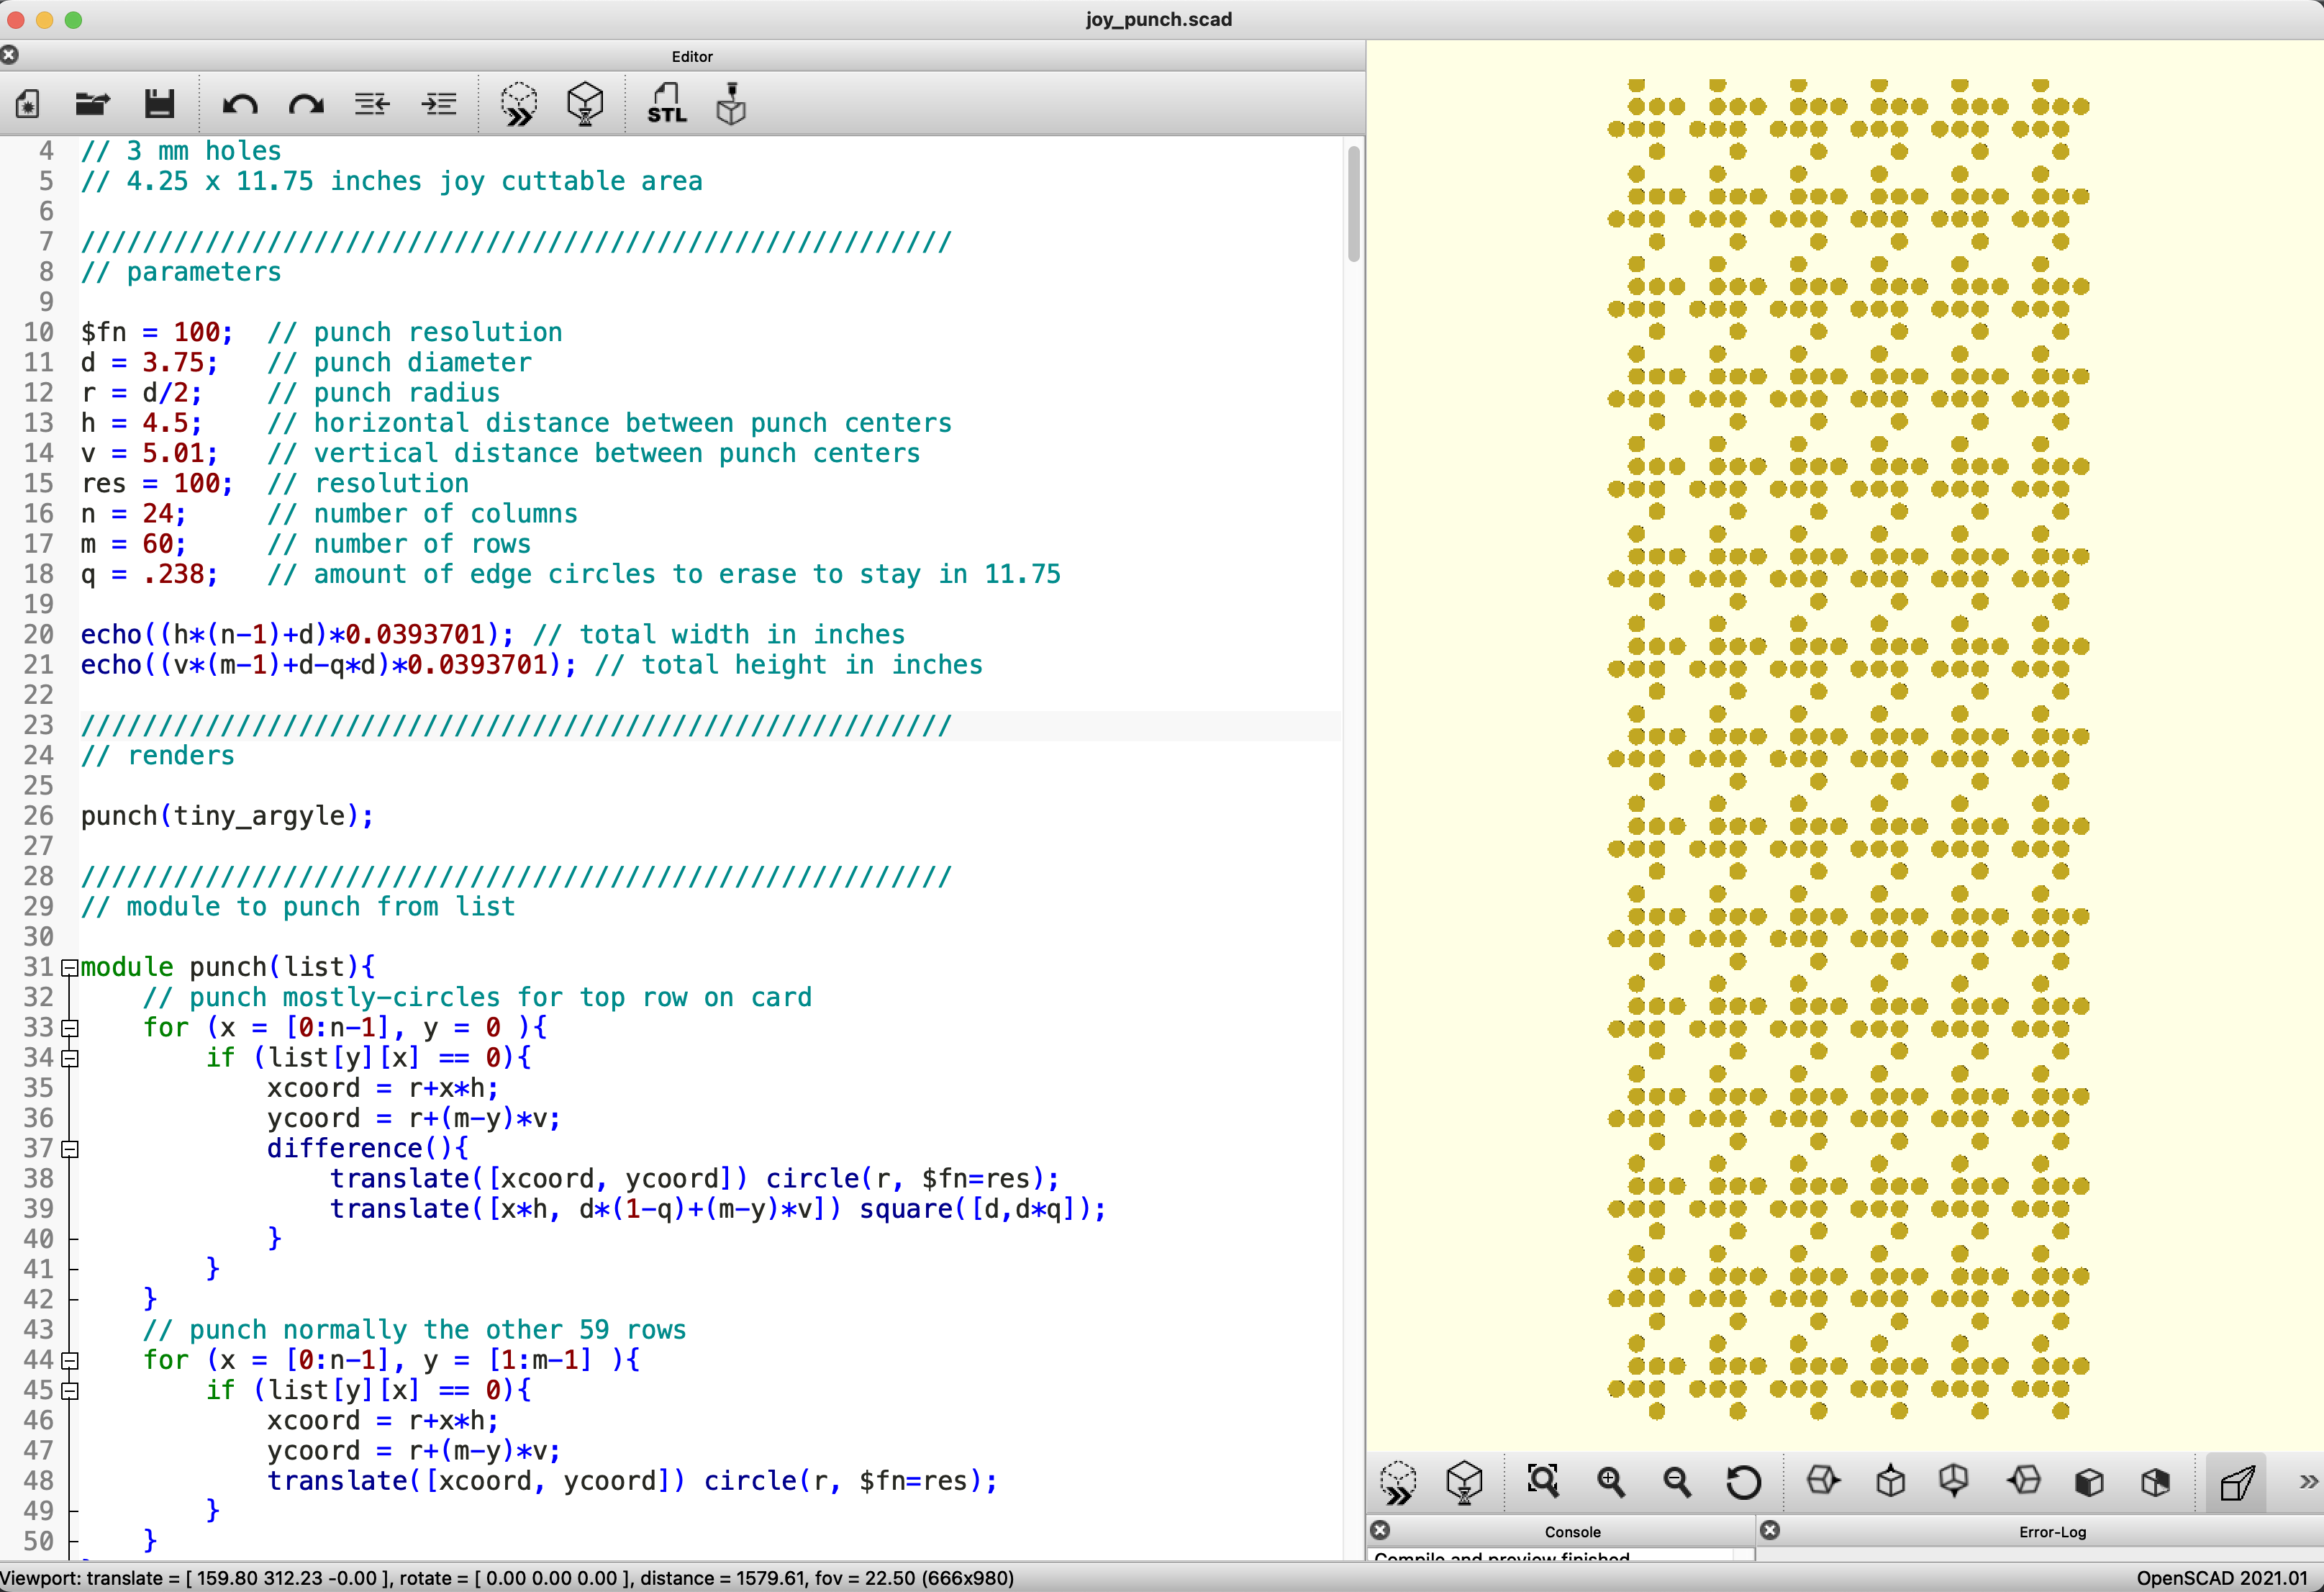
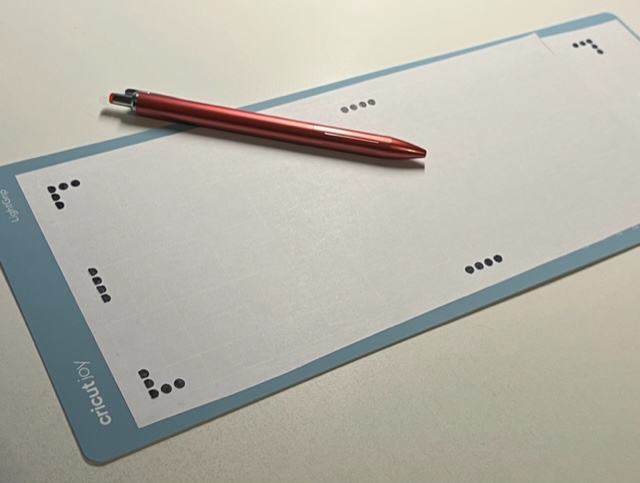
However you make your SVG file, you can then import it into Cricut Design Space and open it into a new Canvas workspace. If you look carefully at the top row of dots in the screenshot below, you will notice that the tops of the dots are cut off a little bit. This is because we want to use the Cricut Joy used with its long mat, the Cricut Joy LightGrip Mat 4.5″ x 12″), and the maximum vertical cutting length of that mat is 11.75 inches — which was is just a tiny bit larger than what we need for 60 rows of dots.
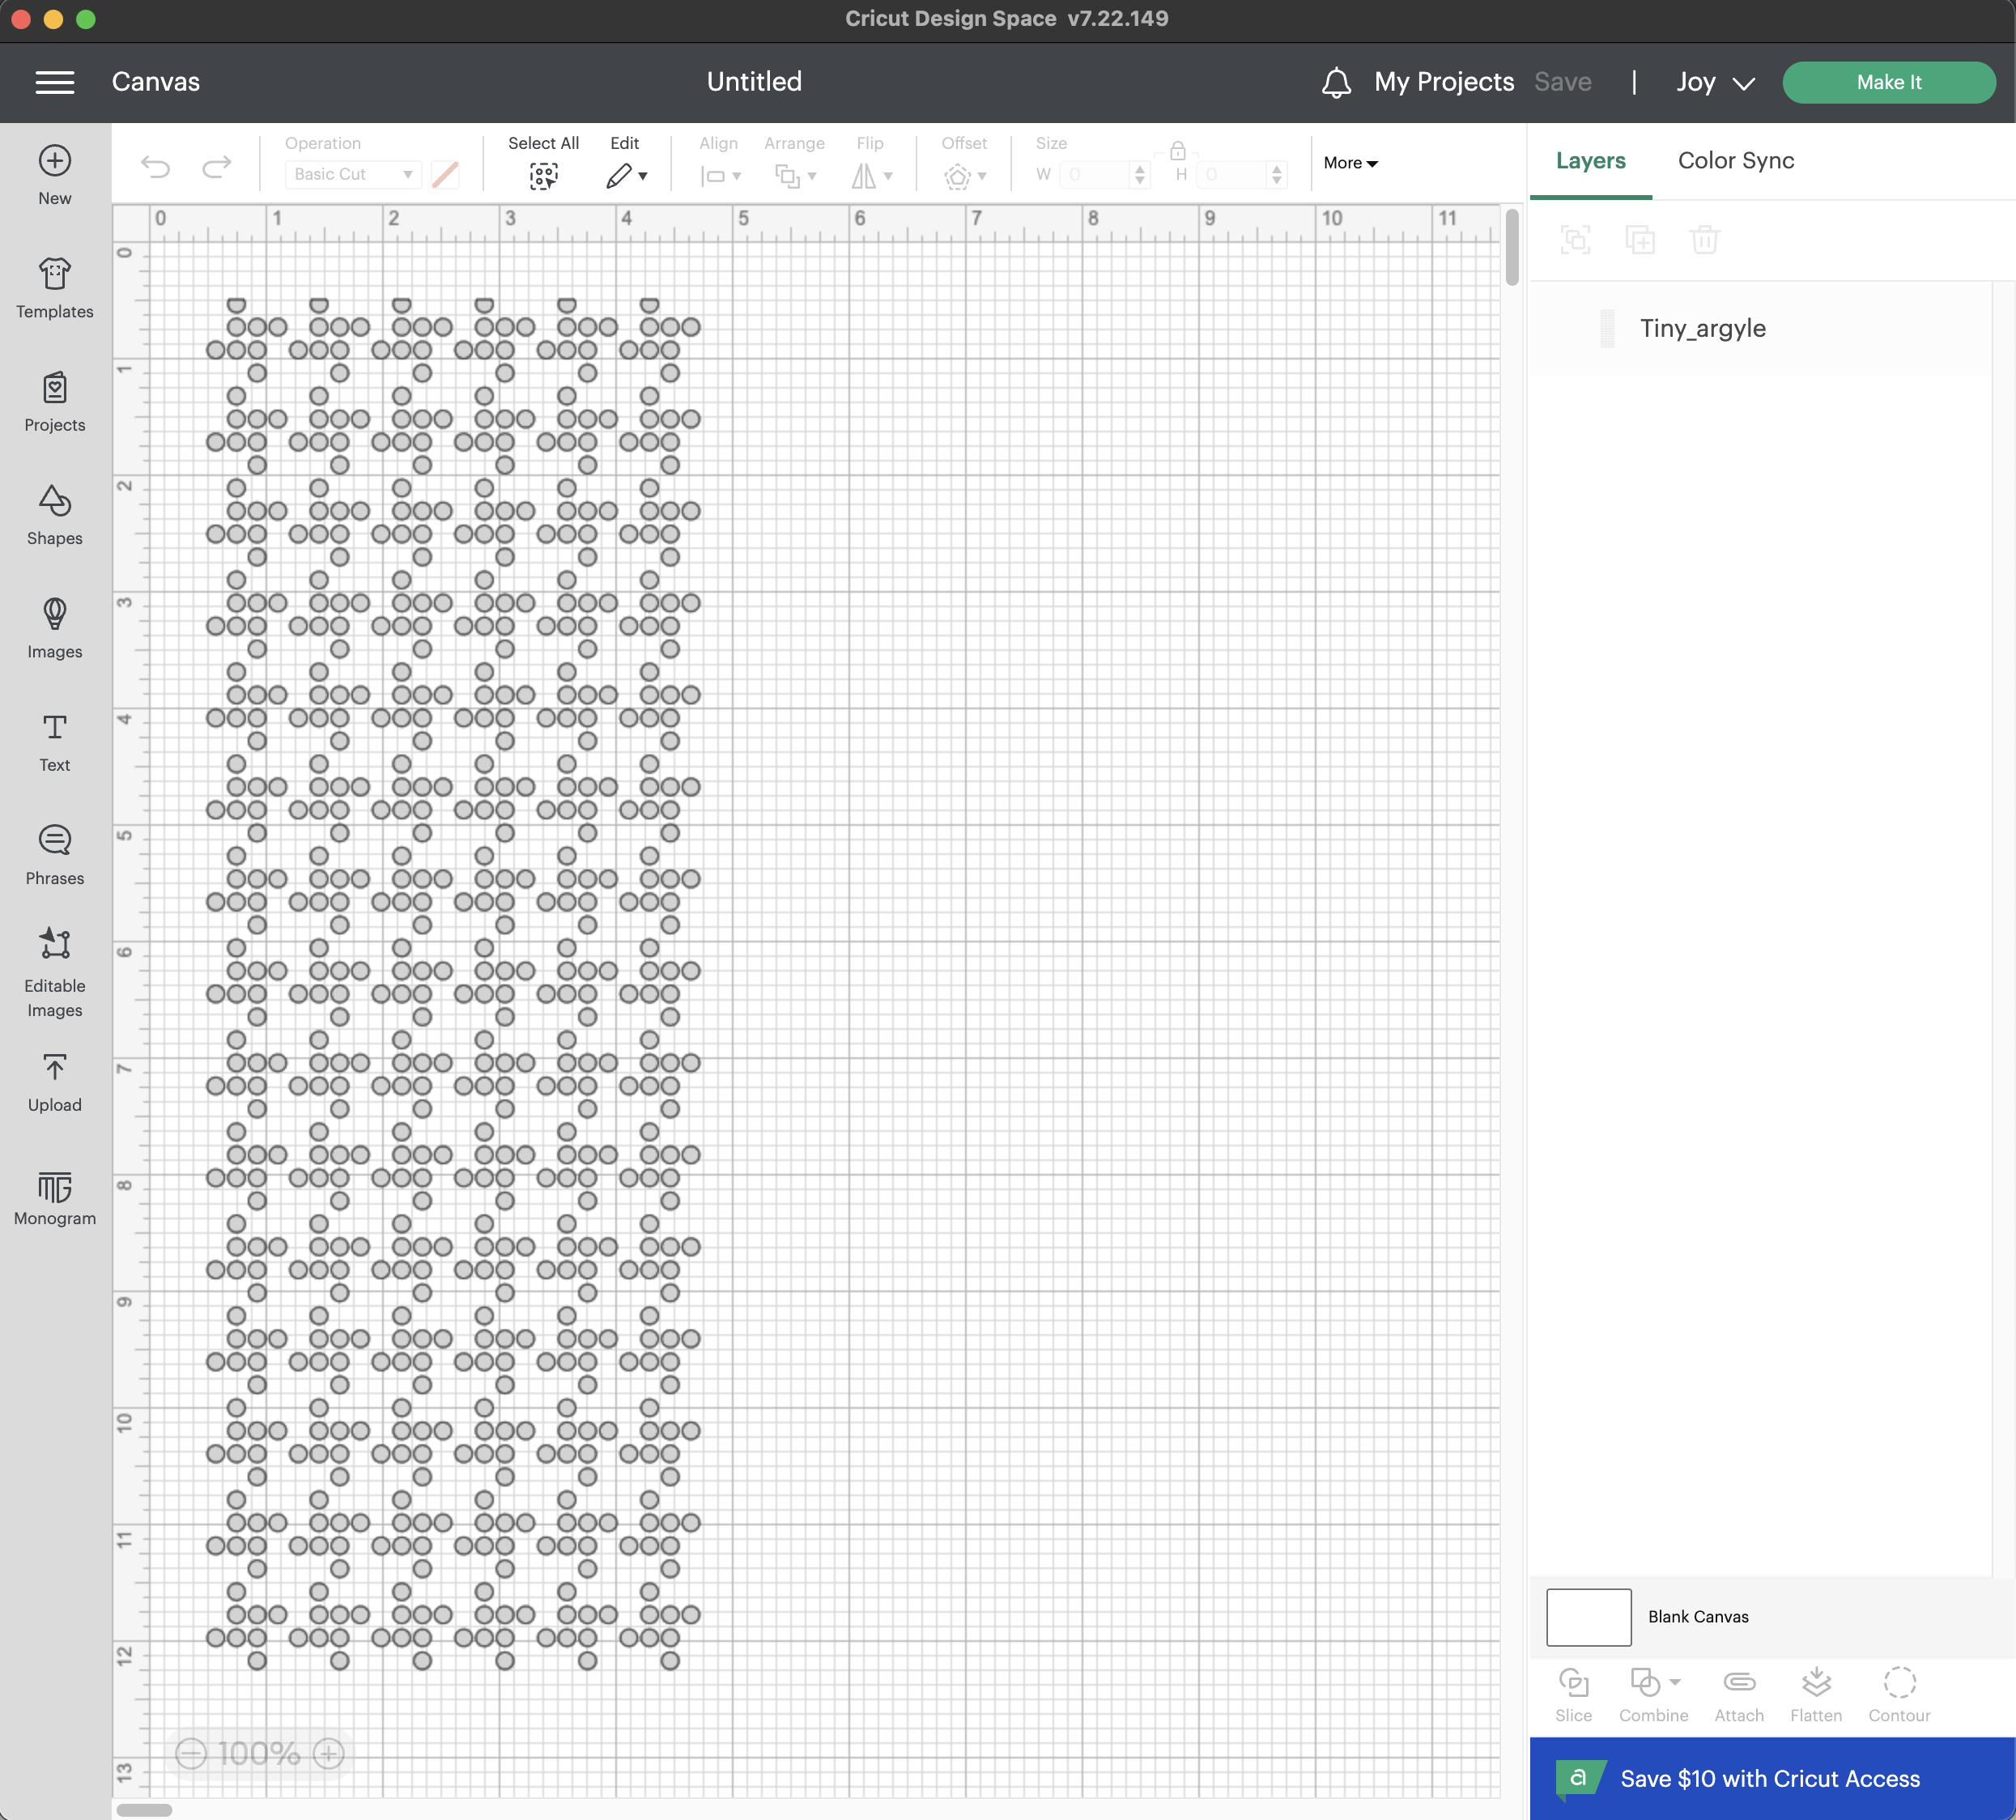
To send this file to the Cricut Joy, click the “Make It” button and give it a minute to load onto the long mat background. If it loads onto some other kind of background (like a larger blank square) then your design is a little bit too bit. If all of your dots get organized to the top of the screen instead of in their designed pattern, then go back to the Canvas workpace, click on the file name in the right sidebar, and click “Combine” to group your design together before sending to the Prepare screen again.

Once the design loads onto the mat background, you will need to drag it all the way to the right as far as it goes. It will only move over a tiny bit, but you do have to do that tiny bit, so that the design is pushed into the upper right corner of the cutting area as far as possible.
After pressing “Continue”, select the setting for Glitter Cardstock, and then “More” Pressure. This will set up the machine to do two passes of cuts, but you will only need the first pass. When the machine is done with the first pass you will just unload the card instead of continuing to the second pass. And now we have to load the material…
Cutting hundreds of tiny holes
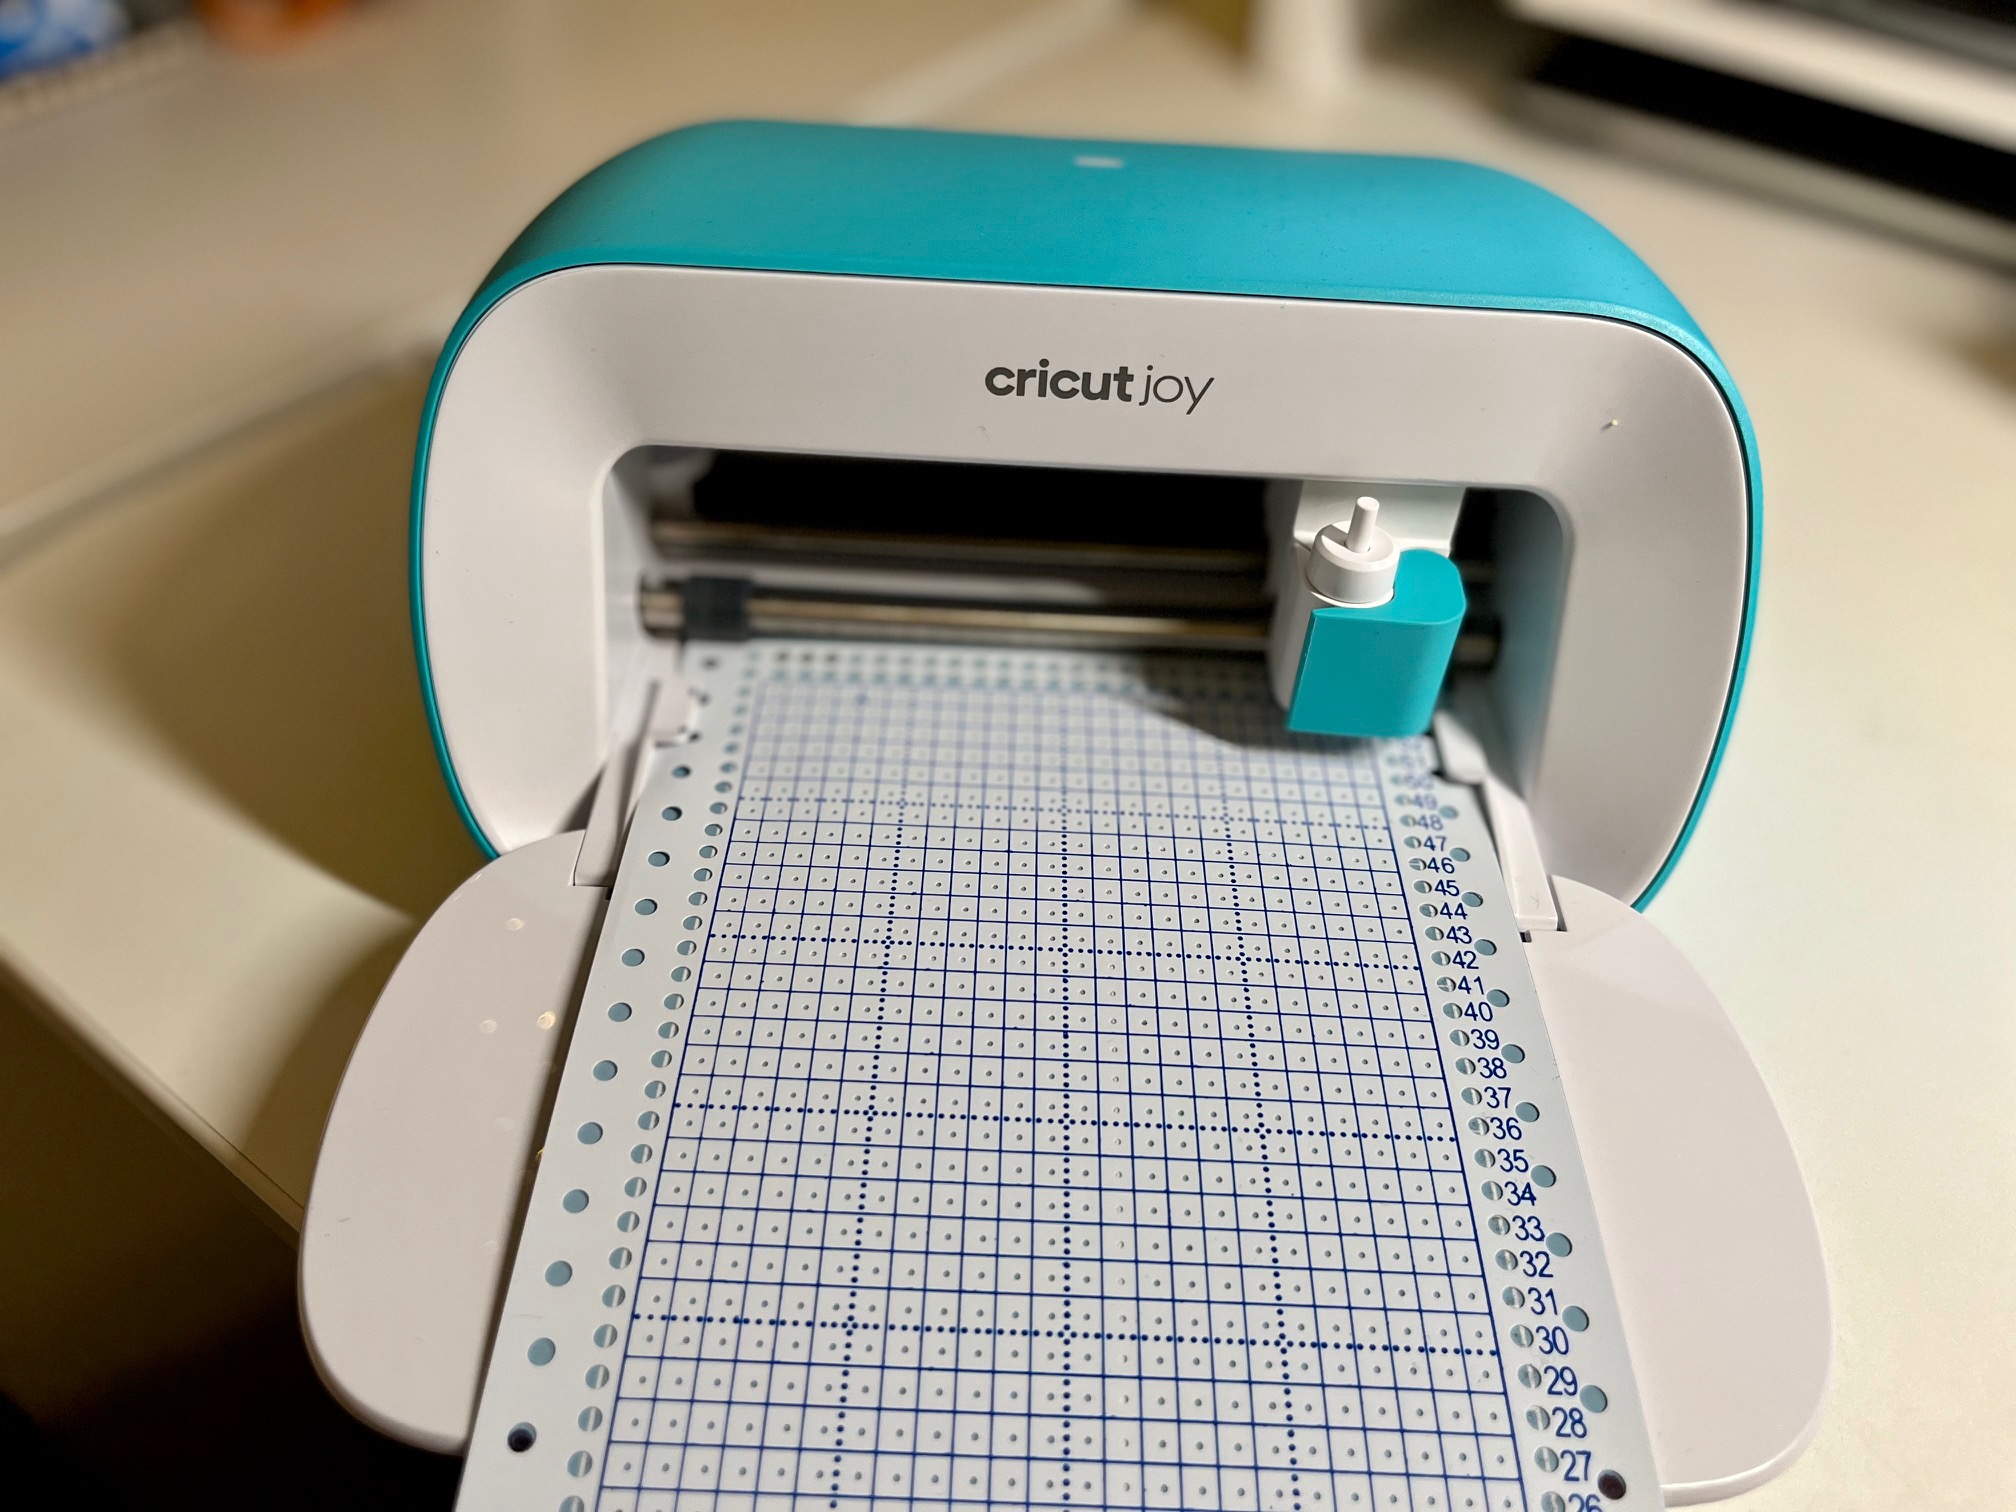
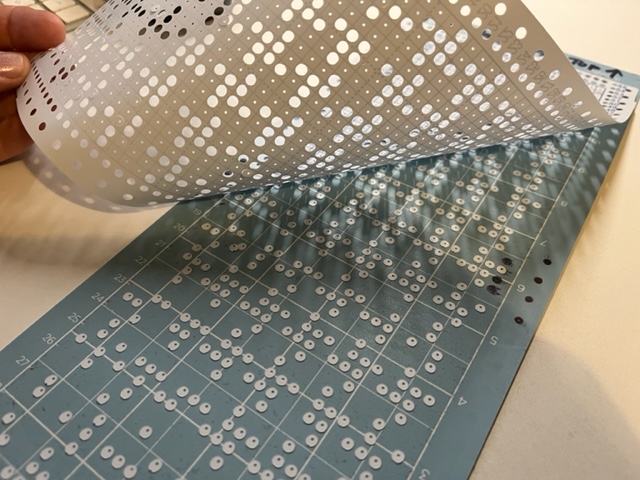
We have had success cutting our punch card designs directly onto Blank 24-stitch punch cards. The tricky part is getting the blank card aligned properly on the mat; see the video above and Appendix A below for more information on how to do this. The blank punch cards fit so exactly into the Cricut Joy that I can’t help but think that maybe this tiny machine was made exactly for this purpose!
After the cutting is done and you pull up the card, most of the dots will be stuck to the mat. Some dots don’t get cut out all the way, especially if you have been using your blade for a while. Cutting tiny circles is apparently really hard on the blade and makes it wear down quickly. Luckily, a Cricut Joy Replacement Blade is pretty cheap, especially if you can find it on sale.
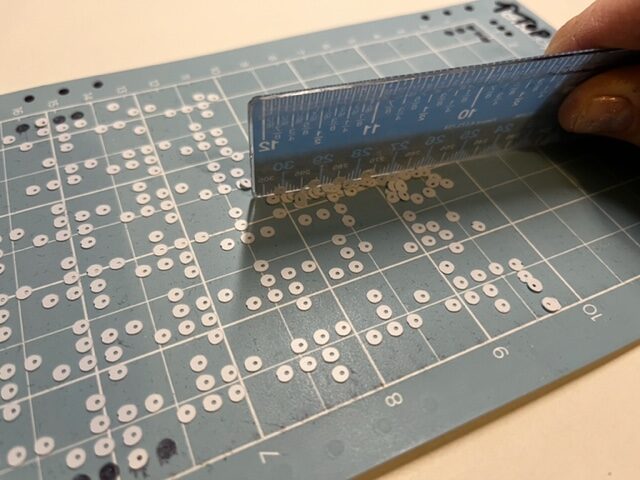
I find that I can get the dots off the mat most easily by pressing down and dragging a ruler across the dots. No matter what I do, the dots get all over me and all over my desk and the floor. I am always very careful not to let any of the dots get close to my eyes, because I think that would really hurt! Check your hands and brush off any dots before touching your face.
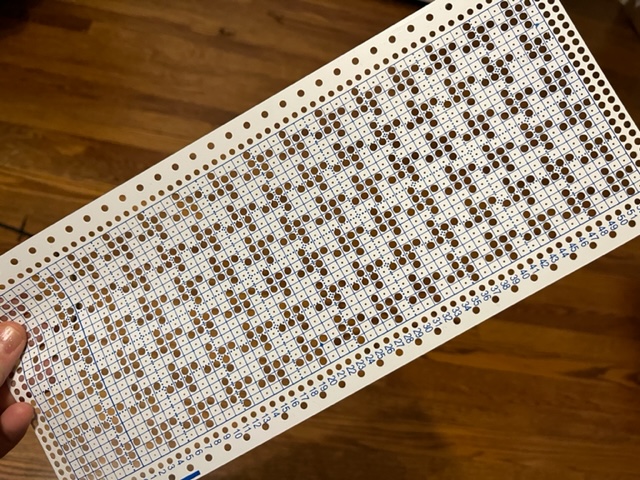
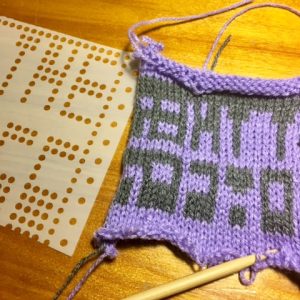
Below is a photo of our successfully cut card. Note that the top row of dots are not complete (their tops are cut off) and that all the dots are (mostly) in their boxes. If you stray too far from the boxes, expecially up or down, then your machine will not select needles correctly when you use the card — so make sure that everything is in alignment. If not then you will have to cut the card over again from scratch. Also look carefully for any “hanging chads” that didn’t get separated from the card, and remove those dots by hand.
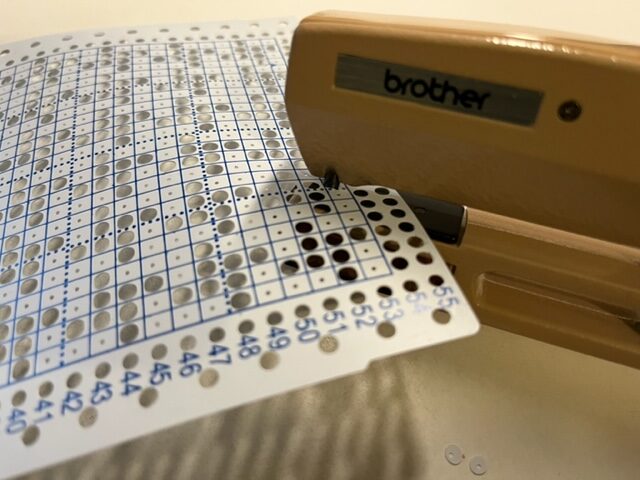
If you have a knitting machine punch card hole puncher then you should use it to re-punch the top row of holes so that they are full circles, which will make them work better:
Using our freshly cut punch card
Here is our freshly cut punch card in action in the Brother KH-881:
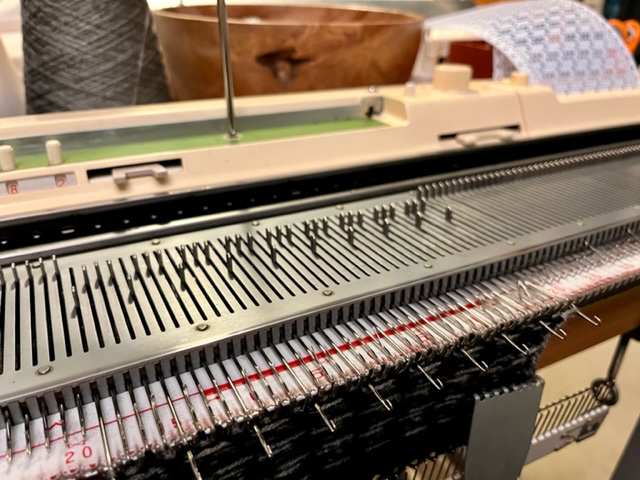
And the resulting knit swatch, a nice baby houndstooth pattern:

Appendix A: The Joy of Alignment
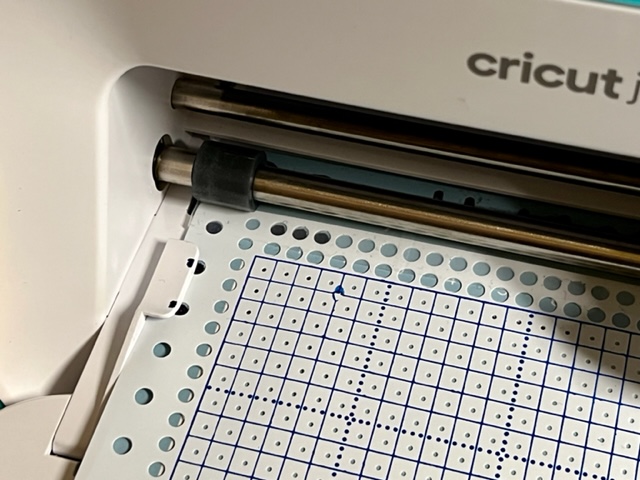
The video near the top of this post explains how to create an “alignment mat” for the process of cutting onto blank punch cards with the Cricut Joy. The two photos below illustrate steps described in the video. Here is a photo showing what things look like after cutting interior guide holes onto plain paper, removing the cut holes only, and then marking the mat by carefully coloring in the holes with a pen:
And here is a close-up of the two dots in the left guide rail that I use to make sure that the mat has loaded correctly before cutting:
Appendix B: OpenSCAD Code
Here is the full code for creating an SVG file for a 24 x 60 punch card with the top row of dots cut off in order to achieve exactly 11.75″ height. The pattern is for the baby houndstooth design illustrated above, but you can make any design by changing the 1s and 0s in the matrix at the bottom of the code.
// mathgrrl joy punch

// 24 x 60 punches
// 3 mm holes
// 4.25 x 11.75 inches joy cuttable area

////////////////////////////////////////////////////////
// parameters

$fn = 100; // punch resolution
d = 3.75; // punch diameter
r = d/2; // punch radius
h = 4.5; // horizontal distance between punch centers
v = 5.01; // vertical distance between punch centers
res = 100; // resolution
n = 24; // number of columns
m = 60; // number of rows
q = .238; // amount of edge circles to erase to stay in 11.75

echo((h*(n-1)+d)*0.0393701); // total width in inches
echo((v*(m-1)+d-q*d)*0.0393701); // total height in inches

////////////////////////////////////////////////////////
// renders

punch(tiny_argyle);

////////////////////////////////////////////////////////
// module to punch from list

module punch(list){
  // punch mostly-circles for top row on card
  for (x = [0:n-1], y = 0 ){
    if (list[y][x] == 0){
      xcoord = r+x*h;
      ycoord = r+(m-y)*v;
      difference(){
        translate([xcoord, ycoord]) circle(r, $fn=res);
        translate([x*h, d*(1-q)+(m-y)*v]) square([d,d*q]);
      }
    }
  }
  // punch normally the other 59 rows
  for (x = [0:n-1], y = [1:m-1] ){
    if (list[y][x] == 0){
      xcoord = r+x*h;
      ycoord = r+(m-y)*v;
      translate([xcoord, ycoord]) circle(r, $fn=res);
    }
  }
}

////////////////////////////////////////////////////////
// punch data

// first row will print on TOP
// so these designs are all rightside-up

tiny_argyle = [
[1,0,1,1,1,0,1,1,1,0,1,1,1,0,1,1,1,0,1,1,1,0,1,1],
[1,0,0,0,1,0,0,0,1,0,0,0,1,0,0,0,1,0,0,0,1,0,0,0],
[0,0,0,1,0,0,0,1,0,0,0,1,0,0,0,1,0,0,0,1,0,0,0,1],
[1,1,0,1,1,1,0,1,1,1,0,1,1,1,0,1,1,1,0,1,1,1,0,1],
[1,0,1,1,1,0,1,1,1,0,1,1,1,0,1,1,1,0,1,1,1,0,1,1],
[1,0,0,0,1,0,0,0,1,0,0,0,1,0,0,0,1,0,0,0,1,0,0,0],
[0,0,0,1,0,0,0,1,0,0,0,1,0,0,0,1,0,0,0,1,0,0,0,1],
[1,1,0,1,1,1,0,1,1,1,0,1,1,1,0,1,1,1,0,1,1,1,0,1],
[1,0,1,1,1,0,1,1,1,0,1,1,1,0,1,1,1,0,1,1,1,0,1,1],
[1,0,0,0,1,0,0,0,1,0,0,0,1,0,0,0,1,0,0,0,1,0,0,0],
[0,0,0,1,0,0,0,1,0,0,0,1,0,0,0,1,0,0,0,1,0,0,0,1],
[1,1,0,1,1,1,0,1,1,1,0,1,1,1,0,1,1,1,0,1,1,1,0,1],
[1,0,1,1,1,0,1,1,1,0,1,1,1,0,1,1,1,0,1,1,1,0,1,1],
[1,0,0,0,1,0,0,0,1,0,0,0,1,0,0,0,1,0,0,0,1,0,0,0],
[0,0,0,1,0,0,0,1,0,0,0,1,0,0,0,1,0,0,0,1,0,0,0,1],
[1,1,0,1,1,1,0,1,1,1,0,1,1,1,0,1,1,1,0,1,1,1,0,1],
[1,0,1,1,1,0,1,1,1,0,1,1,1,0,1,1,1,0,1,1,1,0,1,1],
[1,0,0,0,1,0,0,0,1,0,0,0,1,0,0,0,1,0,0,0,1,0,0,0],
[0,0,0,1,0,0,0,1,0,0,0,1,0,0,0,1,0,0,0,1,0,0,0,1],
[1,1,0,1,1,1,0,1,1,1,0,1,1,1,0,1,1,1,0,1,1,1,0,1],
[1,0,1,1,1,0,1,1,1,0,1,1,1,0,1,1,1,0,1,1,1,0,1,1],
[1,0,0,0,1,0,0,0,1,0,0,0,1,0,0,0,1,0,0,0,1,0,0,0],
[0,0,0,1,0,0,0,1,0,0,0,1,0,0,0,1,0,0,0,1,0,0,0,1],
[1,1,0,1,1,1,0,1,1,1,0,1,1,1,0,1,1,1,0,1,1,1,0,1],
[1,0,1,1,1,0,1,1,1,0,1,1,1,0,1,1,1,0,1,1,1,0,1,1],
[1,0,0,0,1,0,0,0,1,0,0,0,1,0,0,0,1,0,0,0,1,0,0,0],
[0,0,0,1,0,0,0,1,0,0,0,1,0,0,0,1,0,0,0,1,0,0,0,1],
[1,1,0,1,1,1,0,1,1,1,0,1,1,1,0,1,1,1,0,1,1,1,0,1],
[1,0,1,1,1,0,1,1,1,0,1,1,1,0,1,1,1,0,1,1,1,0,1,1],
[1,0,0,0,1,0,0,0,1,0,0,0,1,0,0,0,1,0,0,0,1,0,0,0],
[0,0,0,1,0,0,0,1,0,0,0,1,0,0,0,1,0,0,0,1,0,0,0,1],
[1,1,0,1,1,1,0,1,1,1,0,1,1,1,0,1,1,1,0,1,1,1,0,1],
[1,0,1,1,1,0,1,1,1,0,1,1,1,0,1,1,1,0,1,1,1,0,1,1],
[1,0,0,0,1,0,0,0,1,0,0,0,1,0,0,0,1,0,0,0,1,0,0,0],
[0,0,0,1,0,0,0,1,0,0,0,1,0,0,0,1,0,0,0,1,0,0,0,1],
[1,1,0,1,1,1,0,1,1,1,0,1,1,1,0,1,1,1,0,1,1,1,0,1],
[1,0,1,1,1,0,1,1,1,0,1,1,1,0,1,1,1,0,1,1,1,0,1,1],
[1,0,0,0,1,0,0,0,1,0,0,0,1,0,0,0,1,0,0,0,1,0,0,0],
[0,0,0,1,0,0,0,1,0,0,0,1,0,0,0,1,0,0,0,1,0,0,0,1],
[1,1,0,1,1,1,0,1,1,1,0,1,1,1,0,1,1,1,0,1,1,1,0,1],
[1,0,1,1,1,0,1,1,1,0,1,1,1,0,1,1,1,0,1,1,1,0,1,1],
[1,0,0,0,1,0,0,0,1,0,0,0,1,0,0,0,1,0,0,0,1,0,0,0],
[0,0,0,1,0,0,0,1,0,0,0,1,0,0,0,1,0,0,0,1,0,0,0,1],
[1,1,0,1,1,1,0,1,1,1,0,1,1,1,0,1,1,1,0,1,1,1,0,1],
[1,0,1,1,1,0,1,1,1,0,1,1,1,0,1,1,1,0,1,1,1,0,1,1],
[1,0,0,0,1,0,0,0,1,0,0,0,1,0,0,0,1,0,0,0,1,0,0,0],
[0,0,0,1,0,0,0,1,0,0,0,1,0,0,0,1,0,0,0,1,0,0,0,1],
[1,1,0,1,1,1,0,1,1,1,0,1,1,1,0,1,1,1,0,1,1,1,0,1],
[1,0,1,1,1,0,1,1,1,0,1,1,1,0,1,1,1,0,1,1,1,0,1,1],
[1,0,0,0,1,0,0,0,1,0,0,0,1,0,0,0,1,0,0,0,1,0,0,0],
[0,0,0,1,0,0,0,1,0,0,0,1,0,0,0,1,0,0,0,1,0,0,0,1],
[1,1,0,1,1,1,0,1,1,1,0,1,1,1,0,1,1,1,0,1,1,1,0,1],
[1,0,1,1,1,0,1,1,1,0,1,1,1,0,1,1,1,0,1,1,1,0,1,1],
[1,0,0,0,1,0,0,0,1,0,0,0,1,0,0,0,1,0,0,0,1,0,0,0],
[0,0,0,1,0,0,0,1,0,0,0,1,0,0,0,1,0,0,0,1,0,0,0,1],
[1,1,0,1,1,1,0,1,1,1,0,1,1,1,0,1,1,1,0,1,1,1,0,1],
[1,0,1,1,1,0,1,1,1,0,1,1,1,0,1,1,1,0,1,1,1,0,1,1],
[1,0,0,0,1,0,0,0,1,0,0,0,1,0,0,0,1,0,0,0,1,0,0,0],
[0,0,0,1,0,0,0,1,0,0,0,1,0,0,0,1,0,0,0,1,0,0,0,1],
[1,1,0,1,1,1,0,1,1,1,0,1,1,1,0,1,1,1,0,1,1,1,0,1]
];
What’s next?
Now that we can cut punchcards very quickly… the next step is to be able to make lots of cool patterns quickly. Big news coming soon :)
Update: Create a Custom Material
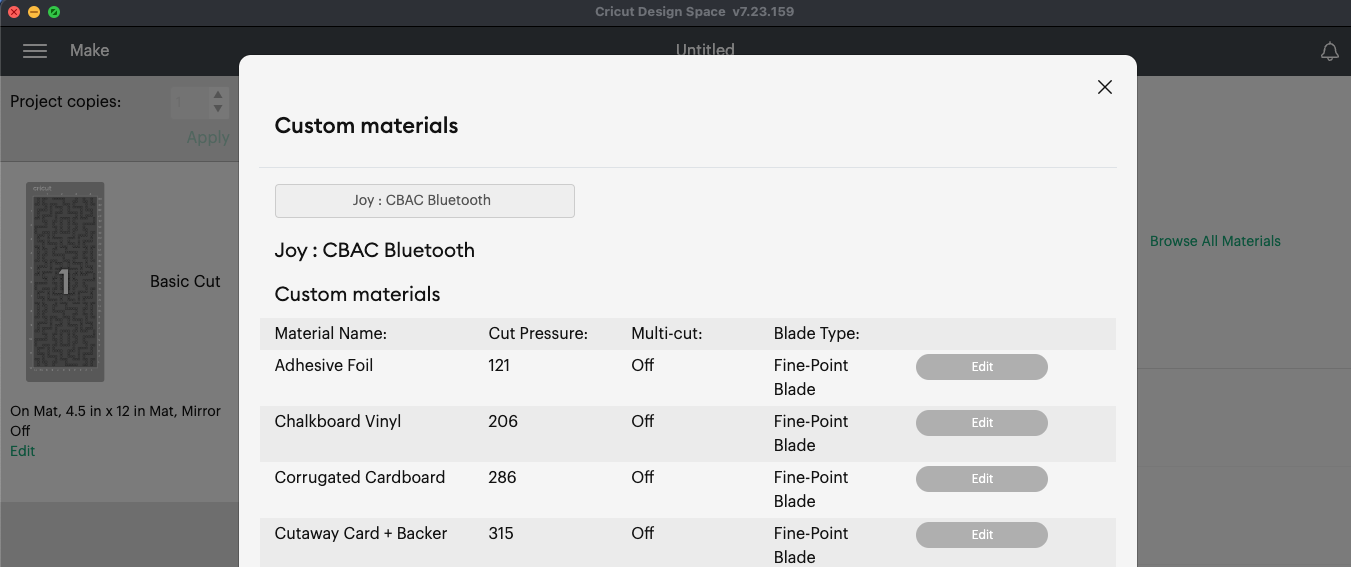
With the Glitter Card Stock setting, the Cricut Joy makes two passes on every circle (even on the “first pass” of the overall cut). This can sometimes cause the circles to come loose and get stuck under the blade, which can lead to some future circles not being cut out properly or even at all. I’ve been using this Cordless Air Duster to blow these errant circles out of the way, but I’d really rather not keep an eye on the machine while it is cutting.
Today I learned that you can create a custom material in Cricut Design Space, even for the Joy! If you start to cut a file (press “Make It”) and then click “Browse All materials” in the upper right, then “Material Settings” in the lower left, you can see the a list the cut force settings for each material. If you scroll to the bottom of this list you can “Add New Material”. From my previous experiments with different material settings, the cut force values for those settings, and a few experiements, I recommend Cut Pressure of 300 330 and Multi-cut Off. Turning off Multi-cut doesn’t completely eliminate the stray circle cut-outs, but it helps immensely. An added bonus is that with only one cut for each circle, it works twice as fast!
——————
We earn a tiny bit from referrals at no cost to you, so if you’ve got something you need to pick up anyway, going to Amazon through this link will help us keep Hacktastic running. Thanks! :)
Thank you,
I was looking for info on the lowest model Cricut (a.k.a. Cheapest) to cut punch cards. I’ve seen. Few Explore Air 2 on FB Marketplace but I have no idea what can go wrong or how to fix these machines so will opt for a new one.