Posts By :

mathgrrl

Polyhedral LEDs, Step 2: Tinkercad

Polyhedral LEDs, Step 2: Tinkercad 1024 816 mathgrrl
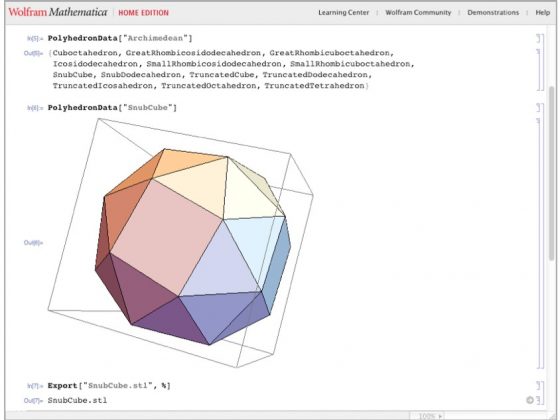
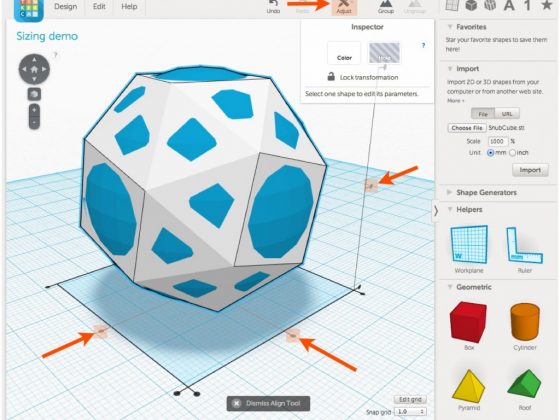
This is the second in a series of posts that walk through the 3D design construction of some Polyhedral Light String Ornaments. In this step we’ll scale that Snub Cube to “ornament size.” Along the way we’ll have a chance to learn about Tinkercad’s importing, scaling, and the Ruler and Align tools. Tinkercad is one of the simplest ways to make or modify 3D models… // Hacktastic

Polyhedral LEDs, Step 1: Mathematica

Polyhedral LEDs, Step 1: Mathematica 844 646 mathgrrl
It’s time for another design walkthrough. This time we’ll be making polyhedral covers for LED string-lights. Since I’m just a hack at 3D design, for me the answer always involves using a chain of software programs, each of which I know how just enough about to get by, in this case Mathematica, TopMod, and Tinkercad. Each ornament is a hollowed-out instellated Archimedean solid or dual… // Hacktastic

Holiday Belt-Tightening

Holiday Belt-Tightening 640 480 mathgrrl
Do you ever get 3D prints that look stringy or lumpy? This week we were seeing a lot of weird-looking prints from one of our Replicator 2’s, so we decided it was time for some holiday hardware maintenance. And wow, did it ever make a difference. After tightening a saggy X-axis belt we’re back as good as new. Tightening the belt isn’t difficult but it isn’t much fun either… // Hacktastic

Snowflake Cutter

Snowflake Cutter 548 414 mathgrrl
Last winter we made 3D-printed snowflakes by converting images to bitmap with Inkscape, and then extruding in Tinkercad. You can read about that on the old MakerHome blog, Days 70 and 71, or download the models from Thingiverse. The reason we made 3D snowflake models that way last year is because that was all we knew how to do. I’m somewhat wiser now, and one whole year older… // Hacktastic

Trigonometry Style

Trigonometry Style 835 629 mathgrrl
Last summer we designed a series of customizable bracelets with trigonometric shapes. Today we have more general code for even crazier bracelets, including ones with oval shapes, gaps to make wrap-style instead of bangle-style, flares, low-poly sampling, and crazier trigonometric combinations. The crazy thing is that every one of the bracelets shown above was created with the same code… // Hacktastic

Menger Menagerie

Menger Menagerie 1024 768 mathgrrl
I swear that this blog is not going to be only about Menger sponges. However this One Last Post About Menger Sponges is about Menger sponges. Lots of them, in fact. And we’re going to put our 3D-printing boots back on! Today’s models are collection of Menger sponges with different Levels and slices, designed to print effectively on various types of printers… // Hacktastic

Mega Menger!

Mega Menger! 640 480 mathgrrl
The NYC Level 3 MegaMenger sponge at MoMath is done! That makes us one of 11 locations so far that have finished a Level 3 Menger sponge as part of the worldwide MegaMenger project. At the moment at least 10 additional Level 3 sites are still in progress, as well as numerous completed Level 1 and 2 sites, which puts the project at 77.4 percent complete… // Hacktastic

The T-word

The T-word 640 480 mathgrrl
Tape. It is not allowed. Origami models are traditionally made with one piece of paper (Robert Lang has some amazing examples) that is only folded – never glued, taped, or cut. Modular origami follows the same rules – no glue, tape, or cutting – but allows multiple pieces of paper (Tokomo Fuse makes beautiful modular designs). But guess what, I’m not Tokomo Fuse or Robert Lang, and neither are you… // Hacktastic

Level Two

Level Two 640 480 mathgrrl
Time to level up! There are many ways to assemble a Level 2 from Level 1’s. One way is to use more general forms of tripods; this is what Jeannine Mosely’s Level 3 sponge project did. We need something quicker, more accessible, easier for everyone working on the project, and that really shows off fractalness. The idea we have may or may not work, but either way this has “hacktastic” written all over it… // Hacktastic

Julia set

Julia set 558 422 mathgrrl
Juila sets can be realized by an inverse-iteration method which is self-correcting; wherever you start from, this process will lead you closer and closer to the Juila set, and if you make a mistake then further iterations will get you back on course. Glen Whitney had the genius idea of making a clock-like linkage that takes square roots of complex numbers to enable this inverse iteration… // Hacktastic
Back to top