
This is the first of a series of blog posts that will catalog our adventures with a Brother KH-260 knitting machine.
Previous machine knitting posts on Hacktastic walked through punch card generation and first steps on a standard gauge Brother KH-881: (1) Getting started, (2) punch cards, (3) Silhouette, (4) StitchFiddle, (5) OpenSCAD, and (6) a finished “Tetris Houndstooth” scarf. But that was… a while ago.
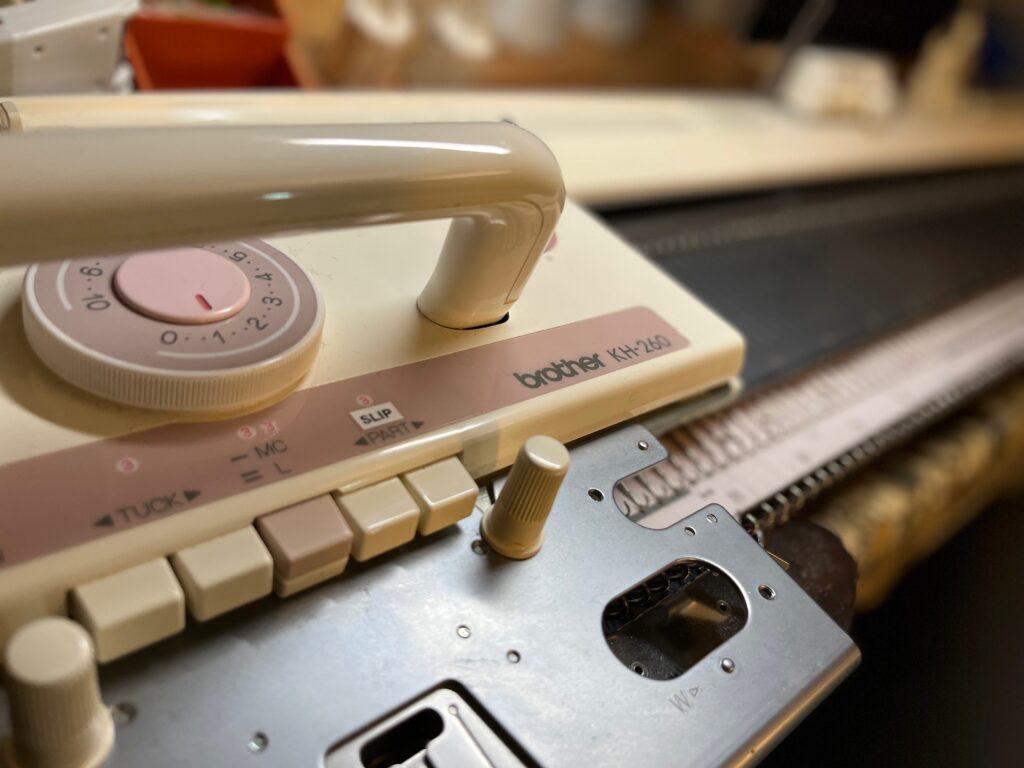
Today we are making a fresh start with a nearly identical machine, the KH-260. This bulky gauge machine has fewer, larger needles and knits with thicker yarn, so it is easier to see and work with while we are learning. We’ve set up the machine and know the basics of using it in various ways, but what now? In this “Field Notes” series we’ll share quick notes about what we learn as we go forward. Nothing fancy, just a day-to-day journal of what works and what doesn’t. Like everything here at Hacktastic, we’ll talk a lot about failures and problems, since that is where we learn the most.
Let’s go!
After dusting off the machine and reminding ourselves how to cast on, we were excited to get going. Of course we pretty much immediately ran into a roadblock: a needle with a broken latch, right in the center of the bed. Luckily this was a very easy problem to fix. With the help of this video from theanswerladyknits we removed the broken center needle and replaced it with a good needle from the far end of the bed.
With a good set of needles to work with we were ready to actually start, except that…
We do not understand the Tension Mast
For some reason we seem to be the only ones on the internet who have trouble getting the tension mast to set up correctly. A few rows into today’s knitting we noticed that the tension mast arm was very low, pointing downwards to the machine. We have a second tension mast and noticed that the center parts of the two masts were NOT in the same configuration. Specifically, there are three pieces of metal right in the middle that bunp into each other: a tooth coming down from the cylinder, a tab that sticks out from the mounting plate, and a fin with a bump on it that comes down from a different wheel on the cylinder. The photo below shows what we think is the correct configuration: tooth, tab, fin.
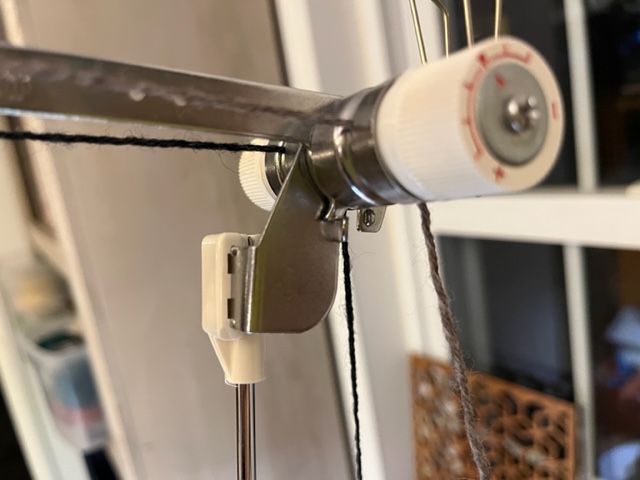
But earlier today our tension mast was droppy because it was in a “tab, tooth, fin” configuration instead, and there did not seem to be a way to easily move things around into the correct configuration. (I have to confess that I resorted to force and violence to reverse the tooth and the tab before taking the photo above.) Nobody else on the internet seems to have this problem so we must be doing something very stupid, or missing something very obvious. If anyone out there has advice about this, please let us know in the comments.
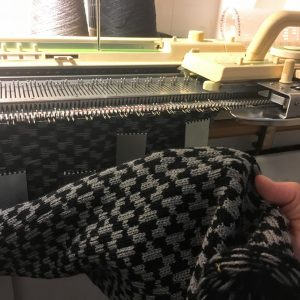
Fair Isle Trash Swatch
With the machine finally working, we wanted to test out a punch card. Nothing fancy, just what we affectionately call a “trash swatch”, with a rough cast on and no cast off, just an open edge at the top. We used the #7p card that comes with the Brother KH-260 standard set of punch cards, starting with black as color A (main yarn slot) and brown as color B (in front of the main slot), and switching colors about halfway through.
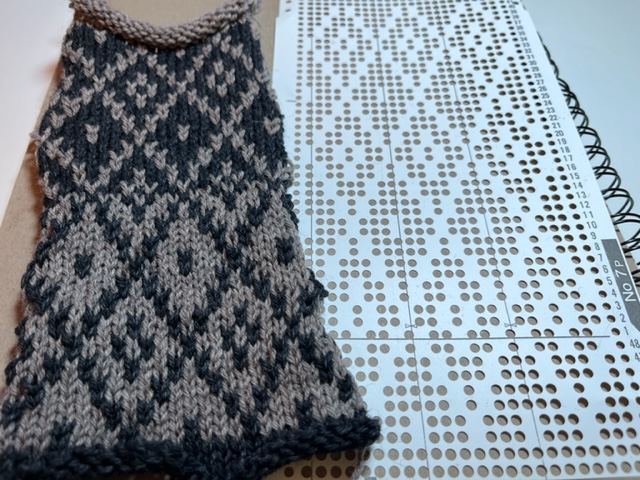
It’s important to try punch cards with both “dark over light” and “light over dark” yarn arrangements, because the results can look very different. Note the following important principle: The holes in the card determine where the second color will be used.
Color A = not punched
Color B = punched
Because we’ll probably want to make a lot of trash swatches, here are instructions to help us remember our method for making them:
FAIR ISLE TRASH SWATCH - MATHGRRL

Start with carriage on the right
Insert desired punch card
Pull out every other needle from approximately -15 to 15
Put yarn in slot A
<---
Hang comb & weights
Pull the needles out all the way and also all the ones inbetween
--->
<---
---> (x 2 more rounds)
Set to KC
<--- (needles will go into position)
Press MC button
Turn on card advancer
Set counter to 0
Put a second color of yarn in slot B
--->
<--- (repeat, place weights at edges as needed)
At some point swap the colors in A and B to see how the card looks the other way
Set counter to 0
--->
<---(repeat to same count as previous)
Push Plain lever to deactivate MC button
Set KC knob back to N
Turn off card advancer
Cut and remove second yarn
--->
<--- (x 3 more rounds)
Cut yarn and knit off the machine when you've had enough
The instructions above assume that you already know the basics of using the KH-260. You can learn those basics by working through the Brother KH-260 Instruction Manual, watching tutorials on YouTube, and at the fantastic Knit it Now website.
End needle selection
For fair isle it is usually best to turn on “End needle selection” (ENS), which on the KH-260 is something that you do by changing some cam positions underneath the carriage. If you haven’t been working with lace or motifs then your ENS is probably already on, so you’ll only need this instruction if you notice that something weird seems to be happening at the edges of your work. See the ENS instructions below from the KH-260 manual:
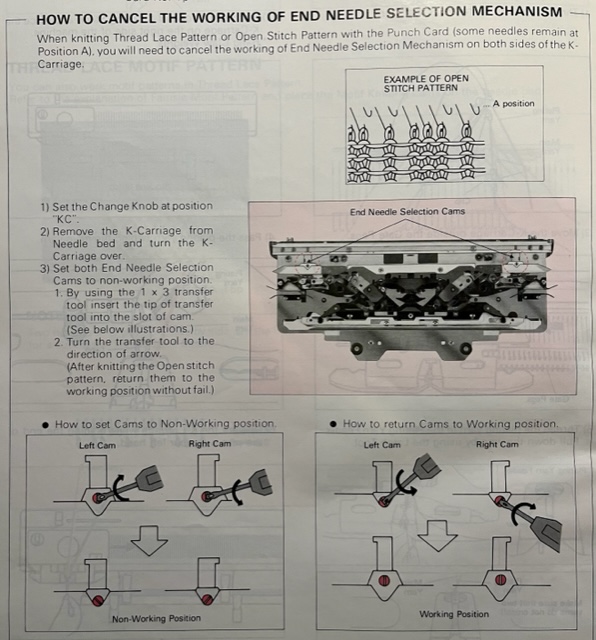
You want to set the pink pins so that they are in the working/UP position when the carriage is set to KC. This will cause the machine to always select the needles at the ends of your work, no matter what the punchcard would otherwise select. The effect is that the floats on the back of the work will always go all the way to the edges. I found out the hard way that you can NOT skip the step of having the knob in the KC position when you are setting these cams :)
What’s next?
More trash swatches, testing out yarns and tension to get something that works consistently for 2-color fair isle on the KH-260, keeper swatches, machine maintenance. After that we’ll break out the 4-color changer…
——————
We earn a tiny bit from referrals at no cost to you, so if you’ve got something you need to pick up anyway, going to Amazon through this link will help us keep Hacktastic running. Thanks! :)

Thank you, I’m new to machine knitting. I have a Brother kh260 I have not attached the ribber yet, figured I needed to learn the machine first. I finally succeeded using a punchcard and tuck and made two washcloths yesterday. Your instructions above are very helpful and I want to try the fairisle very soon. Thank you for taking the time to write your blog.
A grateful newbie