Design Tutorials

Space-Filling Terrazzo – Getting Started

Space-Filling Terrazzo – Getting Started 640 480 mathgrrl
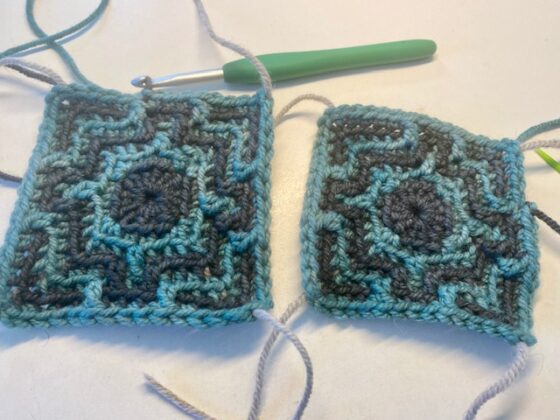
This is the first in a series of posts about a space-filling riff on Tinna’s Terrazzo Afghan. Our design is going to start off looking like one of Tinna’s Terazzo squares, but it’s going to continue as a larger and larger square, with lots of different but “space-filling” patterns along the way. It won’t be ONE space-filling curve (sorry, math geeks), but it will fill space efficiently as we build the pattern out from the center.

Electoral State Stackers

Electoral State Stackers 2016 1512 mathgrrl
I haven’t been stress-printing before the election, YOU have. Well, maybe you will after this post, at least. Fire up your 3D printer(s) because there are dozens of things you need to print before Tuesday, including each of the 50 states (and DC, which has 3 electoral votes), sized to each have approximately the same area, with heights determined by number of electoral votes.

Fitted Face Mask for People Who Aren’t Great at Sewing

Fitted Face Mask for People Who Aren’t Great at Sewing 2560 1920 mathgrrl
Over the past weeks I’ve iterated mask designs many times, acquired a bunch of sewing supplies, and learned from a lot of online patterns and videos. This mask design has a sewn-in nose wire, elastic loops that go all the way around your head, a filter sewn inside the mask, and minimal exposed seams. It’s washable and reversible, so you can decide which side is the outside after you’re done sewing it, or each time you wash it.

Laser Cutting from a 3D File

Laser Cutting from a 3D File 640 480 mathgrrl
To make files for laser cutting, you need two-dimensional information. You could download a picture from the internet, draw something yourself, or create an image in a program like Illustrator or Inkscape. In this post we’ll walk through the process of creating a 2D-laser-cuttable SVG file from a 3D-printable STL file using the free online in-browser modeling program Tinkercad.

Designing with Weighted Random Parameters in OpenSCAD

Designing with Weighted Random Parameters in OpenSCAD 1000 756 mathgrrl
Starting from just one random number you can use code to generate snowflakes, clocks, and even entire worlds. Use our simple randomizer as a starting point for adding some controlled randomness to just about any OpenSCAD design…

Design Tour: Tinkercad, Fusion 360, OpenSCAD, and Customizer

Design Tour: Tinkercad, Fusion 360, OpenSCAD, and Customizer 414 312 mathgrrl
In this article we’ll walk through how to create a simple penny trap model four ways: in Tinkercad, Fusion 360, OpenSCAD, and the Thingiverse Customizer…

Just in Time: Clocks!

Just in Time: Clocks! 640 480 mathgrrl
You can create a unique, custom generated 3D-printed clock face with just a little bit of design knowledge and an inexpensive battery-powered clock kit…

Saddle Surface with Mathematica and Tinkercad

Saddle Surface with Mathematica and Tinkercad 540 406 mathgrrl
A saddle surface is one of the few things I think is really worth 3D printing for Calculus students. There’s something important able to feel the two competing curvatures with your actual hands, instead of just looking at a picture. Since I always like to use the simplest design tools possible, this is a model that I export from Mathematica and then process in the much easier to use design software Tinkercad… // Hacktastic

3D Printing in South Africa

3D Printing in South Africa 628 472 mathgrrl
This month I had the opportunity to speak about mathematics and 3D printing in Johannesburg, Pretoria, Cape Town, and Kimberley as part of the U.S. Embassy Speaker’s Program. For this visit I made a special 3D-printed keychain to give away at events, which highlights the nine provinces of South Africa. By running a loop through the landlocked country of Lesotho, you can make a keychain… // Hacktastic 

Creating Celtic Knots with Fusion 360

Creating Celtic Knots with Fusion 360 640 480 mathgrrl
Today we’ll do a step-by-step walkthrough tutorial on designing 3D Celtic knots from scratch with Fusion 360. Our technique will be to make a grid of dots, then connect the dots with splines, then shift those splines up or down at the crossing points. This gives us a thin curve that traces out the desired knot, and we’ll be able to sweep a circle around that curve to make a round 3D tube… // Shapeways Magazine
Back to top